t> The Joy of Stampin' with Rachael: August 2024

Saturday, August 31, 2024

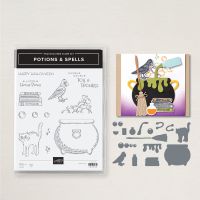
Potions & Spells Card Class Club- September


Price: $35 for kit with an add on option 

                                                                Add on: Treat Kit $15

By joining this club it doesn't commit you to my future classes but there are perks when you attend 6 classes!

Please fill out the below information completely including current shipping information.

I will send a PayPal invoice to the email address you provide below. Please make sure this email address is current. 

I will send invoices on the following Wednesday after you submit your form. Please pay as soon as you receive the invoice. If you do not receive an invoice by the 10th, please email me at thejoyofstampinwithrachael@gmail.com

Once I have received your payment your registration will be complete. 

Kit comes with over $20 worth of products to use to make the kit. Inks and adhesive are not included but can be found at my online store. 

Please let me know if you have any questions.

Happy Stampin' Everyone!!!

REGISTRATION CLOSES - Tuesday, September 10, 2024

Things to know:
·        Class Kits are only available to those who live in the United States.
·        $35 Pricing includes tax and shipping to you!
·        Product will be purchased after payment has been received. There is always a possibility products may be on backorder. If this happens you will receive a substituted product of similar value.
·        I will ship the Class Kit to the address you enter below by September 25th.
There is a Facebook Group just for this class and my Co-Host Guest. That is optional to join and a link to it will come to your email address you provide.
·        You do not need a PayPal account to pay – please select “Pay with Debit or Credit Card” under the “Log In” button to bypass creating an account.
·        Please notify me ASAP if there is a problem or the information you enter is incorrect – thejoyofstampinwithrachael@gmail.com


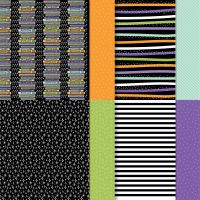
Pick the DSP
Splendid Autumn DSP

Halloween Spells


Add On Treat Holder Option
For just $15 you can add on an Halloween Treat Holder Options. Treat Holder Kit includes 4 treat holder designs. 


Here is a sneak peek to the cards for September! 


Happy Stampin' Everyone!!!


Friday, August 30, 2024

Double Feature Friday- Changing Leaves


Are you ready for Summer to end and to start crafting for the Fall???
Here are two great ideas from the Stamp & Share Crew Design team using Stampin' UP!'s Changing Leaves Bundle!!


Changing Leaves Bundle

All images © 1990-2024 Stampin’ Up!®


Supplies:


·       Stamp Sets: Changing Leaves* (164351) or Changing Leaves Bundle Savings (164139); Layering Leaves (161277)

·       Card Stock (CS) and Designer Series Paper (DSP): Thick White (159229); Basic Black (121045); Full of Life 6” x 6” (163357)

·       Stamp Pad: Memento Tuxedo Black Ink (132708)

·       Tools: Bone Folder (102300); Paper Snips (103579); Paper Trimmer (152392); Stylish Shapes Die-cuts (159183); Stampin’ Cut & Emboss Machine (149653); Changing Leaves Hybrid Embossing Folder and Dies* (164138)

·       Miscellaneous: 2024-2026 In Color™ Resin Dots (163389); Shy Shamrock 3/8” Bordered Ribbon (163787); Stampin’ Dimensionals (104430); Stampin’ Seal Adhesive (152813); Multipurpose Liquid Glue (110755); Mini Glue Dots (103683)


*Included in Bundle


Measurements:


·       Thick White: 5-1/2” x 8-1/2” card base, 4” x 5-1/4”, and scrap for 1-11/16” die-cut circle

·       Basic Black: 2-1/4” x 5-1/4”, 4-1/4” x 5-1/2” for die-cut leaves and 2-1/8” circle

·       Rainbow Pattern DSP: 2” x 5-1/4”


Instructions:


1.     Score the 5-1/2” x 8-1/2” piece of Thick White CS at 4-1/4” along the 8-1/2” edge; fold and burnish score line well to create a card base.

2.     Stamp the right center side of the 4” x 5-1/4” piece of Thick White CS with Memento Tuxedo black ink cluster dot images. Use the embossing folder to add texture to the piece. Mount to the center front of the card base using Stampin’ Dimensionals.

3.     Stamp the DSP strip with leaf images in Memento Tuxedo Black ink. Glue the DSP strip vertically to the 2-1/4” x 5-1/4” piece of Basic Black CS, leaving a 1/8” border of black showing on the left and right sides. Mount the strip vertically to the left front side of the card base, 3/8” from the folded edge.

4.     Stamp the center of a Thick White CS circle die-cut with sentiment of choice in Memento Tuxedo Black ink. Glue the circle to the center of the Basic Black CS circle die-cut. Mount the circles in the center of the DSP strip on the front of the card with Stampin’ Dimensionals, 1-3/8” from the bottom DSP edge.

5.     Glue Basic Black die-cut leaves around the top and bottom right edges of the Basic Black CS die-cut circle using Multipurpose Liquid Glue, tucking the bottom ends of the stems under the Basic Black CS circle die-cut.

6.     Tie a 5” piece of ribbon into a knot. Mount to the right center edge of the Basic Black die-cut circle on the front of the card with Mini Glue Dots.

7.     Randomly add large and small Shy Shamrock Resin Dots around the leaf die-cuts on the card front.


Changing Leaves

All images © 1990-2024 Stampin’ Up!®


Supplies:


·       Stamp Sets: Changing Leaves (164351)

·       Card Stock and Paper: Pecan Pie Card Stock or (CS) (161717); Basic Beige Card Stock (164511); Iconic Celebrations Designer Series Paper (DSP) (164193)

·       Stamp Pads: Pecan Pie Classic Stampin’ Pad (163046); Uninked Stamp Pad and Whisper White Refill (147277)

·       Tools: Changing Leaves Hybrid Embossing Folder (164138)

·       Miscellaneous:  Neutrals Adhesive Backed Sequins (161627); 2023-2025 In Color Jute Trim Pack (161637); Take Your Pick Tool (144107); Stampin’ Dimensionals (104430); Stampin’ Seal Adhesive (152813); Blending Brushes (153611)


Measurements:


·       Basic Beige Card Stock 1: 8 1/2” x 5 1/2”, 3 7/8” x4 1/8”, scrap for die cutting

·       Pecan Pie Card Stock 2: 4 1/8” x 5 3/8”, scrap for embossing/die cutting

·       Iconic Celebrations DSP: 1 1/8” x 3 7/8”


Instructions:


1.     Emboss Basic Beige using Hybrid Embossing Folder

2.     Die cut Pecan Pie scrap using Hybrid Embossing Folder and Changing Leaves largest die.

3.     Using blending brush, lightly brush Whisper White Ink into embossed die cut leaves.  Attach dimensionals behind each leaf.

4.     Adhere embossed Basic Beige to felt side of Pecan Pie layer using seal.  Adhere DSP to right side of same layer.  Adhere embossed leaf to beige embossed layer.

5.     Wrap Jute around layer and tie a bow to left side. Stamp sentiment in Pecan Pie ink and die cut with smallest label die.  Adhere to leaf using dimensionals.

6.     Place Neutral Adhesive Backed Gems on card front.


Friday, August 23, 2024

Double Feature Friday- Nests of Winter Suite


It is Double Feature Friday with the Nests of Winter Suite! 

This Suite is coming out September 4th! That is when you can shop my online store for all of the supplies! 

Until then, use the Tutorials to get you stamping today with supplies you already have!!!


Nests of Winter Gift Bag

All images © 1990-2024 Stampin’ Up!®


Supplies:


·       Stamp Set: Winterly Tree Tops (164184)

·       Card Stock (CS) and Designer Series Paper (DSP): Pebbled Path CS (161722); Basic White CS (159276); Nests of Winter DSP (164183)

·       Stamp Pads: Versamark Ink (102283)

·       Tools: Greetings of The Seasons Dies (164112); Timber 3D Embossing Folder (156406); Heat Tool (129053); Embossing Additions Tool Kit (159971); Paper Trimmer (152392); Bone Folder (102300)

·       Miscellaneous: WOW! Metallic Embossing Powder (165678); Stampin’ Dimensionals (104430); 2023-2025 In Color Jute Trim (161637); Cream ¼” Woven Ribbon (164143); Tear & Tape Adhesive (154031); Neutrals Adhesive-Backed Sequins (161627)


Measurements:


·       Pebbled Path CS: 2 1/2” x 2 1/2” for die cut label, 3  of 1” X 4 ½”

·       Basic White CS: 2” x 2” for sentiment

·       Nests of Winter DSP: 6” x 11 1/2” for bag; 1 ½” X 2 ½” for die cut label

·       Cream Ribbon: 2 X 10”


Instructions:


1.     Using the paper trimmer, use the scoring blade to score down the 6” length of DSP at the following measurements along the horizontal:  4 ½”, 5”, 5 ½”, 10”, 10 ½”, and 11”.

2.     Rotate the DSP so the 6” length is along the ruler.  Score down the 11 ½” length at the 5” mark.  The remaining 1” will form the base of the bag.

3.     Burnish all the folds using the bone folder.

4.     Cut/miter the folds in the base of the bag up to the 1” horizontal score line.  See photo for the visual.

5.     Using a standard hole punch, create two holes evenly spaced from the sides and top of the bag.  It’s helpful if you punch the front and back of the bag at the same time.

6.     On the 6 X 11 ½” strip, place a 5” strip of tear & tape adhesive on the last vertical fold from 11” to 11 ½”.  This piece will be where the sides of the bag overlap and are secured.  Fold the paper bag so that you now have a 4 ½” front and back piece and secure with the adhesive.

7.     Fold the sides of the bag’s base in first, followed by the front and back pieces.  2 strips of tear and tape adhesive on the last piece will hold it in place.

8.     Place 2 strips of 4 ½” tear and tape adhesive to the back of all 3 pieces of pebbled path cardstock.  Place one strip inside the bottom of the bag for reinforcement.

9.     On the inside of the bag between the punched holes on both the front and back sides, place a short piece of tear & tape adhesive.  This will be where the ribbon will adhere to.

10. Thread one end of the 10” cream ribbon in one hole and secure to half of the adhesive on the inside of the bag.  Thread the other end of ribbon through the opposite hole and line up with the other end of ribbon on the adhesive and press down.  The ribbon should not overlap and lie flat.  Repeat with the second piece of ribbon on the opposite side of the bag. 

11. To reinforce the handles on the top 1” inside of the bag, place one remaining piece of pebbled path cardstock over the ribbon and press down to secure in place.  Repeat with the opposite side.  This completes the bag.

12. For the tag, you will need two of the Greetings of the Season Die cuts.  Use the 2 ½” X 2 ½”  pebbled path piece to cut the larger tag.  Use the 3D Timber embossing folder to dry emboss the wood grain onto the tag rolling it through the Stampin’ Cut & Emboss Machine.

13. Using the 1 ½” X 2 ½” piece of coordinating birch DSP, die cut the small oval tag for the second layer of the tag.

14. On the basic white 2” X 2” square, stamp “Sending thanks & much love” from the Winterly Tree Tops stamp set with Versamark Ink.  Use the Embossing additions Tool Kit to create a tidy space for pouring the Copper WOW! Embossing Powder over the inked sentiment.  Tap off any extra powder.

15. Holding the sentiment with the embossing tweezers, heat the image with the heat tool until the embossing powder becomes a shiny surface.

16. Cut the sentiment just around the words and adhere to the oval tag using Stampin’ Dimensionals.

17. Place 3 of the copper Neutrals adhesive-backed sequins around the sentiment.

18. Use the pebbled path 2023-2025 In color jute trim to tie the tags together and then to the cream ribbon handle on the bag.


Winterly Tree Tops

All images © 1990-2024 Stampin’ Up!®


Supplies:


·       Stamp Sets: Winterly Tree Tops (164184)

·       Card Stock and Paper: Coastal Cabana Card Stock or (CS) (131297); Basic White Card Stock (159276); Nests of Winter Designer Series Paper (DSP) (164183)

·       Stamp Pads: Memento Tuxedo Black Ink (132708)

·       Tools: Everyday Details Dies (162864)

·       Miscellaneous: Rhinestone Basic Jewels (144220); Cherry Cobbler Stampin’ Blends; Silver & White Sheer Ribbon (162149); Stampin’ Dimensionals (104430); Multipurpose Liquid Glue (110755)


Measurements:


·       Coastal Cabana Card Stock: 4 1/4” x 11”

·       Basic White Card Stock: (9) 1 1/4” x 1 5/8”, Scrap for Label

·       DSP: (9) various designs - 1 1/8” x 1 1/2”, bird image fussy cut

·       Ribbon: approx. 22”


Instructions:


1.     Score & fold Coastal Cabana CS @ 5 1/2”

2.     Adhere DSP to Basic White CS pieces, adhere matted layers to card front starting in the four corners in a grid pattern

3.     Stamp greeting on Basic White CS scrap, die cut, adhere to lower row on card front

4.     Tie Ribbon around card front and make a bow

5.     Fussy cut bird image, adhere to card front with Stampin’ Dimensionals

6.     Color Rhinestone Basic Jewels with Dark Cherry Cobbler Stampin’ Blend, adhere to card front


Happy Stampin' Everyone!!!


Wednesday, August 21, 2024

New at SU Blog Hop- Emboss Dry, Emboss Heat Technique


Welcome to the NEW AT SU! Blog hop! We are a group of StampinUp! Independent Demonstrators from around the world who are full of creative paper crafting ideas to share with you and get you crafting! Today we are sharing ways you can use Stampin' UP!'s Embossing Folders to Elevate your creations.


I chose the Metal Plate 3D Embossing Folder to Dry Emboss and Versamark to Heat Emboss with silver powder! 
*Dry emboss uses cardstock/paper with the Stampin' Cut & Emboss Machine to change the texture of the paper. It leaves a dry impression from the embossing folder.
**Heat embossing requires Versamark (Clear Ink), Embossing Powder, and a Heat Tool. 


For this technique the Embossing Folder can act like the stamp or you can create your own Foil Paper. 


Technique Steps
1. Open up the embossing folder and put Versamark (Clear Ink) all over the top part of the embossing folder (the side that has the little black Stampin' UP! logo). 
2. Put the paper down on the dry side and close the inked folder onto the paper (you could just do a light press and create a stamped look if you wanted at this point).
3. Run it through your Stampin' Cut & Emboss Machine.
4. Sprinkle on the Embossing Powder and shake off the extra (I used Silver). 
5. Use the Heat Tool to melt the powder. 
You now have a piece of cardstock that looks like Silver Foil Paper and is embossed! 


Since I paired this embossing folder with the Trusty Tools, I wanted a rustic look and some spots did not get heat embossed. If you want the full piece of paper covered you need to measure it slightly larger to allow for some "holding" space and then trim it down to size. 


I just love the look and result this technique created for this card! 

Don't stop here! Keep the hop going to learn even more fun ways to use Stampin' UP! Embossing Folders!
*Click on next or select a link that interests you


I am happy to answer any questions about the techniques shown here! Please contact your StampinUp! demonstrator to make a product purchase. If you do not have a demonstrator, you can use the links below to order products from me or join my team.


Sale ends August 31st! 
*Click on image to see the sale!

Happy Stampin' Everyone!!!


Miss Monday- Humble Home

  Here is my Stamp & Share Crew Creation for September!  I live in a Military Community where every 3 to 6 months people are moving in. ...