t> The Joy of Stampin' with Rachael: July 2021

Saturday, July 31, 2021

Stamp Camp-Christmas In July Cards


I just held my first Christmas in July Stamp Camp! Above is my "send out kit" table. I had 11 wonderful ladies attend my Zoom class for 3 plus hours of fun from all the time zones in the USA! It was just a $40 event and you had to buy the stamp set and inks separately. I used the Tidings & Trimmings stamp set from the Annual Catalog and the matching dies. 

What's In the Kit??


The kits comes with 10 cards to make with everything but the DSP cut for them. We cut the paper together during the zoom and they can pick and choose which ones to use. The green bow are the 5 simple ones and the red bow are 5 fancy ones. 


That got a bright envelope with 2 games inside and a wish list. We played a Christmas Song Scrambler and a ribbon matching game with the new ribbon from the Mini Catalog! I let them know all of the supplies we used and so if they liked something they could add it to their list. 


Their kit came with 10 envelopes, 10 card kits, one spool of Chevron Weave Ribbon, Metallic Pearls, Mini Dimensionals, a DSP Pen.  and, half a pack of the Tiding of Christmas DSP.


Just like Christmas, I gave out gifts, or items part of their swag bag. Their gifts included a fun treat, a hot cocoa holder, DSP chapstick holder, and a reusable wipe to clean off their stamps. 


They got their kits about a week and a half before Stamp Camp date and I gave them a pre-party activity to make mini tags with! I had everyone on a Facebook group where they could share their tag creation and get an entry into my Grand Prize drawing at the end.

Simple Cards
These cards were design to be easy to mass produce. They are basic layouts with just a little embellishing.  


Here are all 5 of the simple cards. I sent everyone an email the night before Stamp Camp with all of written instructions for each card (which they could print off). 

4 Squares Noel Card


White Snowy Stocking Card


Simple Stocking DSP card


Tripe Star Card


Double DSP Card

Fancy Cards
These are the cards that take more time, have more layers, more stamping, and more embellishments. Some are fun folds or a gift card holders. These are cards made in mind to give to your special friends at Christmas like teachers, co-workers, and dear neighbors.


I used an assortment of supplies from the Annual Catalog, the New Mini Catalog and even some items from Sale-a-bration! 


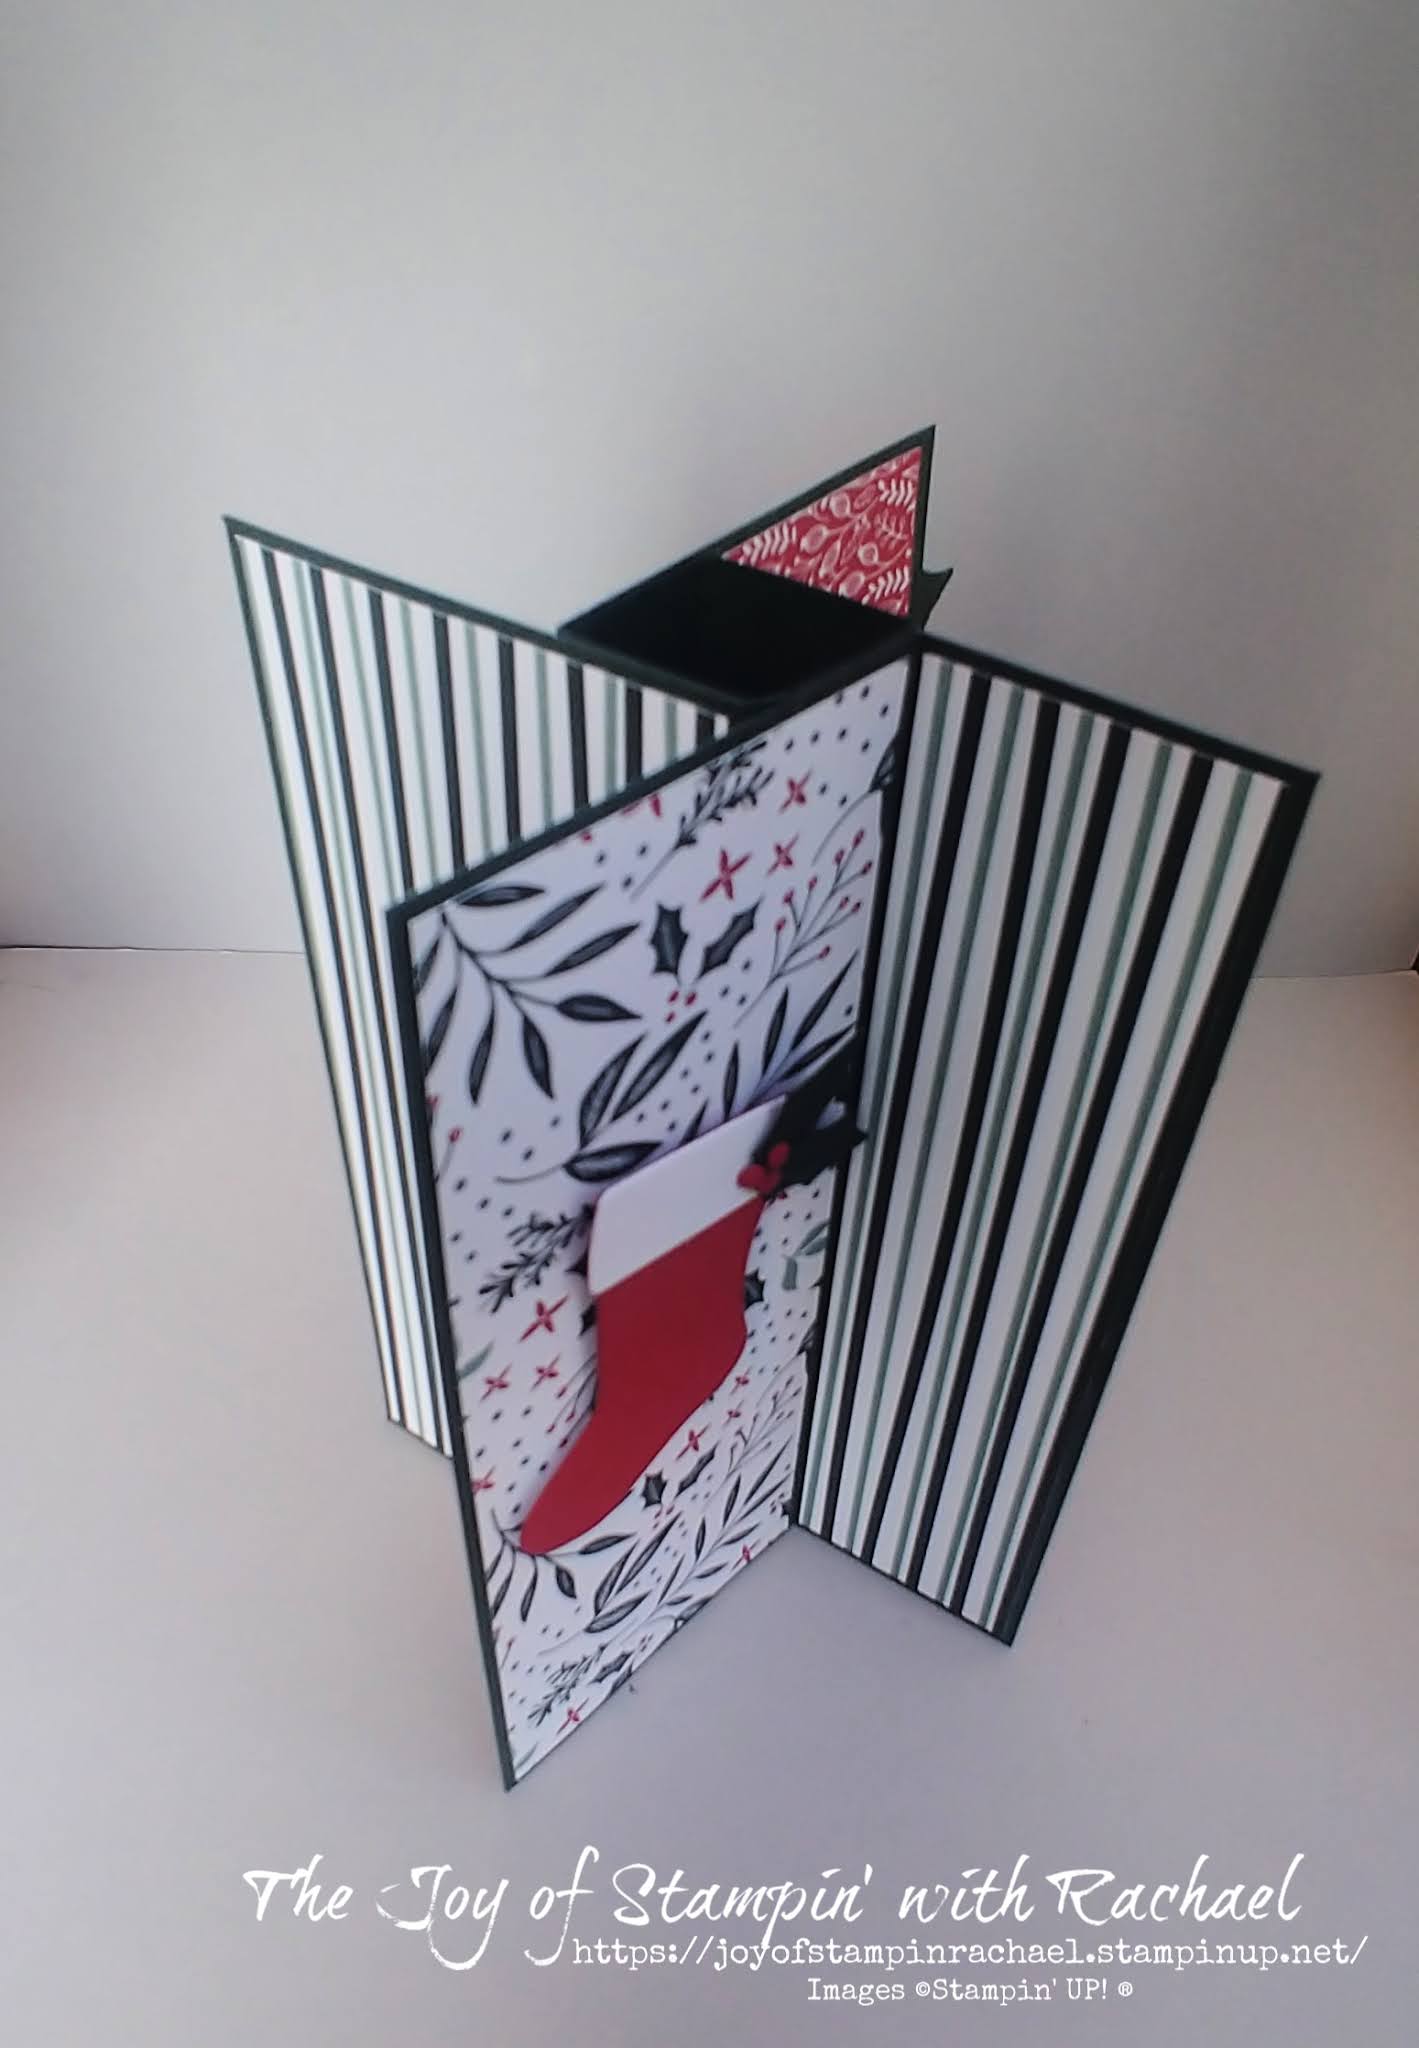
Two Stocking Easel Card


Opens up like this. 


Noel Star Card


Lots of Layers & Gift Card Holder


No Stampin Deer Card (using the SAB Be Dazzling Paper)


Star Cookie Card (inspired by Brian King)


Stamp Camp Swaps

As part of the event campers could have been part of the swap. It was optional and earned you another entry into the grand prize drawing and the chance to with the Fan Favorite award. 


By Megan Snider


By Robyn Benett


By Mandy Whitfield


By Phyllis Walker


By Natalie Woll


***Winner*** By Cindy Hafner

I hope you have enjoyed learning about my Stamp Camp and hope you can join my next one in October or my Bingo Night in August! 
Click on this link to sign up for Stampin' Bingo ---> https://forms.gle/SLPwgob6mpJgrv386


Happy Stampin' Everyone!!!


Friday, July 30, 2021

Fun Fold Friday- Christmas Pinwheel Tower Card


I've been seeing all around Pinterest this Pinwheel Tower Fun Fold. So finally I decided I had to learn how to make it and make a Christmas card (for Christmas in July) using the DSP that is on sale for only July, Tidings of Christmas. These measurements are from the Demonstrator named Frenchie. The best thing about this Pinwheel card is that it folds down flat to fit in a standard A2 envelope! 


There are 4 sides to this card. With each spin you can see another side. 


Most of it covered with DSP but leave one side available for "white" space to write on. 


You can make all the sides the same or change up your DSP to create a different look. 


I really do love the way this card turned out and hope you try to make it too! 


Supplies
Tidings & Trimmings Stamp Set
Tidings of Christmas DSP
Paper: Evening Evergreen, Basic White, Cherry Cobbler
Ink: Cherry Cobbler

Always Recommended
Paper Snips
Trimmer
Simply Shammy
Die Cutting Machine
Bone Folder
Adhesives: Tombow, Tear Tape, Seal, & Dimensionals

Measurements
Evening Evergreen Cardbase: 4 7/8 x 5 1/2 scored @ 1/2, 1 1/4, 2, & 2 3/4
3 Evergreen: 5 1/2 x 2 1/8
2 prints of 6 x 6 DSP: 
Holly Print: Two- 5 3/8 x 2,  One-1 1/4 x 5 3/8
Strip Print: One- 5 3/8 x 2 , Three- 1 1/4 x 5 3/8
Basic White: 5 3/8 x 2

Steps
  1. Measure, score and cut your paper. 
  2. Stamp your greeting in Cherry Cobbler onto the Basic White.
  3. Die cut your stocking, stocking top, and 4 holly leaves, and 1 row of Cherry Cobbler dots.
  4. To Make the Pinwheel watch the video. It is too hard to put into words without being more confusing. 
  5. After the Pinwheel is made glue on the DSP. 
  6. Attach the stocking with dimenionals and add the holly leaves to the front and back. 


Facebook Live Video


Happy Stampin' Everyone!!!


Thursday, July 29, 2021

Royals June Card Swap


In June, one of my amazing team members organized a card swap for our team. The challenge was to create a card with only current products and to use two colors from the list. 

Melon Mambo
Poppy Parade
Mango Melody
Pacific Point
Granny Apple Green

Below each card you'll find the name of the card creator and a link to the stamp set they used. I hope these cards inspire you to swap and to ink up your stamps! 

By Kelly Green 

By Mandy Whitfield

By Natalie Woll

By Julie Miller

By Stefanie Wilcox

By Christina Kunzler


Happy Stampin' Everyone!!!


Wednesday, July 28, 2021

Wednesday's Kit Class- Paper Pumpkin The Adventure Begins


Wednesday's Kit Class using the stamps from the Paper Pumpkin The Adventure Begins Kit. 
Once you use up all the paper supplies from this kit, this is still so much more that you can make with the stamps and products from the Annual Catalog. Order $35 worth from me by Friday the 30th and I'll send you the paper pieces to this kit for FREE! Shop with this link below.


Suggested Items to Order
Beauty of the Earth DSP $9.78

Bark 3D Embossing Folder $10

Evergreen Forest Embossing Folder $10

Champagne Rhinestones $6

Supplies
The Adventure Begins Stamp Set
Beauty of the Earth DSP
Bark 3D Embossing Folder
Evergreen Forest Embossing Folder
Champagne Rhinestones
Stitched Rectangle Dies
Tasteful Texture Dies
Essentials Twine Pack
Ink- Mossy Meadow & Misty Moonlight
Paper- Misty Moonlight, Mossy Meadow, Basic White, Bumblebee, Night of Navy, Gray Granite 

Always Recommended
Paper Snips
Trimmer
Simply Shammy
Die Cutting Machine
Bone Folder
Adhesives: Tombow, Tear Tape, Seal, & Dimensionals


I used the Beauty of the Earth DSP for all of my cards today. I thought they, with they tree images, paired so nicely. 


This saying is so uplifting and so I paired it with paper that looked like the sky. 

Measurements
Thick Basic White Cardbase: 5 1/2 x 8 1/2 scored @ 4 1/4
DSP: 4 x 5 1/4
5 1/2 x 2
Basic White: 5 1/2 x 1/2

Steps
  1. Measure, score, and cut your paper. 
  2. Die cut your label in Basic White and stamp in Misty Moonlight your saying. 
  3. Stamp your butterflies onto the DSP. 
  4. Glue the DSP to the cardbase.
  5. Glue your white strips to the DSP and glue over the DSP. 
  6. Attach your label with dimensionals.
  7. Make a White bow and attach with a glue dot. 


This one uses just a small piece of the DSP and has the embossed trees as it's background. Don't forget to stamp the inside with the trees. 


You can make this card too by shopping at my online store and following the steps below. 

Measurements
Gray Granite Cardbase: 5 1/2 x 8 1/2 scored @ 4 1/4
Gray Granite: 4 x 5 1/4
Mossy Meadow: 1 3/8 x 5 1/8
DSP: 1 1/4 x 5
Basic White: 4 x 5 1/4

Steps
  1. Measure, score, and cut paper. 
  2. Die cut a small stitched rectangle in Bumblebee and stamp in Mossy Meadow your saying. 
  3. Stamp tree borders on the Basic White for the inside of the card. 
  4. Emboss the Gray Granite with the Evergreen Forest and glue to the cardbase. 
  5. Glue the DSP to the matt and attach with dimensionals. 
  6. Attach the label with dimensionals. 
  7. Embellish with rhinestones. 


This one I love because of the blue trees! 


This layout is very similar to the next card, but just different matte sizes and the extra twine and banner piece. 

Measurements
Night of Navy Cardbase: 5 1/2 x 8 1/2 scored @ 4 1/4
Night of Navy: 4 x 5 1/4
Misty Moonlight: 4 1/4 x 3 1/4
4 x 1/2
DSP: 4 x 3
Basic White: 4 x 5 1/4

Steps
  1. Measure, score, and cut your paper. 
  2. Stamp your saying on the blue strip in Misty Moonlight and flag the ends (see video).
  3. Stamp onto the Basic White 4 x 5 1/4 your Tree, but stamp it off first and then stamp full strength the needs. 
  4. Emboss the Misty Moonlight with the Bark embossing folder and glue to the cardbase. 
  5. Glue your DSP to your matte and attach with dimensionals. 
  6. Glue your label to the DSP and make a figure 8 with your twine and glue it to the label. 
  7. Attach the saying with dimensionals. 
  8. Embellish with rhinestones. 


This is my most simple card out of the bunch and I love it! 


Measurements
Mossy Meadow Cardbase: 5 1/2 x 8 1/2 scored @ 4 1/4
Gray Granite: 4 x 5 1/4
Mossy Meadow: 4 1/8 x 3 1/8
DSP: 4 x 3
Basic White: 4 x 5 1/4

Steps
  1. Measure, score, and cut your paper. 
  2. Die cut the Basic White label and on it in Mossy Meadow Ink
  3. Stamp on the Basic White for the inside a tree and the needles. 
  4. Dry emboss the Bark onto the Gray Granite and glue it to the cardbase. 
  5. Glue your DSP to the Mossy Meadow matte. 
  6. Attach your label with dimensional.
  7. Make a Gray Granite bow and attach with a glue dot. 

Facebook Live


Happy Stampin' Everyone!!!


Tuesday, July 27, 2021

Tuesday's Tip at Ten- Twine into Two


Tuesday's Tip at Ten: How to make Twine into Two! Sometimes you don't need as much bulk that twine creates or simply want a different look. Well my tip to you today is how you can take your twine and make it into two. Just divide the ends into two by separating them from 4 to 2 pieces. Twine is made by strands of thread like material twisted together. Slowly pull them apart and away from each other (untwisting as you go). Use your fingers to smooth out the part that is still together until it is all undone. Now you have literally doubled your twine. 
Below is an example of where I used this tip and you can see why. When you make a circle "nest" you don't want it to be bulky but just added texture. 


Messy Nest. I wrapped this one 6 times with ease. 


Stampin' UP! has the best Baker's Twine and it now comes in a set of 5 of the most used neutrals. 
 Crumb Cake and white, 10 yards (9.1 m) each; black, Gray Granite, and Very Vanilla, 5 yards (4.6 m) each. 


Happy Stampin' Everyone!!!


Tuesday's Tip at Ten- Cleaning Your Stampin' Cut & Emboss Machine

  Stampin' UP! has wonderful Products and one of my most loved and used item is my Stampin' Cut & Emboss Machine. This is what I...