t> The Joy of Stampin' with Rachael: February 2021

Friday, February 26, 2021

Fun Fold Friday-Darling Donkeys Peek-A-Boo Flip Card


Today's Fun Fold Friday card is a Peek-A-Boo Flip card using the Darling Donkey Sale-a-bration stamp set and some of the Hey Birthday Chick Dies. 


Here is what the card looks like when it is flipped opened. Watch the quick (6 second) video below to show you this card in action.

Video of card opening and closing. 


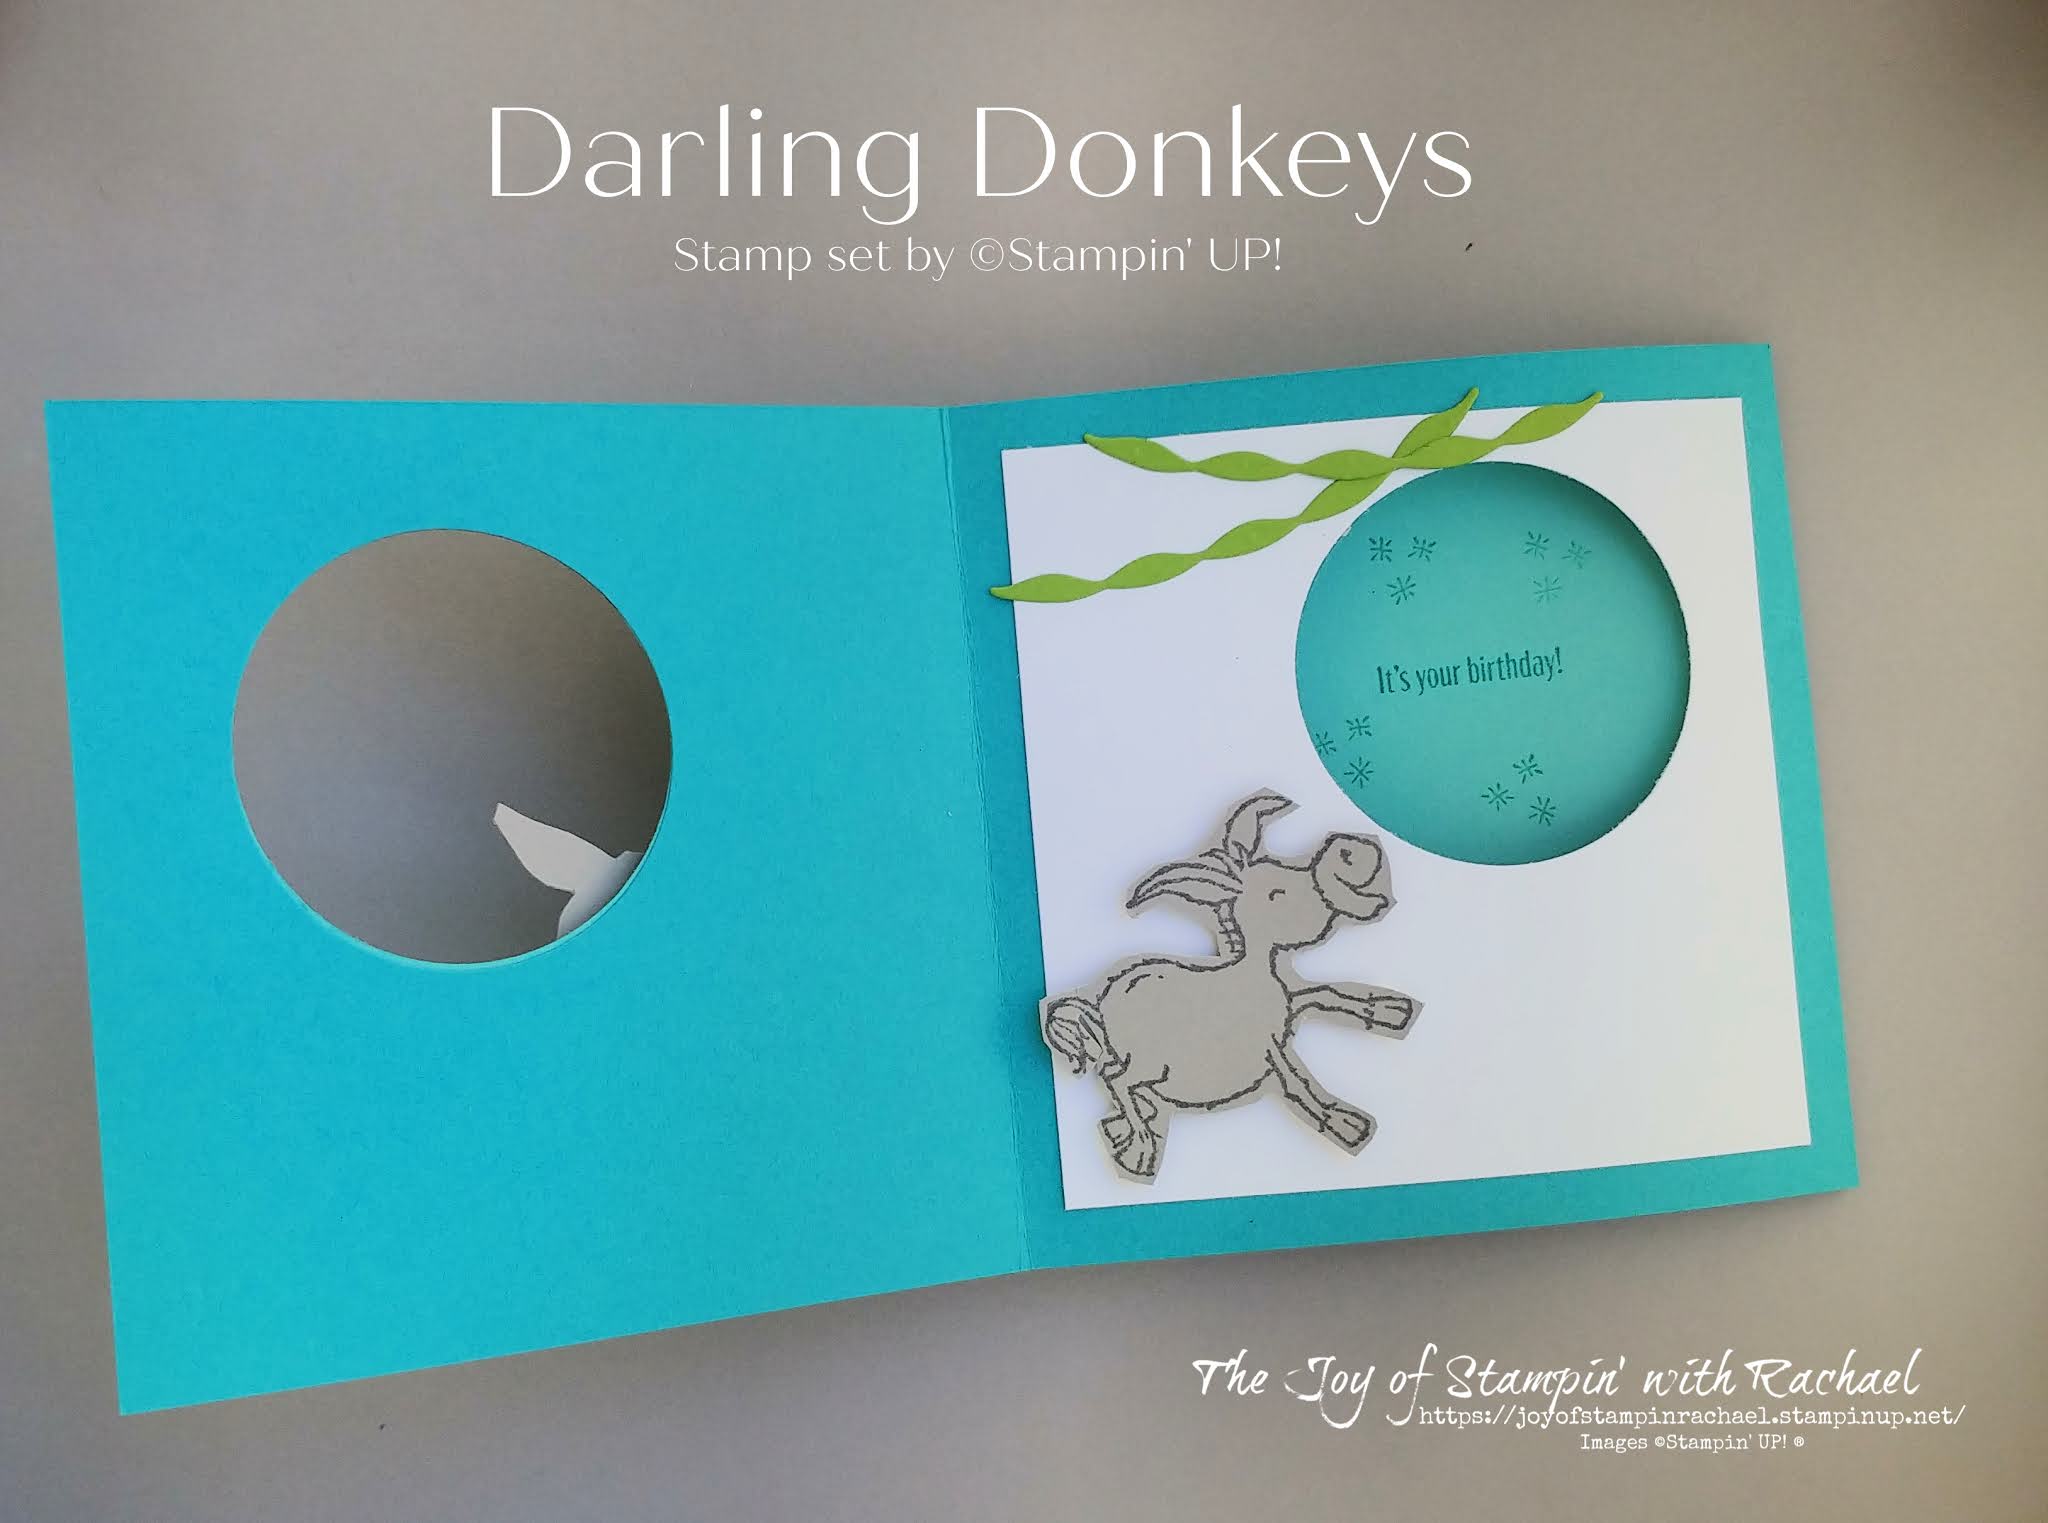
This card uses 3 layers and matching 2 inch holes to create a window and have the hidden message slide in. 

Here is the top view of the card and shows how it goes together a little bit. Along with it are some measurements. 


Supplies
Darling Donkeys Stamp Set
Bermuda Bay Ink & Cardstock
Coastal Cabana Ink & Cardstock
Granny Apple Green Cardstock
Basic White Cardstock
Gray Granite Cardstock & Ink
Basic Gray Ink
Hey Birthday Chick Dies
Embossing Folder of Choice (for grass)
*2 inch Circle Punch
Pencil

*Could use a smaller size if needed

Always Recommended
Paper Snips
Trimmer
Simply Shammy
Die Cutting Machine
Bone Folder
Adhesives

Measurements
Bermuda Bay: 4 1/4 x 8 1/2 scored @ 4 1/4
4 1/4 x 5 3/4 scored @ 5 1/2
Coastal Cabana: 4 x 8 scored @ 5 1/4
Basic White: 3 3/4 x 3 3/4 
3 3/4 x 5
Granny Apple Green: 3/4 x 5 1/4

Steps
  1. Measure, score and cut your paper. 
  2. Stamp 2 donkeys onto Gray Granite paper with Gray Granite Ink and Basic Gray.  Fussy cut those out and set aside.
  3. Die cut your Basic White Fence with the Birthday Chick Dies and die cut the streamers out of Granny Apple Green. Set aside.
  4. Emboss your strip of grass with embossing folder of choice. 
  5. Punch your first circle out of the Bermuda Bay 4 1/4 x 8 1/2 on the front. (Fold will be on the left side)
  6. Line up your Coastal Cabana over your Bermuda bay and using your pencil trace the circle onto it. Then punch out that circle.
  7. Attach those two pieces with just adhesive around the circle (see video). 
  8. Trace another circle onto the Bermuda Bay and Punch that out. Then place the square Basic White over that hole and punch that. Attach it with glue after. 
  9. Use tear tape on the Bermuda Bay 4 1/4 x 5 3/4 on the end of the score line. (See video for tip). Attach to the other Bermuda Bay piece.
  10. Insert loosely the Basic White to the back layer and stamp your saying through all the holes. Then glue it onto that back piece. 
  11. Open up your card and stamp onto the Coastal Cabana another saying. 
  12. Decorate your card front with the grass, fence, and donkey. Stamp the stars with Bermuda Bay Ink. 
  13. Decorate the inside with another donkey (use dimensionals to pop him up) and the streamers.   
*Meg Loven designed this card and has step by step images for this fold. Visit her blog to make it more clear if the written directions are confusing and you don't have time to watch the video. 

Facebook Live Video


Happy Stampin' Everyone!!!


Thursday, February 25, 2021

Looking Up All-Inclusive Kit


Today's kit class with the Looking UP All-Inclusive Kit! Watch my video below and see how easy it is to put this kit together! I love the variety of this kit! You get to make 5 different designs and 3 of each! 

Order this kit for $29 by clicking on the link below

Airplane Card

Raindrops Card

Palm Trees

Skyline

Hot Air Balloons

Facebook Live Video


Happy Stampin' Everyone!!!

Throwback Thursday- A Little Wild Card


Throwback Thursday with this fun A Little Wild stamp set by ©Stampin' UP! Almost everything is retired on this card. The Emerald Envy cardstock and ink. The Washi Tape. The ribbon and embellishments. Even that scallop punch has retired! But this layout will never go out of style. This is such a classy card and I had gotten it from a swap may years ago. If you have this stamp set in your craft room you can recreate this card or use this layout to help inspire a new card with the same look! 


Happy Stampin' Everyone!!!


Wednesday, February 24, 2021

Wednesday's Kit Class- Paper Pumpkin's Bouquet of Hope


Today's Wednesday's Kit Class is a special edition as I use the stamp set Bouquet of Hope from February's Paper Pumpkin Kit. I give you 3 different ways on how to use the stamp set after you made all the cards in the kit. When you order $35 worth by Friday the 26th you'll get this kit (with all the paper items and embellishments) for FREE! Just order with the link below or use the Hostess Code RXXRTQH6


 Suggested Items to Order
Bouquet of Hope Refill Kit $10

Jar of Flowers & Punch $36.75

**If you don't have the Bouquet of Hope stamp set I suggest the Jar of Flowers stamp set or any large floral image could be substituted in. 

Supplies
Bouquet of Hope Stamp Set
Jar Punch
Banners Pick a Punch
Story Label Punch
Stitched Rectangle Dies
Flower & Field DSP
Basic Black Cardstock
Basic White Cardstock
Mossy Meadow Cardstock
Vellum
White Embossing Powder
VersaMark Ink
Mossy Meadow Ink
Memento Black Ink
Stampin' Blend Markers: Poppy Parade, Daffodil Delight, Granny Apple Green, Basic Black
Mossy Meadow Thread
Daffodil Delight Ribbon
*Flowers from kit

Always Recommended
Paper Snips
Trimmer
Simply Shammy
Die Cutting Machine
Bone Folder
Adhesives


I just love the stark contrast of the White embossed powder on the Basic Black! 


Measurements
Basic Black Cardbase 5 1/2 x 8 1/2 scored @ 4 1/4
DSP: 4 x 5 1/4
3/4 x 4
2 1/2 x 3/4
Basic White: 4 x 5 1/4
2 3/8 x 1/4

Steps
  1. Measure, score, and cut all your paper. 
  2. Die cut a stitched Rectangle in Basic Black. Pick the one largest enough to fit your bouquet.
  3. Heat emboss with VersaMark ink, white embossing powder, and your heating tool the bouquet onto the stitch rectangle. 
  4. Stamp on the Basic White strip in Mossy Meadow.
  5. Use your Banner's Pick a Punch for your 2 1/2 x 3/4 DSP.
  6. Glue the 3/4 x 4 DSP to the 4 x 5 1/4 Basic White and glue inside your cardbase.
  7. Glue your DSP to the card front and attach your Black Stitched Rectangle with dimensionals. Glue on your bannered DSP and use dimensionals to pop up the stamped greeting. 
  8. Make a bow with the Mossy Meadow thread and attach with a glue dot. 


This card using the bouquet of flowers as a background look instead of the focus. 


Measurements
Basic White Cardbase: 5 1/2 x 8 1/2 scored @ 4 1/4
Mossy Meadow: 4 1/8 x 5 3/8
Basic White: 4 x 5 1/4

Steps
  1. Measure, score, and cut all your paper. 
  2. Die cut a medium size Stitched Rectangle in Basic Black and heat emboss the saying with White Embossing Powder in the center. 
  3. Stamp in Mossy Meadow Ink the bouquet all over the Basic White and then glue to the Mossy Meadow layer. Attach to the cardbase. 
  4. Using dimensionals attach the embossed rectangle.
  5. Glue on 3 flowers from the kit or use the medium Daisy Punch to create flowers and add to 3 of the corners.


This card shows how you can color in the floral image to add the pop of color. The vellum jar is a fun bonus, but you could leave it off this card and it would look just fine. 


Measurements
Basic White Cardbase: 5 1/2 x 8 1/2 scored @ 4 1/4
DSP: 4 x 5 1/4
Basic Black: 2 3/4 x 4 1/8

Steps
  1. Measure, score, and cut your paper. 
  2. Die cut a stitched rectangle in Basic White. 
  3. Stamp in Memento ink onto the stitched rectangle and use your Stampin' Blends to color and add a little wink of stella to the center of the flowers. Attach the Basic Black layer after you are done coloring. 
  4. Punch out a Vellum Jar. Wrap a small piece of ribbon at the top and glue over the bottom of the flowers. Make a bow with the Daffodil Delight ribbon and attach with a glue dot. 
  5. Glue your DSP to the card front and attach the rectangle image with dimensionals. 
  6. Bonus Label: Create a label with the Story Label punch and stamp the saying on there and the mini flowers from the kit. Attach to the front or glue onto the inside of the card. 


Facebook Live Video


Happy Stampin' Everyone!!!


Hey Birthday Chick Card


It is time for me to make and send out my swaps again. This one I made for the Queen's Birthday Swap. These dies with the Hey Birthday Chick and the Hey Chick stamp sets are AMAZING!!! There are so many fun little pieces and honestly work best together. 

One of my favorite tips when using 12 x 12 DSP is making an inside DSP piece. When you cut a 12 x 12 paper into two 4 x 5 1/4, you get a leftover piece that can then be cut in half and used for the inside of your card! :) It is a happy accident. 


Supplies
*Hey Birthday Chick Bundle (stamp set and dies)
Artistry  Blooms DSP
Stitched Whimsy Dies
Adhesive Sheets
**Blending Brushes
Crumb Cake Ink 
Garden Green Ink and Cardstock
Melon Mambo Ink and Cardstock
Soft Suede Cardstock
Pool Party Ink
Memento Black Ink
Daffodil Delight Cardstock
Stampin' Blends: Real Red, Pumpkin Pie, Granny Apple Green, Crumb Cake

*On backorder until March 1st
**Can't order until March 29th

Always Recommended
Paper Snips
Trimmer
Simply Shammy
Die Cutting Machine
Bone Folder
Adhesives

Measurements
Granny Apple Green: 4 1/4 x 11 scored @ 5 1/2
DSP: 4 x 5 1/4
4 x 3/4
Basic White: 4 x 5 1/4
3 1/2 x 4 3/4

Steps
  1. Measure, score, and cut your paper. 
  2. Stamp your Balloon Chick with Memento Ink on Basic White cardstock and use the die to cut out with your Stampin' Cut & Emboss machine.
  3. Die cut in Granny Apple Green the corn stalks and corn husk. Die cut in Daffodil Delight the corn. Glue the husk & the cob together and set aside. 
  4. Die cut the barn in Soft Suede.
  5. Die cut the Happy Birthday in Granny Apple Green after you have attach adhesive sheets to the back of a scrap of cardstock (about 1 1/2 x 2).
  6. Die cut the 3 1/2 x 4 3/4 Basic White with the Stitched with Whimsy dies. 
  7. Use a sponge or your blending brushing and create a Crumb Cake bottom, Granny Apple Green center, and 3/4 of the top with Pool Party.
  8. Glue on your barn and then your corn stalks. 
  9. Use dimensionals to add your chick after you colored her with your blends.
  10. Attach the corn to the stalks with liquid glue or glue dots.
  11. Remove the backing of the adhesive sheet on the Happy Birthday and attach to the bottom left of the card. 
  12. Glue the DSP to the cardbase and attach the stamped and layered paper with dimensionals. 
  13. Inside: stamp with Granny Apple Green your Birthday saying of choice and glue on the strip of DSP to to the bottom. 


Happy Stampin' Everyone!!!


Hey Chick Easter Card


I created this Hey Chick Easter Card for a Demo Swap. The theme was Easter/Spring and needed to include at least 2 of the chosen colors: Daffodil Delight, Granny Apple Green, Highland Heather, Flirty Flamingo and Balmy Blue


Hey Chick Stamp Set & Dies


I really love the Hey Chick stamp set and used two others to complete this card. I used the Hey Birthday Chick for that cute little party hat chick and for the greeting I used the Timeless Tulips. 


Hey Birthday Chick Bundle


Timeless Tulip Stamp set


It is hard to see in photos because of how light the yellow is, but the card says "Happy Easter, Happy Spring, happy, happy everything!" 


I chose the Fine Art Floral Designer Series Paper because it used a lot of the colors I needed to meet the swap colors. 

Fine Art Floral DSP

You can make these cards too when you order from my online store and follow my steps below! 

Supplies


Hey Birthday Chick Stamp Set & Dies

Hey Chick Stamp Set & Dies

Timeless Tulips Stamp Set

Basic White Cardstock

Flirty Flamingo Cardstock

Daffodil Delight Cardstock & Ink

Scrap of Granny Apple Green, Flirty Flamingo, and Daffodil Delight (for the bows)

Memento Ink

Stampin’ Blends: Just Jade, Light Smoky Slate, So Saffron, Poppy Parade, Pumpkin Pie

Fine Art Floral DSP


Always Recommended
Paper Snips
Trimmer
Simply Shammy
Die Cutting Machine
Bone Folder
Adhesives


Measurements


Thick Basic White Cardbase:  5 ½ x 8 ½ scored @ 4 ¼

DSP: 4 x 5 ¼

3/4 x 4

2 strips Daffodil Delight 5 ¼ x ½

Basic White: 2 ½ x 5 ¼


Steps

1.      Measure, score, and cut all your paper.

2.      Stamp in Memento Ink 1 hen, 3 eggs, and one egg/chick onto Basic White. Color with your blends and die cut each one out.

3.      Die cut the mini bows in 3 colors and glue onto your little eggs.

4.      Stamp in Daffodil Delight the “Happy Easter…” saying on the left bottom of the Basic White.

5.      Glue the Daffodil Delight Strips to the back of the Basic White.

6.      Glue the DSP and the Basic White stamped piece onto the card front.

7.      Attach your Mama Hen and cracked open chick with dimensionals and glue the other eggs with liquid glue.


Happy Stampin' Everyone!!!


Tuesday, February 23, 2021

Tuesday's Tip at Ten-How to check your glue


I love Stampin' UP!'s Tombow glue. Sometimes called the "green glue" because of the double sided green lids.  BUT sometimes it is hard for me to know when to order more! So I am here to tell you how to check your glue to see how much you have left in your bottle. 

First- Remove the outside wrapper. Make your glue completely naked! You heard me, take the whole wrapper off! You will notice that the wrapper gets sticky anyway the the naked bottle is easier to clean. 

Second: Once your bottle is naked and free from the wrapper, hold your bottle with the smaller lid facing down and up to the light. This will allow you to see through the bottle just enough to see how much you have left! You can either use a sharpie and mark it or watch for it to get to only 1/4 left. Just like a gas tank for your car, you never want to go below that quarter left and be on empty when you need it most! 

Order your Tombow Glue from me with using the link below! 

#TuesdaysTipatTen

Happy Stampin' Everyone!!!

Monday, February 22, 2021

Miss Monday- Hey Birthday Chick Cards


Miss Monday cards using the Hey Birthday Chick stamp set by ©Stampin' Up! This card is also for a Team Swap organized by one of my team members with the theme of Birthdays! 


So I made 10 cards for this swap. I also like to swap in evens because it makes for easier math when cutting. You can get two cardbases from 1 sheet of cardstock and from one sheet of 12 x 12 piece of DSP you can get 6 card fronts (4 x 5 1/4). 

I usually just make the 2 cards for Miss Monday so you can see them side by side. I used the Artistry Blooms DPS for the large card front look and love how the color varies so slightly on both. 

Here is the inside of the card where the theme is carried over with the saying and the DSP strip on the bottom. 

The Birthday Chick dies have some of the BEST details!!! Check out this barn and the texture on the ears of corn! See more about these dies and order them by clicking on the link below. 


For added details I added the stitched outline using the Stitched with Whimsy Dies

I used the adhesive sheets to help me attach the "Happy Birthday" and ran them through the Stampin' Cut & Emboss machine together. 


You can make these Miss Monday cards too by following my steps below and using the supply list to order. 

Supplies
*Hey Birthday Chick Bundle (stamp set and dies)
Artistry  Blooms DSP
Stitched Whimsy Dies
Adhesive Sheets
**Blending Brushes
Crumb Cake Ink and Cardstock
Garden Green Ink and Cardstock
Melon Mambo Ink and Cardstock
Pool Party Ink
Memento Black Ink
Daffodil Delight Cardstock
Stampin' Blends: Real Red, Pumpkin Pie, Magenta Madness, Crumb Cake

*On backorder until March 1st
**Can't order until March 29th

Always Recommended
Paper Snips
Trimmer
Simply Shammy
Die Cutting Machine
Bone Folder
Adhesives

Measurements
Melon Mambo Cardbase: 4 1/4 x 11 scored @ 5 1/2
DSP: 4 x 5 1/4
4 x 3/4
Basic White: 4 x 5 1/4
3 1/2 x 4 3/4

Steps
  1. Measure, score, and cut your paper. 
  2. Stamp your Balloon Chick with Memento Ink on Basic White cardstock and use the die to cut out with your Stampin' Cut & Emboss machine.
  3. Die cut in Granny Apple Green the corn stalks and corn husk. Die cut in Daffodil Delight the corn. Glue the husk & the cob together and set aside. 
  4. Die cut the barn in Crumb Cake.
  5. Die cut the Happy Birthday in Melon Mambo after you have attach adhesive sheets to the back of a scrap of cardstock (about 1 1/2 x 2).
  6. Die cut the 3 1/2 x 4 3/4 Basic White with the Stitched with Whimsy dies. 
  7. Use a sponge or your blending brushing and create a Crumb Cake bottom, Granny Apple Green center, and 3/4 of the top with Pool Party.
  8. Glue on your barn and then your corn stalks. 
  9. Use dimensionals to add your chick after you colored her with your blends.
  10. Attach the corn to the stalks with liquid glue or glue dots.
  11. Remove the backing of the adhesive sheet on the Happy Birthday and attach to the bottom left of the card. 
  12. Glue the DSP to the cardbase and attach the stamped and layered paper with dimensionals. 
  13. Inside: stamp with Melon Mambo you Birthday saying of choice and glue on the strip of DSP to to the bottom. 


Happy Stampin' Everyone!!!


Sunday, February 21, 2021

Paper Pumpkin- Bouquet of Home Kit


Paper Pumpkin Bouquet of Hope for February 2021. This kit comes with everything you need to make 9 cards that are perfect to send to bring hope! 


Here are all three cards made following the directions from this months kit. 

The "thinking of you" card.

The "sorry for you loss" card.

The "I'm always here for you" card.

This kit includes 3 different languages for the "thinking of you" sticker. 


Video
Here is Stampin' UP!'s video to help you get started on your kit and to show you some tips! 

Join in the Monthly Kit fun and subscribe to Paper Pumpkin by the 10th of each month! Use this link to sign up today! Try it for a month and cancel if you don't love it at any time! 


Happy Stampin' Everyone!!!


Friday, February 19, 2021

Fun Fold Friday-In Bloom Card


Fun Fold Friday with the In Bloom Stamp set, Pierced Blooms Dies and the Paper Blooms DSP. I've created this fun "bridge" card that has a window to the inside of the card. 


Here are my simple measurements for this card. Read all about it below and order the supplies online from my Stampin' UP! Store!

Supplies
In Bloom Stamp set
Pierced Blooms Dies
Seaside Spray Cardstock
Basic White Cardstock
Sale-a-bration Paper Blooms DSP
Rococo Rose Cardstock & Ink
Seafoam Cardstock
Night of Navy Cardstock
Opal Rounds

Measurements
Seaside Spray Cardbase: 4 1/4 x 7 1/4 scored @ 5 1/2
2 Seaside Spray: 1 3/4 x 4 1/4
3 Basic White: 1 1/2 x 4
3 DSP: 1 1/4 x 3 3/4
Basic White: 4 x 5 1/4

Steps
  1. Measure, score, and cut your paper. 
  2. Die cut your flowers and leaves with the Pierced Blooms Dies. Curl the ends of your blossom with your bone folder. 
  3. Glue your layers together. Seaside spray, basic white, and DSP. 
  4. Line up your bottom layer to the end of the cardbase and create a "bridge" with the other dsp panel piece with either glue or dimensionals. 
  5. Hold the bridge down and slip your Basic White under and stamp your saying onto the Basic White through the "gap".
  6. Attach your flowers to the bridge and embellish with the Opal rounds. 

Facebook Live Video


Happy Stampin' Everyone!!!

Thursday, February 18, 2021

Throwback Thursday- This Little Piggy


Throwback Thursday card with This Little Piggy stamp set! I had gotten this card from a swap from a Stampin' UP! in person event years ago and always, always loved this card. It reminded me of the artist Andy Warhol style. Well, I finally recreated this idea using the Darling Donkeys Sale-a-bration stamp set.  

By Laura Weathers from Roswell New Mexico


I changed up the colors and stamp set but the layout his that same and it made a super fun card for my young boys to give to their friends (I am always looking for card ideas for that 10-12 age group). 

You can make this card too which this "Quick Recipe"
- 1 embossing folder (Painted Texture)
-Neutral cardbase (Gray Granite)
-4 bright panels of cardstock cut at 1 3/4 x 2 (I used Bermuda Bay, Pacific Point, Granny Apple and Rich Razzleberry)
-Classic Label punch
-Stamp set with animal image

Stamp the donkey image one time on each cardstock panel in Black Ink at the same place. Try not to have the whole image into the panel. Glue and attach with dimensionals. 

I hope you give this "artist" method a try and create some really fun card ideas!!!

Happy Stampin' Everyone!!!


Wednesday, February 17, 2021

Wednesday's Kit Class- Pierced Blooms Dies & Paper Bloom DSP


Wednesday's Kit Class with the Pierced Blooms Dies and Paper Bloom Sale-a-bration Designer Series Paper! Order from my online store today through Friday the 18th $35 worth and I'll send you this Wednesday's Kit Class for FREE! 

Use this link to order with the Hostess Code

Suggested Items to Order
Pierced Blooms Dies $37

In Blooms Stamp Set $17

FREE Paper Bloom DSP

Supplies
In Blooms Bundle
Paper Bloom DSP
Peaceful Moments Stamp Set
Stitched Rectangle Dies
Stitched Shapes Dies
Layering Circle Dies
Subtle Embossing Folder
Painted Texture Embossing Folder
Purple Posy Cardstock
Daffodil Delight Cardstock
Gorgeous Grape Cardstock & Ink
Granny Apple Green Ink
Rococo Rose Cardstock
Night of Navy Cardstock & Ink
Rhinestones
Opal Rounds

Always Recommended
Paper Snips
Trimmer
Simply Shammy
Die Cutting Machine
Bone Folder
Adhesives


Measurements
Purple Posy Cardbase: 5 1/2 x 8 1/2 scored @ 4 1/4
Purple Posy: 4 1/4 x 5 1/2
Basic White: 3 1/2 x 1
4 x 5 1/4

Steps

  1. Measure, score and cut your paper. 
  2. Make two banners on the end of your Basic White strip and stamp in Gorgeous Grape "Happy Birthday..." .
  3. Die cut your Stitched Rectangle and stamp your leaves and stem onto that in Granny Apple Green. 
  4. Die cut your flowers in Purple Posy and Gorgeous Grape and the centers in Daffodil Delight. Curl them slightly with your bone folder and attach with dimensionals. 
  5. Emboss with the Subtle Embossing Folder the Purple Posy and attach to the cardbase. 
  6. Attach the Birthday label with dimensionals. 


Measurements
Basic White Cardbase: 5 1/2 x 8 1/2 scored @ 4 1/4
DSP: 2 1/2 x 4 1/4

Steps
  1. Measure, score, and cut your paper. 
  2. Glue your DSP to your cardbase. 
  3. Die cut in Rococo Rose a large scalloped circle and the largest Stitched circle in Basic White. Stamp in Night of Navy onto the stitched circle. Glue circles together. 
  4. Die cut from the Paper Blooms DSP 2 medium pink flowers, 1  big blue flower, 3 mini flowers (for the centers), and some leaves. Use your bone folder to curl up the edges of the flowers just a little bit.
  5. Die cut a Night of Label bow and attach with glue dot. 
  6. Attach the circles with dimensionals and attach your flowers with glue dots. 
  7. Add rhinestones to the center of your flowers. 


Measurements
Night of Navy Cardbase: 5 1/2 x 8 1/2 scored @ 4 1/4
Rococo Rose: 4 x 5 1/4 
DSP: 3 7/8 x 5 1/8

Steps
  1. Measure, score, and cut your paper.
  2. Die cut in Basic White your stitched label from the Pierced Blooms Dies. Stamp Happy Birthday from the Peaceful Moments stamp set in Night of Navy. 
  3. Die cut your flowers and leaves from the Paper Blooms DSP. You'll need 2 flowers and 4 leaves and 2 mini flowers. Use your bone folder to curl the edges slightly. 
  4. Glue your DSP to the Rose cardstock and attach to the cardbase.
  5. Attach your label and flowers with dimensionals. Glue in your leaves by sliding them under the flowers. 
  6. Put the Opal Rounds in the center of your flowers. 


Measurements
Rococo Rose Cardbase: 5 1/2 x 8 1/2 scored @ 4 1/4
DSP: 2 1/2 x 5 1/2
Night of Navy: 5 1/2 x 1/2
Basic White: 4 x 5 1/4

Steps
  1. Measure, score, and cut your paper. 
  2. Glue the Night of Navy behind the DSP and then glue to the cardbase. 
  3. Die cut a Stitched Rectangle out of Basic White and then emboss that with the Painted Texture embossing folder. Attach with dimensionals.
  4. Fussy cut a flower from the Paper Blooms DSP and glue onto the stitched rectangle. 
  5. Stamp using the Peaceful Moments Happy Birthday stamp in Night of Navy on a scrap of Basic White. Fussy cut out and glue onto the corner of the stitched rectangle. 
  6. Use the Opal Rounds for the center of the flower and 2 more to embellish. (Glue in Basic White for the inside of the card and stamp on there is optional).

Facebook Live Video


Happy Stampin' Everyone!!!


Double Feature Friday-Sneak Peek Seaside Wishes

  It is Double Feature Friday!   Today you are getting a sneak peek to a new Stampin' UP! Bundle coming out May 1st, Seaside Wishes! If ...