Tuesday's Tip at Ten: Use a lighter shade of cardstock for the inside of your card instead of always just Basic White.
These cards were made for a customer's order and so I was able to use the retired cardstock (Misty Moonlight & Just Jade), retired Designer Series Paper (Pattern Party), and my retired stamp set (For Being You).
But I just love the look of a lighter green (Soft Seafoam) instead of the Basic White. This lighter shade still allows someone to write on it and the writing to be seen.
I also love I how shorted the cardbase front by one inch so you can see the inside without having to open it!
I ended up making 50 of these cards and am so excited for to send them out.
I did use all retired items, but you could use this layout with the paper, inks, and stamps you have by using the measurements below!
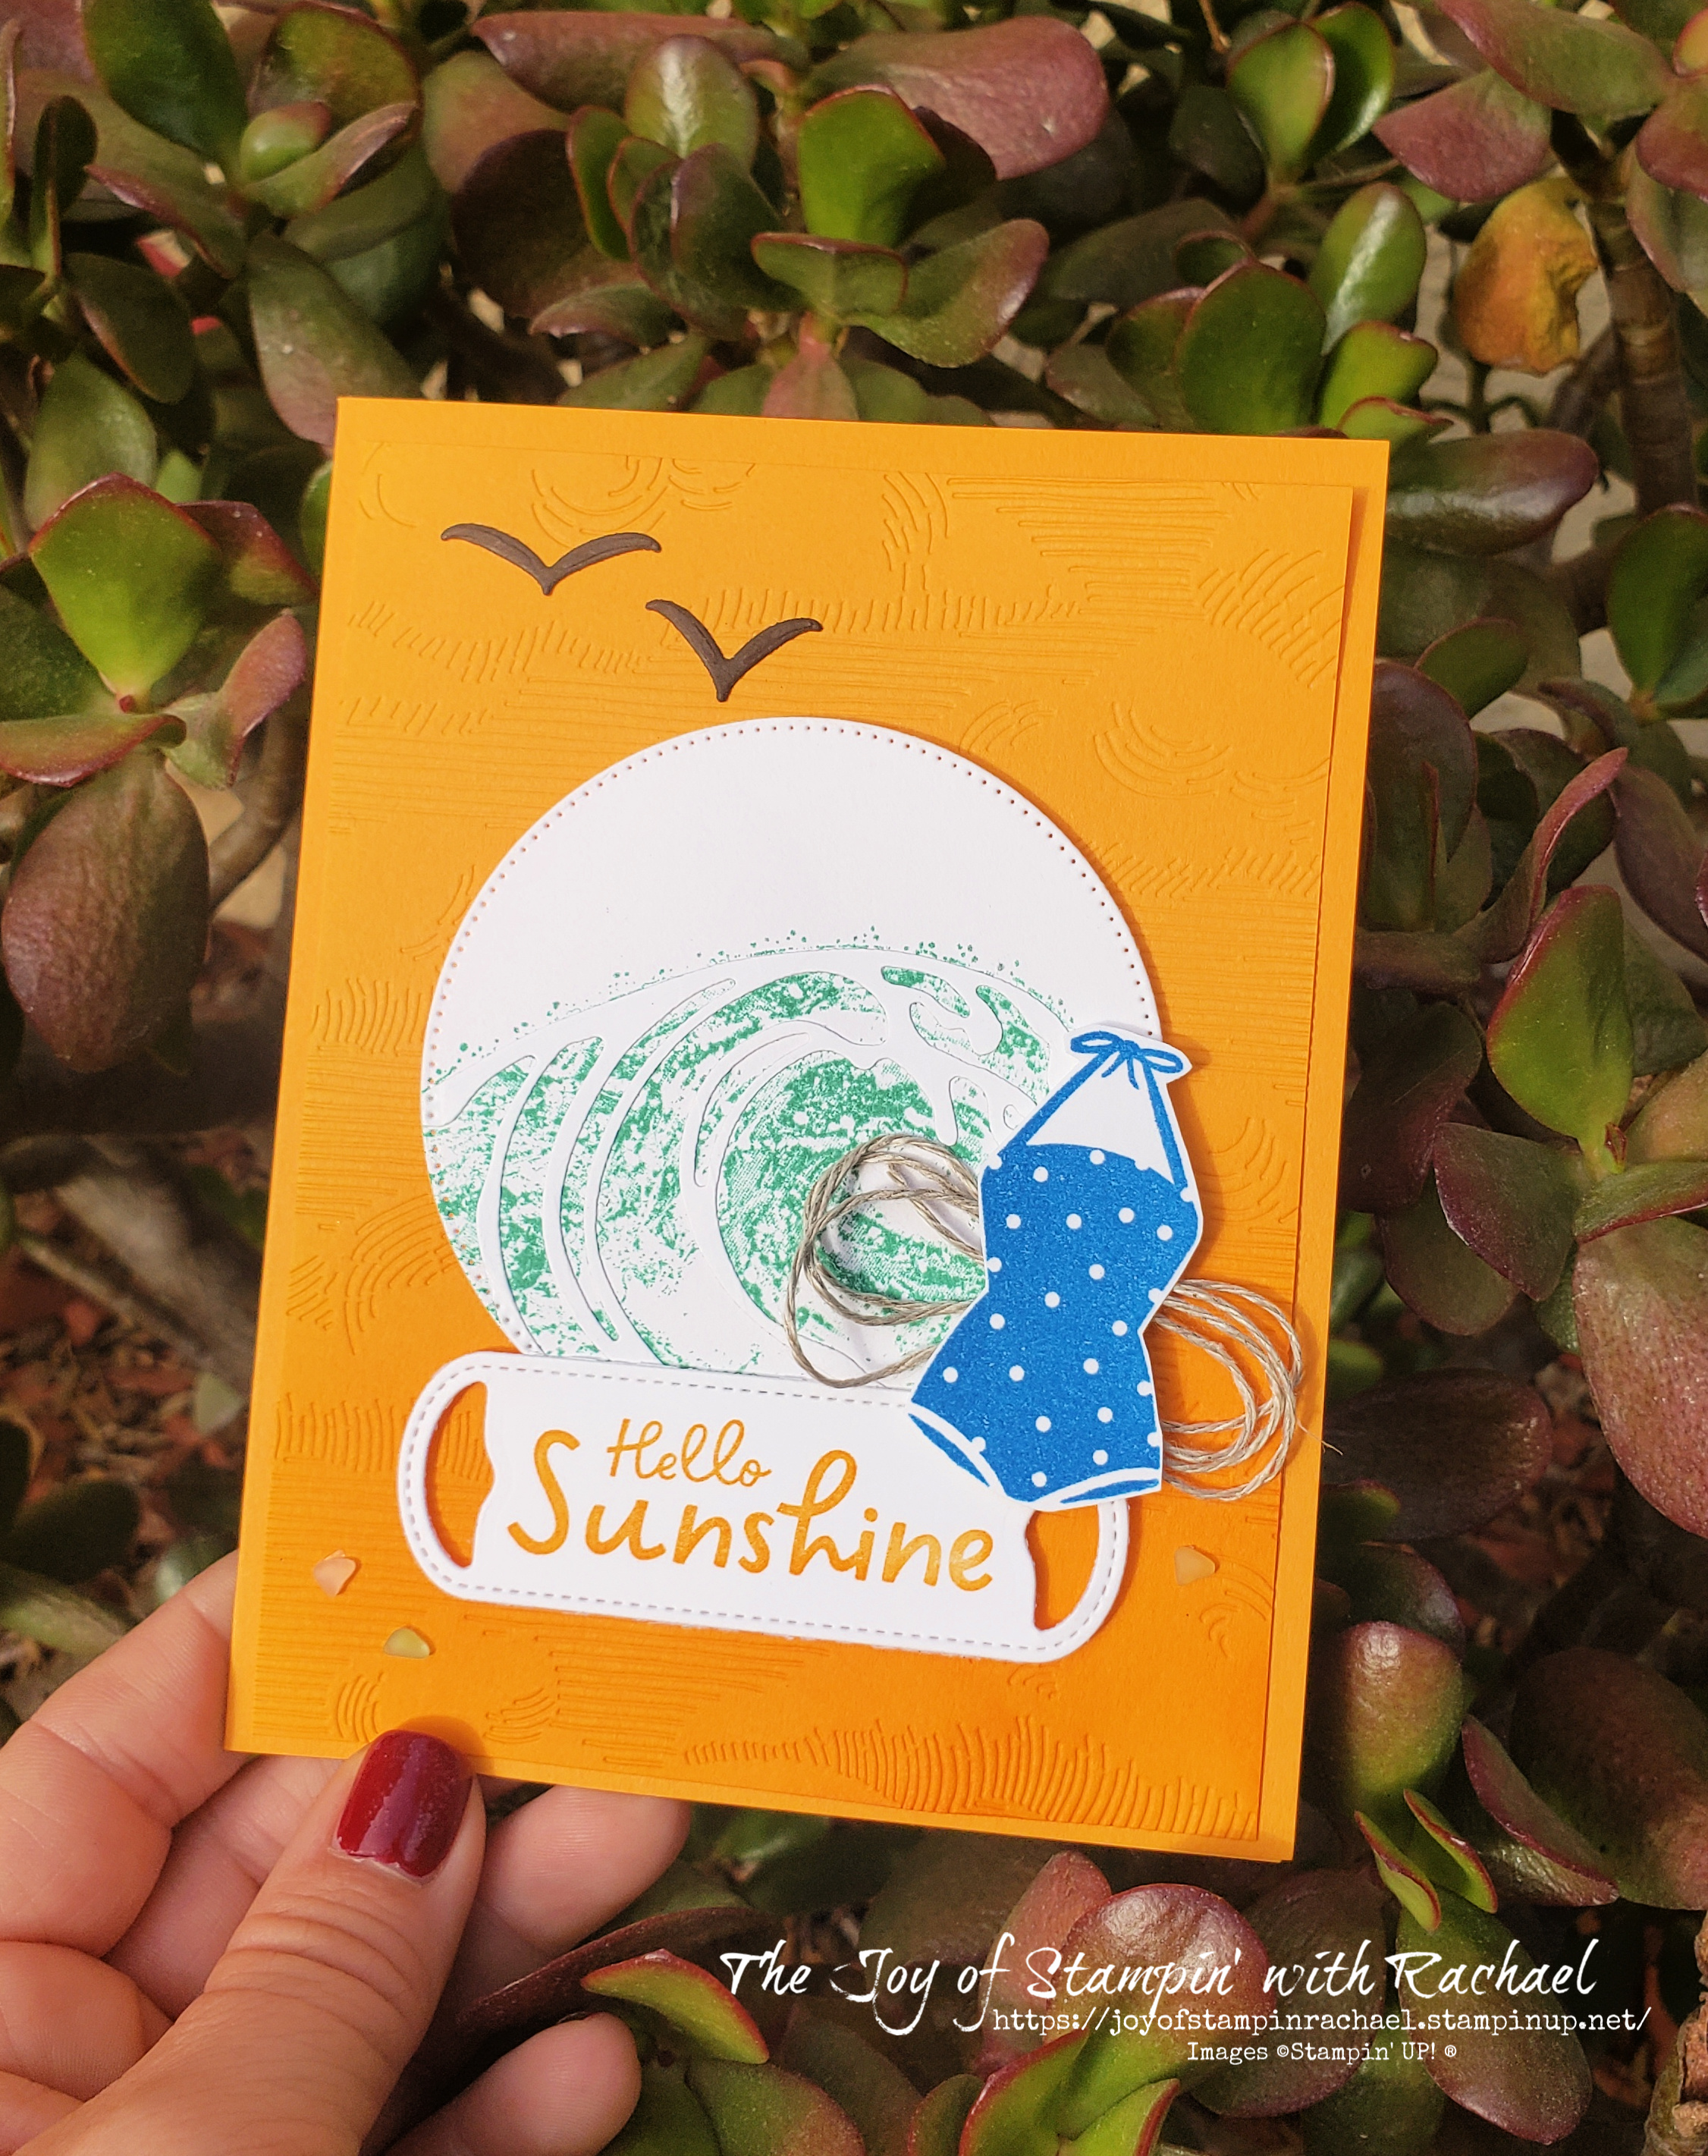
Miss Monday with the New Sunny Splash Stamp Set! Summer is almost here and this cute swimming suit stamp set with fun sayings will make the BEST cards for this season!!!
There are so many fun details to this card. Like the Wave Dies, the Sea Glass, and Cloud Embossing Folder!
The saying "hello sunshine" could be used for so many cards. Hello Sunshine and Happy Birthday. Hello Sunshine, I've been thinking of you. Hello Sunshine, I miss you (just to name a few)!
You can make this card too when you order from my online store and follow the steps below!!!
Stamp the swimming suit onto the Basic White using the Pacific Point and fussy cut it out.
Stamp the wave with the Coastal Cabana ink onto the Basic White and glue the Basic White wave over it. Die cut it out with the the largest Stylish Shapes circle.
Emboss the Mango Melody with the Clouds embossing folder and use the blending brush and Mango Melody ink on the bottom half. Glue to the cardbase.
Use dimensionals to attach the circle and label.
Make a linen thread nest by wrapping it on your fingers 3 to 4 times and attach to the back of the swimming suite. Attach the swimming suit with dimensionals.
It is Fun Fold Friday! I paired together the Abigail Rose DSP with the Blessings of Home Stamp set to create this Vintage Style wedding Card!
The inside is just as wonderful showing off the DSP and creating a little pocket to put a gift card into.
This card was inspired by my great friend, Phyllis Walker and she used different paper and stamp set. You can use this Fun Fold with whatever supplies you have or shop from my online store to make one just like mine!
Supplies
Blessings of Home Stamp Set
Abigail Rose Designer Series Paper (DSP)
Scalloped Contour Dies
Stampin' Cut and Emboss Machine
Paper- Early Espresso, Crumb Cake
Ink- Early Espresso, Basic White
Blender Pen
Pearls
*Very Vanilla Lace Ribbon
Early Espresso Faux Suede Ribbon (in video)
Measurements
Early Espresso: 4 1/4 x 5 1/2
DSP: 10 x 5 1/4 scored @ 4, 5, 6
2 x 5 1/4
Crumb Cake- 5 1/2 x 8 1/2
10 inches ribbon
Steps
Measure, score and cut your paper.
Die cut out 2 Crumb Cake scalloped rectangles.
Stamp in Early Espresso onto the scalloped rectangle.
Use your blender pen and the Basic White ink to color in the flowers.
Fold your DSP to create a pocket and die your ribbon around it into a knot bow.
Glue on your strip of DSP onto the front.
Glue DSP to the Early Espresso and attach the Crumb Cake rectangle scallops with dimensionals on the front and liquid glue for inside.
It is Wonderful Wednesday and the last one for May! When you order today (May 25th) I'll send you the Resin Stars to make your Wednesday a little more Wonderful!
Just order with the Hostess Code
PPDJ6VFJ
at checkout if you are spending less than $150. If spending more, don't use the Hostess Code and you use the Hostess Rewards towards your order! If you are spending over a $150 let's talk about you can become a Happy Shopper on my team and get the discount with every order!
I am a HUGE fan of Paper Pumpkin Kits! They are what kept me stamping when I didn't have anyone to stamp with back in my early years of stamping. This month's is pretty fantastic as it shows off the new In Colors on each design. Below you will see one of each design featuring that In Color.
Watch my video below to get some quick tips on how to make these or watch the Paper Pumpkin Video Here. Also learn how to make one of the card designs with supplies you have over, and over again (even after the kit supplies are gone).
Sweet Sorbet
Orchid Oasis
Parakeet Party
Starry Sky
Tahitian Tide
Inside each card you have a pocket option you can add to place a gift card or an extra message.
Here is the card I made that looks like the Orchid Oasis design! Learn how you can make it too with just a couple of extra supplies and using the Paper Pumpkin stamp set. Missed out on this month's kit?
Be sure to subscribe to Paper Pumpkin by June 10th to get the next kit!
Measure, score, and cut your paper with your paper trimmer.
Die cut out of the Basic White the second largest circle. From that circle, die cut the next size out of it (see video).
Use the Versamark and Gold Embossing Powder onto the small circle cut out. Then stamp in Orchid Oasis the "just for" right above it.
Take the 4 x 5 1/4 Basic White and the cardstock and put the corner of it on the middle, lower end of the Basic White. Using the Oasis ink and blending brush, add color to the Basic White.
Move the cardstock and little above and change the angle and do another layer of blending, just lighter.
Move the cardstock one more time and do the same thing as above.
Let the paper dry or use heat tool to speed up the dry time or use an embossing buddy. Then heat emboss the gold flecks onto the blended areas.
Glue down the Basic White unto the cardbase and attach the stamped circle with dimensionals.
Embellish with the In Color Dots in the matching color.
Tuesday's Tip at Ten is to show you how to save paper when creating layers on your cards. I love to "matte" my DSP (Designer Series Paper). It makes the card look more complete and can add a pop of color. However, when you create a matte only the edges are visible which means the center goes to waste. That is why I like to die cut out a shape that I need or could be used to die cut something out even later. This extra step, can make your cardstock extra long and in the long run save you money!
For the card above I was able to reuse right away that center piece for another layer on the card. I made this card for a friend's card order for her Tupperware Team! I used the retired What's Cookin' stamp set and dies and the Stampin' You Way To The Top stamp set for the "Welcome to the Team".
I used the Stitched Rectangles for this paper saving tip!
This bundle includes this awesome stamp set that has all the lowercase letters, accented vowels, numbers, and background images for them.
This Hello card was made for a Leadership Swap that features new product from Stampin' UP!
I used the Hostess Designer Series Paper, Design A Daydream, which is paper you can get for FREE with a party that reaches over $150 or when you order $150 items yourself.
I made sure to stamp the inside (which I don't always do) with the cute little flowers.
You can make this card too when you order from my online store and follow the steps below.
Supplies
Alphabest Stamp Set
Best Label Punch
White Embossing Powder
Versamark Ink
Heat Tool
Paper-So Saffron, Basic White, Mint Macaron, Pool Party, Soft Seafoam, Petal Pink
Ink- So Saffron, Pool Party, Mint Macaron, Brushing Bride
Classic Matte Dots
Adhesives- Dimensionals, Multipurpose Glue, Seal+
Measurements
So Saffron Cardbase: 5 1/2 x 8 1/2 scored @ 4 1/4
Mint Macaron: 3 1/8 x 4 1/8
DSP: 3 x 4
Basic White: 4 x 5 1/4
Scraps of Mint Macaron, Pool Party, Soft Seafoam, and Petal Pink
Steps
Measure, score and cut your paper.
Choose what background image you want for each color of paper and stamp one of each in the matching ink (I used Brushing Bride on my Petal Pink because it showed up better).
Use the Versamark to stamp the letter onto the background image and sprinkle on the embossing powder. Shake off the extra and melt the powder with the Heat Tool. Do this for each letter.
With the Best Label Punch, punch out each letter.
Stamp in So Saffron the stars onto the cardbase top right corner and bottom left.
Stamp in So Saffron little flowers onto the Basic White corner, then glue it to the inside of the cardbase.
Glue the matte to the DSP and then attach it with dimensionals.
Attach the letters with dimensionals onto the DSP.
Fun Fold Friday with the Beautiful Hello stamp set and the Beautiful Shapes Dies. I created this fun window card that could be used for any celebration! Get this as a bundle and save 10%.
This bundle came out in the Jan-June Mini Catalog as a product suite and the bundle is carrying over but the paper and embellishments are not.
Once open, the Basic White side opens up again (see video) for a spot to write your whole message.
You can make this card to when you shop at my online store and use the steps below.
Supplies
Hello Beautiful Stamp Set
Beautiful Shapes Dies
Abstract Beauty 4 x 6 Specialty Designer Series Paper
This month's Royals Kit Class uses the Your Biggest Fan stamp set and Sports Events Dies! My team, Royal Hearts Stampers, can order this 4 card kit for just $10 as a team member perk!
Customers can get this kit for FREE when they order the Your Biggest Fan stamp set in the month of May.
Just use the Hostess Code PPDJ6VFJ when you visit my online store.
It is yet again another Wonderful Wednesday! That means that when you order from my Online Store today I'll send you the Resin Stars to make your Wednesday a little more Wonderful too! It is also a day I share something wonderful to me.
Just use the Hostess Code PPDJ6VFJ at checkout.
Wonderful Wednesday with Birthday Swaps from the Queens of the Stamp Age (aka Queens). This talented Stampin' UP! Demonstrator group has done it again. Made amazing cards to inspire us and share with others. Below each card you will see the name of the stamper and the main stamp set they used. If you want more details about a card, just comment and I'll give you a fuller recipe. There was two swap themes for this April swap, His and Hers Birthday Cards.
I hope these have inspired you to swap, stamp, or join my team and gave you great ideas to stamp your own cards! To see this cards fully, please watch the video below to get more details on each.


.jpg)


