t> The Joy of Stampin' with Rachael: August 2020

Monday, August 31, 2020

Get and Go Starter Kit Deal


Who loves a great deal?? You know I do! I signed up as a Stampin' UP! Demo when they had a promotion for a starter kit only costing $25 and I was sold (still here almost 7 years later)! Well, they have gone and done it again and are adding even more to the already fabulous Stampin' UP! Starter kit!! They are adding on a "Get & Go" kit that includes 16 cards kits, 2 stamp sets (Queen Anne's Lace and So Much Love), and rhinestones (you know I love rhinestones)!! Stampin' UP! wants to give you everything you need to hold your first Stampin' UP! event with friends!! 

Let me show and tell you more about the 16 card kits. 

08.18.20_PRODUCTIMAGE_SEPT_RECRUITMENT_SAMPLE_1

There are 2 card bases, 8 of each. 

08.18.20_PRODUCTIMAGE_SEPT_RECRUITMENT_SAMPLE_2

Granny Apple Green card pack contents
8-1/2" x 5-1/2" (21.6 x 14 cm) Granny Apple Green Cardstock
3"x 4" (7.6 x 10.2 cm) Bermuda Bay Cardstock
3"x 4" (7.6 x 10.2 cm) Coastal Cabana Cardstock
3/4"x 4" (1.9 x 10.2 cm) Daffodil Delight Cardstock
5-3/4" x 4-3/8" (14.6 x 11.1 cm) Whisper White Envelope

and

Coastal Cabana card pack contents
2-1/4" x 3-1/2" (5.7 x 8.9 cm) Whisper White Cardstock
2-3/4" x 4" (7 x 10.2 cm) Daffodil Delight Cardstock
3" x 4" (7.6 x 10.2 cm) Bermuda Bay Cardstock
8-1/2 x 5-1/2" (21.6 x 14 cm) Coastal Cabana Cardstock
5-3/4" x 4-3/8" (14.6 x 11.1 cm) Whisper White Envelope

You will also get videos of how to make the cards. You'll only need to make sure you have adhesive to assemble these kits. 

You can join my team today by clicking on the link below!


Why Join My Royal Hearts Stampers Team?
I would love nothing more to have a good customer turn into a great team member! I take care of you as a customer but I spoil my team with rewards for sales, team challenges, and team game nights!! My team is very diverse. Some are business minded like me and some are more hobby demos that are there for the community support and great deal (20% off every order). I support and love every team member. I have even had a handful of "kit nappers" (those who just get the great Starter Kit deal and don't order again from them self and after 3 months become my customer again).  And I fully support, and encourage those Demos as well. I have some that start as "kit napper" and stay for the friendships! 

Did you know you can use Hostess Rewards towards the cost of your $99 starter kit?

Make a great deal even better by hosting an online party with me and then use your hostess rewards towards your starter kit!!! I have demos who have gotten their Starter Kit for FREE using all their rewards from their online party!! It really is a great way to do it!! Message me and get your event dates set up and going! :) 

Manly Monday-Seaside Notions Jar Shaker Card


Four Manly Monday cards using the Seaside Notions stamp set by ©Stampin' UP! and the Jar Shaker Domes. I've been wanting to make this card for a couple of weeks now and collected these seashells the first week of July from Newport Beach. The waves were too big that day and so my daughter and I filled a baggie full of little shells that would fit into these dome shape jars. My son says he doesn't think he looks "Manly", so I may be pushing it. But we can all agree that everyone loves collecting seashells in my house! Scroll down to see lots of photos, list of supplies, measurements, and steps with photos.

All Four cards, some slightly different.

No sequins on the side to make it look more manly for this one.


If you don't have easy access to little seashells like me, you can still make this card using just the sequins. Sequins only on the left and shells and sequins on the right.
You can make this card too by following the directions below and ordering from my online store by clicking the "Shop with Me" link above.

Supplies
Seaside Notions Stamp Set
Seabed 3D Embossing Folder
Whale of a Time Sequins
Mason Jar Shaker Domes
Linen Thread
Crumb Cake Cardstock and Ink
Pool Party Cardstock
Thick Whisper White Cardstock
Soft Suede Ink
 Jar Punch

Always Recommended
Paper Snips
Trimmer
Simply Shammy
Die Cutting Machine
Bone Folder
Adhesives

Measurements
Thick Whisper White Cardbase: 8 1/2 x 5 1/2 scored @ 4 1/4
Crumb Cake: 1 3/4 x 5 1/4
Pool Party: 4 x 5 1/4

Steps
  1. Cut and measure all of your cardstock. 
  2. Run your Pool Party through My Boss using the Seaside Bed folder.
  3. Stamp in Soft Suede "Happy Birthday" and stamp in Crumb Cake in Crumb Cake the little rocks pieces. Then tear the top of the Crumb Cake slowly, just removing the very top. 
  4. Glueing only the bottom and edges of the Crumb Cake, attach to the Pool Party.
  5. Use the Jar Punch, pushing it all the way up, and punch out both layers.
  6. Next, look at each photo below for the last steps.


Step 7: Lay cut out image over the cardbase. Put a little glue on the back of the jar you punched out and insert where the missing jar spot is.

Step 8: Remove bigger layer and set a side, leaving the glued jar on the cardbase.


Step 9: Place Whale of a Time Sequins on top of the jar.


Step 10: Place seashells, if you have them, over the jar.

Step 11: Place the Jar Dome over the shells and sequins and remove one side of the adhesive strip.

Step 12: Add adhesive to the Pool Party piece or glue around the jar on the cardbase and remove the second adhesive strip on the front of the jar dome. Lay linen thread over the top and sticky parts of the dome.

13. Lastly, line up the Pool Party piece to go over the jar perfectly and embellish with sequins and a linen thread bow. 


Happy Stampin' Everyone!

Stampin' Cut & Emboss Machine- My Boss


Available September 1st is the beautiful, long awaited for, Stampin' Cut & Emboss Machine, aka My Boss! Here are some facts/details about it that makes it pretty amazing and 3 ways you can get your hands on this machine!

Three Ways to Buy

Pay Full Price: You can order this machine from me by visiting my online store! It cost just $120 plus shipping and tax.  I will send you a BIG thank you gift and make sure you are happy as my customer.

  Pay only $99 (plus tax) : Join as a Stampin' UP! Demonstrator (Happy Shopper) and spend only $99 plus tax and get free shipping! Starter kits come with $125 worth of products of your choice, which means you save $21 this way and get 20% your future orders!! (My favorite deal)

Get if for FREE: Lastly, you can this for FREE when you earn enough Hostess Rewards by hosting an online Facebook party. Your Party would need to sell $870 worth, but could totally be done!! Email me if this is how you want to get your Boss.

thejoyofstampinwithrachael@gmail.com 

I love my standard Stampin' Cut & Emboss machine and am super excited for when the mini comes out too! Let me help you get the BEST deal for you to get this machine!! 


Happy Stampin' Everyone!

Friday, August 28, 2020

Fun Fold Friday: Whale Done


Today's  Fun Fold Friday is an accordion fold card using the Whale Done Stamp set by ©Stampin' UP! This card is pretty easy (the DSP does all the hard work) but has lots of measurements! I used a piece of printer paper first to make sure my measurements were right. The best part about this card is that it just keeps on going and going and has secret messages spots! What will you put in yours?  

Quick measurements

The accordion card opened up all the way reveals all it's secrets.  I used the leftover DSP to add some to the card folds but the card in my video leaves both secret message spots open. Watch my video below, shop at my store, and follow the directions so you can make your own Fun Fold Card.


Supplies
Whale Done Stamp Set
Whale Builder Punch
Whale of a Time DSP
Seabed Embossing Folder
Whale Sequins
Balmy Blue Cardstock and Ink
Whisper White Cardstock
Pacific Point Ink

Always Recommended
Paper Snips
Trimmer
Simply Shammy
Die Cutting Machine
Bone Folder
Adhesives

Measurements
Card base: Balmy Blue 10 1/4 x 4 1/4
scored @ 2 1/4, 3 1/2, 6 1/4, & 7 3/8
DSP: 2 x 4
2 5/8 x 4
Balmy Blue: 2 1/2 x 4

Steps
  1. Cut all your paper following the measurements above.
  2. Stamp your whale on scrap of Whisper White using the Pacific Point ink and punch him out using the Whale Builder punch
  3. Stamp your "secret" messages in between the "skinny" score lines. 
  4. Run the Balmy Blue 2 1/2 x 4 through your die cutting machine with the Seabed embossing folder.
  5. Glue all your DSP and and Balmy Blue embossed panels.
  6. Attach whale with dimensionals.
  7. Embellish with the Whale of time Sequins. 


Happy Stampin Everyone!
 

Peaceful Nativity 3D Card


I made this fun Peaceful Nativity 3D Card for a card swap and love how simple and yet fun it is. This is my favorite Christ Centered stamp set from the new Mini Catalog from Stampin' UP! It also pairs well with For Unto Us stamp set. 

It stands up by it self.

You can look through the card and see the images inside. 

You can make this card too using the supplies and steps below! Be sure to shop with me on my online store for all your Stampin' UP! needs.

Supplies
Peaceful Nativity Stamp Set
Nativity Dies
Crumb Cake Ink and Cardstock
Night of Navy Cardstock
Basic Black Cardstock
Whisper White Cardstock
Gold Foil
Oval Dies
Gold Embossing Powder
Versamark

Always Recommended
Paper Snips
Trimmer
Simply Shammy
Die Cutting Machine
Bone Folder
Adhesives
Measurements
Whisper White and Night of Navy: 5 1/2 x 4 1/4 scored @ 1/2 and 1 on both ends

Steps
  1. Cut and score your cardstock.  
  2. Run your Night of Navy through your die cutting machine (The Boss) with the oval die.
  3. Stamp with Versamark your saying underneath the cut out oval on the Night of Navy and heat emboss with the gold powder.
  4. Stamp on Crumb Cake your stable image and run through your Boss. Also cut out the stable image that is embossed as well. Cut out the Mary, Joseph image in Basic Black. Cut out your star using the Gold Foil paper. 
  5. Glue your stamped stable over the cut out oval.
  6. Using tear tape, put tape down on the ends of the Whisper White on the far end of the 1/2 score. Attach the Night of Navy on one side and use your bone folder on your score lines.
  7. Glue in the inside the embossed stable and add your Mary and Joseph cut out with dimensionals (line it up so it will look right through the oval). Then remove the tear tape on the other side and seal it closed. 
  8. Use your bone folder to help with the edges and you have created a 3D Nativity card!
Happy Stampin' Everyone!


Thursday, August 27, 2020

Throwback Thursday- Apron Builder Dies


Who remembers the Apron Builder Dies and the beautiful Elegant Eggplant color? Both are retired and both are featured in today's Throwback card! These dies not only have the apron but the cutest kitchen tools and oven mittens! I've used this set to make team cards for friends, for Stampin' UP! teams, and Mother's Day cards! I hope this throwback takes you down memory lane and that you get your Apron Builder Dies out and create something new with your old today. 


Happy Stampin' Everyone!!!

Wednesday, August 26, 2020

Wednesday's Kit Class- Cute Fruit


Make these cards following the steps and buying the supplies below OR get this kit for FREE when your order by Friday, August 28th, 10 am PT a $35 online order using hostess code 4MDTBTBR or shopping with the link below. 


Get Started by gathering supplies, or shopping at my online store. 

Supplies
Cute Fruit Stamp Set
In Colors DSP
Whisper White Cardstock
Thick Whisper White Cardstock
Just Jade Cardstock & Ink
Bumblee Cardstock & Ink
Misty Moonlight Cardstock & Ink
Magenta Madness Cardstock & Ink
Flower For Every Season Gems
Flowers for Every Season Ribbon Combo Pack
Well Written Dies
Stitched Shapes Dies
Rectangle Stitched Dies
Tasteful Textile 3D Embossing Folder
Tailored Punch

Always Recommended
Paper Snips
Trimmer
Simply Shammy
Die Cutting Machine
Bone Folder
Adhesives

Measurements
Cardbases: 11 x 4 1/4 scored @ 5 1/2
Slimline Cardbase: 8 1/2 x 7 scored @ 3 1/2

Smile Fruit Slices Card


Steps
  1. Cut your Misty Moonlight Cardbase and your Whisper White piece 4 3/4 x 3 1/2.
  2. Cut strips of Whisper White, Misty Moonlight, Bumblebee, and Magenta Madness by 1 1/4 by 8 1/2.
  3. Use your Tailored Punch with your strips by lining them up in the center and punch. See video for demo. 
  4. Run your In Color shapes through your Die Cutting machine using the Tasteful Textile 3D folder.
  5. Stamp 2 Whisper White Hexagon using the Bumblebee for the circle and the Magenta Madness for the center, stamping off to create different shades.
  6. Stamp 3 with just the Bumblebee (use stamping off again for different shades).
  7. Stamp 2 Just Jade Kiwi fruits onto the Whisper White Hexagons. 
  8. Stamp Smile and a smiley face in Misty Moonlight on a Whisper White Hexagon. 
  9. Then line up and glue on hexagons using liquid glue for most but pop up any 3 using demensionals.
  10. Glue down gems and you are done!
One in Melon Card


Steps
  1. Cut your cardbase out of the Thick Whisper White.
  2. Cut your Whisper White 5 x 3 3/4 and you DSP and cardstock strips into 3 3/4 x 3/4. Glue down strips using your liquid glue onto your Whisper White (watch video for tips).
  3. Run your Whisper White cardstock through your die cutting machine using the medium Circle Stitched Shape. Then stamp "You're one in a melon" on it in Misty Moonlight,
  4. Stamp the watermelon on a scrap of Whisper White and fussy cut it out with your paper snips.
  5. Attach to circle with dimensionals and attach circle with dimensionals. 
  6. Attach it all to card with, you guessed it, dimensionals
  7. Add gems and you are done!


Happy Pineapple People Card


Steps
  1. Cut your Thick Whisper White for your Slimline cardbase.
  2. Cut Whisper White 3 x 8 1/2 and Just Jade 8 1/2 x 3/4.
  3. Stamp your pineapples as happily as you can using the different colors. Pick one Pineapple person to be your focal point and make them upright (mine the Bumblebee one with with bow).
  4. Stamp your greeting and pineapple heads in Just Jade and glue on your Just Jade strips behind your Pineapple people.
  5. Use a Stampin' Write Marker to add the "jazz hands". 
  6. Attach bow with glue dot using the Misty Moonlight twine.
  7. Glue down some gems and attach to the base and you are done!

Banana Thanks a Bunch Card


                                                                                Steps
  1. Cut your cardbase in Thick Whisper White. Then in Whisper White Cut 4 x 5 1/4 and emboss through your machine using the Tasteful Textile embossing folder
  2. Cut your DSP 2 1/4 x 5 1/4. Cut Bumblebee strips 5 1/4 x 3/4.
  3. Run Misty Moonlight through your die cutting machine using the Thanks from the Well Written dies.
  4. Run Whisper White with your Stitched Rectangle dies.
  5. Stamp on you stitched rectangle 2 bananas and the banana tops.
  6. On a scratch paper, stamp one banana and fussy cut it out.
  7. Using a sponge, go around the edges of the banana you cut out and then attach with dimensionals (see video).
  8. Glue everything together and tie a bow with the Misty Moonlight twine (attach with glue dot).


Happy Stampin' Everyone!

Tuesday, August 25, 2020

Tuesday's Tip at Ten: Stampin' Dimensional Edges


When you have used up all of the Stampin' Dimensionals you can either cut them up and use them as pieces or keep them whole and use them to make shaker cards with! Shaker cards work best with a continuous strip of foam adhesive and Stampin' UP! sales foam strips but you could totally make a shaker card with the dimensional outline (the leftovers)! I hope this tips helps you shake it up a little!


Happy Stampin' Everyone!!

Monday, August 24, 2020

Paper Pumpkin August 2020- World's Greatest


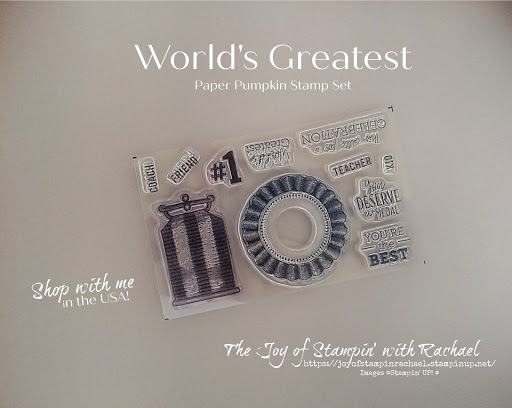
August 2020 Paper Pumpkin, World's Greatest, is soo awesome! I already shared my extra cards I made with just the stamp set after the kit was made (see Manly Monday post). But here are the cards that came with the kit. I got to make 3 of each design (I've already given out 2 of the cards to our Federal Police Officers that guard our housing) and love everything about this kit!


Card #1 Shaker Card

Card #2 Trophy card with option for 4 different name plates

Card #3 Ribbon Medal 

Which is your favorite? I love them all, but especially love the style of stamp the ribbon is, dist-ink-tive. I have one more complete kit of this one that I am selling. Comment below if you want more details for that. :) However, you can get next month's awesome kit too if you subscribe by September 10th. I promise it to be awesome, but if you aren't happy with the kit, you can return any unopened kit and get a refund! How awesome is that!! But who are we kidding, you'll love each kit you get if you are a crazy stamper like me!!
Subscribe with me by clicking here!!

Manly Monday- World's Greatest Paper Pumpkin Stamp Set


Four Manly Monday cards using August 2020 Paper Pumpkin stamp set, World's Greatest! Paper Pumpkin kits tend to not be manly based, so you can guess the joy this stamp set and kit brought when it leaned towards the manly side. So, I used some of the stamps that came in the set but not featured in the kit and love the results! My only problem, I couldn't decide if adding a blue bow made it less manly?? What is your vote? Bow or No Bow?

All 4 cards together! 

With Bow


No Bow

I think I love it more with the bow but honestly, both are great!! You can make these alernative cards too using your August 2020 Paper Pumpkin stamp set and by following my steps below. I do have ONE extra World's Greatest Kit to sell! Leave me a comment if you would like to add this set to your collection.

Supplies
World's Greatest Paper Pumpkin Stamp Set
Stitched Rectangle Dies
Birch Stamp Set
Gray Granite Cardstock
Whisper White Cardstock
Gray Granite Ink
Night of Navy Ink
Gold Foil
1 in cirle Punch
1 3/8 scalloped circle punch (retired) or the Layering Cirlce Dies
Old World Paper 3D Embossing Folder
Stars from Paper Pumpkin Kit

Always Recommended
Paper Snips
Trimmer
Simply Shammy
Die Cutting Machine
Bone Folder
Adhesives

Measurements
Gray Granite Cardbase: 8 1/2 x 5 1/2 scored @ 4 1/4

Steps
  1. Run your cardstock through your Cut an Emboss Machine (The Boss) for the stitched Rectangles.
  2. Run your Night of Navy cutted rectangle again through your Boss but this time with the 3D embossing folder.
  3. Stamp the medal/ribbon in Night of Navy on a scrap of Whisper White and Fussy cut it out.
  4. Stamp in Gray Granite the saying in the right corner of the stitched Whisper White rectangle.
  5. Stamp in Gray Granite, using your stamperatus, the Birch background image directly to the front of your card base.
  6. Punch out your gold foil with scallop punch and punch out your 1 inch circle in Whisper White and stamp #1 on it in Night of Navy.
  7. Glue everything together with liquid glue, dimensionals, and glue dots.
  8. Add Night of Navy ribbon (from the playing with patterns combo pack) if you love it too and then add your gold stars leftover from the kit using glue dots. :)


Happy Stampin' Everyone! 

Friday, August 21, 2020

Fun Fold Friday-Harvest Hellos Diorama Card

 
Today's Fun Fold Friday features this Teacher card that has a Diorama Fold. With school just starting again, I thought this fun card would be great to share! Watch my video at the bottom to see exactly how this card is made!


The secret to this card are the score lines on the side that make it stand up and pop up! 


Here is a fun inside view where you can see the 3D effect of this card. The best part is that it folds flat for shipping!!! You can make this card too by shopping on my online store and following the directions below. 

Supplies
Harvest Hellos Stamp Set
Apple Builder Punch
Layering Circle Dies
Crumb Cake Cardstock
Whisper White Cardstock
Real Red Cardstock
Garden Green Cardstock
Early Espresso Cardstock
Linen Thread
Versamark
Garden Green Ink

Always Recommended
Paper Snips
Trimmer
Simply Shammy
Die Cutting Machine
Bone Folder
Adhesives
Measurements
Whisper White and Crumb Cake: 5 1/2 x 4 1/4 scored @ 1/2 and 1 on both ends

Steps
  1. Cut and score your cardstock.  
  2. Run your Crumb Cake through your die cutting machine (The Boss) with the circle die.
  3. If you want a circle border, run 2 layering circle dies through the Boss to cut both out at the same time. Glue that on the Crumb Cake, lining up the circle.
  4. Stamp the "welcome back" all over the Crumb Cake using the Versamark. Then stamp your apple, stem, and leaf on their matching colors with the Versamark and use the Apple Builder Punch to cut out your stamped images.
  5. Glue your apple together and tie a bow with the linen thread and attach with a glue dot. 
  6. Using tear tape, put tape down on the ends of the Whisper White on the far end of the 1/2 score. Attach the Crumb Cake and use your bone folder on your score lines.
  7. Stamp the "A+ Teacher" saying in Garden Green ink through the Crumb Cake circle onto the Whisper White.
  8. Attach the apple you made with dimensionals and you are done!


Card from video!

Happy Stampin' Everyone!!!

New at SU April Blog Hop- CASE a Team Member

  Welcome to the NEW AT SU! Blog hop! We are a group of Stampin ’ Up! Independent Demonstrators from around the world who are full of creati...