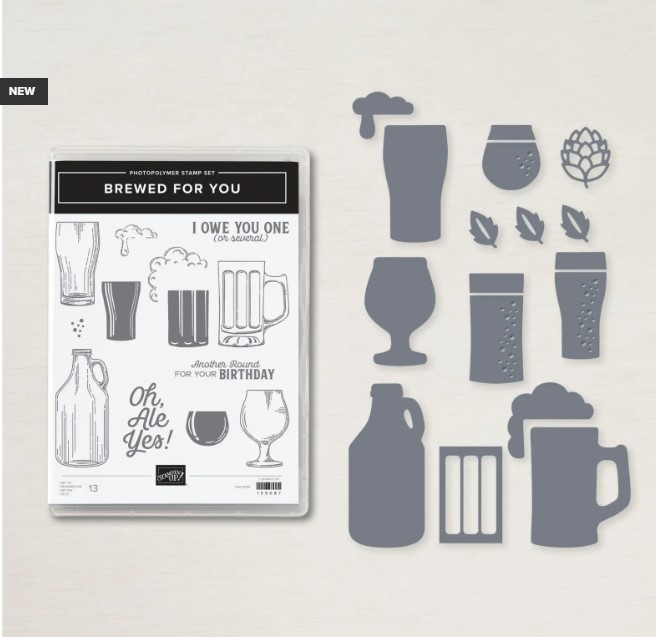
t> The Joy of Stampin' with Rachael: June 2022

Thursday, June 30, 2022

Stamp & Share Crew Tutorial- Brewed For You


Today's Stamp & Share Tutorial uses the Brewed for You Bundle! 
I LOVE this Design Team, because they give great samples with stamp sets I would never get. We do not drink alcohol in my home and so this stamp set does  not appeal to me but WOW what a fabulous cards can be made with it!  


This one is a Fun Fold as well! Above photo is the front and below is what it looks like in the inside!!!
 

I hope you enjoy this bundle and be sure to add it to your list if it your "taste"! I wouldn't want you to miss out just because I don't own it! 

Brewed for You

All images © 1990-2022 Stampin’ Up!®


Supplies:


·       Stamp Sets: Brewed for You (159087); Flowering Tulips (157672)

·       Card Stock and Paper: Starry Sky (CS) (159263); Basic White (CS) (159276); Crumb Cake (CS)(120953); 2022-2024 In Color 6x6 Designer Paper (DSP) 159253

·       Stamp Pads: Memento Tuxedo Black (132708); Versamark (102283)

·       Tools: Brewed Dies (159092); Layering Circle Dies (151770); Stitched Rectangle Dies (151820); Timber 3D Embossing Folder (156406); Heat Tool (129053); Basic Stampin’ Emboss Powders (155554)

·       Miscellaneous: Daffodil Delight Stampin’ Blends (154883); Soft Suede Stampin Blends (154906); Paper Trimmer (152392); Paper Snips Scissors (103579); Stampin’ Dimensionals (104430); Stampin’ Seal (152813); Stampin’ Cut & Emboss Machine (149653); Stampin’ Dimensionals (104430); Stampin’ Mini Dimensionals (144108); Stampin’ Seal Adhesive (152813)

Measurements:

·       Crumb Cake: 4 ¼” x 11”, 8” x 3 ¼”, scrap

·       Starry Sky: scrap

·       Basic White: 3” x 3 ¾”, scrap

·       2022 – 2024 In Color Designer Series Paper: 4” x 2 ½” (2), 3” x 3 ¾”, 4”  x 5 ¼”

Instructions:

1.     Cut a piece of Crumb Cake 4 ¼” x 11 and score at 5 ½” and then from one of the sides cut off 2 ¾”

2.     Cut a piece of Crumb Cake 8” x 3 ¼” and score at 4”

3.     Cut the 2022-2024 In Color DSP 4” x 2 ½” (2); 3” x 3 ¾”; 4” x 5 ¼”

4.     Adhere the 2022-2024 In Color DSP to the card base as shown and to the Crumb Cake insert piece.

5.     Die cut a scalloped circle out of Crumb Cake Card Stock.

6.     Die cut the next size smaller circle out of Starry Night Card Stock.

7.     Die cut the next size smaller circle out of Crumb Cake card stock and then emboss with the Timber 3D Embossing Folder.

8.     Adhere all three circles together. Then adhere to the front center of the insert for the card.

9.     Adhere the insert to the card as shown. It will be centered and the opening will go in the opposite direction of the card opening.

10. Take a large scrap piece of Basic White Card Stock and stamp the beer jug (growler), two mugs, one glass and two beer foams in Versamark and then heat emboss with the Black embossing powder. Die cut all of these out with the Brewed Dies.

11. Color in the jug/growler with the Light Soft Suede Stampin’ Blend and use the Dark Soft Suede Stampin Blend to add depth.

12. Color in the beer mugs and beer glass with dark Daffodil Delight Stampin Blend.

13. Adhere the beer jug/growler first then adhere foam to beer mugs and adhere mugs with dimensionals to pop up.

14. Stamp sentiment in Memento Tuxedo Black in and die cut with stitched rectangles. Adhere to front of card as shown with dimensionals.

15. Cut inside piece out of Basic White 3” x 3 ¾”.

16. Stamp sentiment in Memento Tuxedo Black ink and adhere beer glass with Stampin Seal.


Wednesday, June 29, 2022

Wonderful Wednesday- Paper Pumpkin Pick of the Crop Bonus Card


It is Wonderful Wednesday and the last one for June! If you order today, I will send you the Pebbles Enamel Shapes to help your Wednesday a little more Wonderful!!! Just order with the Hostess Code
ETDCBADQ


Today's Wonderful Wednesday creation comes from the Paper Pumpkin Pick of the Crop kit stamp set! I always like to find ways to use the stamp set once all of the supplies from the kit is gone. If you would like to see what came in the original kit, click here to visit that blog post. 


I found a fun way to make these strawberries with just a little extra fussy cutting. 


For the inside of the card I used the masking technique and my Stampin' Blends to come them in. 


I used the Scalloped Contour Dies to create this layer look and the Gingham embossing folder for some added texture. 


To make the strawberry with 2 colors is quite easy with just a little help of your Paper Snips. Just like a strawberry starts out green/white, so does the base of our strawberry. Then stamped in the Sweet Sorbet is the strawberry center with the stems cut off. Glue them together and you have a pretty sweet two toned strawberry! 

Supplies
Pick of the Crop Stamp Set
Scalloped Contour Dies
Stampin' Cut & Emboss Machine
White Embossing Powder
Heat Tool
Paper- Garden Green, Sweet Sorbet, Basic White
Ink- Veramark, Memento Ink, Sweet Sorbet, Evening Evergreen
Stampin' Blends- Sweet Sorbet, Soft Succulent or Granny Apple Green
Dimensionals

Measurements
Sweet Sorbet Cardbase: 5 1/2 x 8 1/2 scored @ 4 1/4
Garden Green: 5 1/2 x 4 1/4
Basic White: 4 x 5 1/4
5 1/2 x 4 1/4
Scraps of Garden Green and Sweet Sorbet for strawberries

Steps
  1. Measure, score and cut your paper.
  2. Die cut your Scalloped Contour layers. Die cut from the center of the Garden Green the smallest scallop rectangle.
  3. Heat emboss with white onto the smallest scallop rectangle your favorite saying that fits. I used the "Love You a whole bunch". 
  4. Stamp in Evening Evergreen onto the Garden Green scrap and stamp in Sweet Sorbet onto the Sweet Sorbet the strawberry. Fuss cut them both out but remove the stems from the Sweet Sorbet. Do this 3 times. 
  5. Emboss with the Gingham Folder onto the Basic White. 
  6. Glue your layers to the cardbase front. Use dimensionals to attach the label and then add the strawberries to be slightly behind the label. 
  7. For the inside, stamp one strawberry onto a post it note or masking tape and fussy cut it out. Stamp in Memento Ink one strawberry into the corner of the Scallop Rectangle. Cover it with the mask and stamp next it to make the strawberries look like they are over lapping. Color the strawberries with your Stampin' Blends and glue the scalloped rectangle into your card. 

Facebook Live Video

Happy Stampin' Everyone!!!

Paper Pumpkin- Pick of the Crop


Here are the cards that I made using the June Paper Pumpkin Kit, Pick of the Crop. 

You can order the refill of this kit by being a Paper Pumpkin subscriber and clicking here


Each card used lots of already colored die cuts. 


The only stamping on this card is on the tag. 


This card reminds me from a scene in Beauty & the Beast when Belle is in the market. Since a fun design! 


In this kit came one Mini Canvas Shopping Bag BUT as a subscriber you have a chance to order more. This bag fits perfect 3-5 cards and would make a fantastic gift! 

Not a Paper Pumpkin subscriber? You can subscribe today by clicking here. It is just $23.50 a month and you can cancel anytime. Below is a sneak peek to July's Kit. 

Take a "quiz" to learn more details about this kit and as a subscriber have the chance to win one free month! Click on link below! 


Happy Stampin' Everyone!!! 


Tuesday, June 28, 2022

Tuesday's Tip at Ten- Stamping on Canvas


Did you know you can use Stampin' UP! Inks to stamp onto canvas material???
It is quite easy and fun to customize something like a bag. This canvas bag came with the June Paper Pumpkin kit but you can order more as a Paper Pumpkin subscriber by clicking here. 

These cute bags are the perfect size for cards and are great as gifts. What a fun way to personalize something for someone by stamping onto these bags. 

My Tips when stamping on Canvas Bags:
-Avoid the edges
-Don't wash bags, only spot clean
-Use Stazon Ink if you want it to be permeant
-Stamp on a flat and hard surface

I can't wait to see what the bags you get will look like! 
Happy Stampin' Everyone!!!

Monday, June 27, 2022

Miss Monday- Hello Beautiful Thank You Card


Miss Monday with the Hello Beautiful stamp set. I am always in need of Thank You cards. Either it be send to Stampin' Friends or to neighbors! This one is great because it is so simple, yet so full of color. 


I used the SIP method for this card: Stamps, Ink, and Paper! No die cutting. No punching out shapes. Just the basics.  I did slightly embellish with the Black Matte Dots, but even that is simple. 

Supplies
Hello Beautiful Stamp Set
Paper- Night of Navy, Basic White
Ink- Polished Pink, Smoky Slate, Pale Papaya, Coastal Cabana, Fresh Freesia, Daffodil Delight, Granny Apple Green, Night of Navy
Black Matte Dots

Measurements
Basic White Cardbase: 5 1/2 x 8 1/2 scored @ 4 1/4
Night of Navy: 4 1/8 x 5 3/8
Basic White: 4 x 5 1/4

Steps
  1. Measure, score, and cut your paper. 
  2. Stamp with the largest shape first in Polished Pink, and then Night of Navy. Build onto those stamped images. 
  3. Stamp your greeting in the bottom right corner in Night of Navy. 
  4. Glue on the stamped piece onto the Night of Navy matte and then to the cardbase. 
  5. Embellish with Black Matte dots. 

Happy Stampin' Everyone!!!

Friday, June 24, 2022

Fund Fold Friday- Sale-a-bration Sneak Peeks


Ready for a Sneak Peek to 4 Sale-a-bration products that are available to earn from July 1st to August 31st???
Well, I hope you enjoy this Tear Away card that uses Hippest Hippos Stamp Set, Hippo Dies, Rings of Love DSP, and Amazing  Phrasing Stamp Set.  


I made 21 of these cards for a swap and just love how adorable that little hippo is! 


This Tear Away method is a great way to show off the DSP without using a lot of it! For some extra color for the inside I added a piece of Petal Pink instead of Basic White. 


Just think of all the friends you could send this card to and make them smile!!

Supplies
*Amazing Phrasing Stamp Set
*Hippest Hippos
*Hippo Dies
*Ring of Love DSP
Ink- Basic Gray, Mint Macaroon
Paper- Smoky Slate, Petal Pink, Night of Navy, Mint Macaroon
Blending Brush
Paper Trimmer
Stampin' Cut & Emboss Machine

*Sale-a-bration item available July 1st with a $50 or $100 order 

Measurements
Mint Macaroon Cardbase: 5 1/2 x 8 1/2 scored @ 4 1/4
Mint Macaroon: 4 x 5 1/4
Night of Navy: 4 1/8 x 5 3/8
Petal Pink: 4 x 5 1/4
DSP: 2 1/2 x 4
Smoky Slate: 2 1/2 x 2 1/2

Steps
  1. Measure, score, and cut your paper. 
  2. Stamp u Basic Gray onto the Smoky Slate the Hippo with Flower and die cut the hippo out. Color the flower with Basic White ink or a Chalk Marker (retired). 
  3. Use a Blending Brush and the Mint ink to color on the bottom right corner and top left corner of the Mint 4 x 5 1/5 cardstock. 
  4. Measure on the 4 inch side with a pencil at the 1 1/2 and 3. These will be your stamping guides and your tear lines.
  5. Stamp "Hey" and "good lookin'" in Mint Macaroon above and below the marks you made. 
  6. Tear the cardstock where you made the marks about 3 inches in and stop (don't go past 4 inches). Be sure to pull up when you tear to create the best torn look. Cut off about an inch form the torn piece and roll to where it ends. 
  7. Glue onto the back of the torn spot the DSP. 
  8. Glue on the Night of Navy matte and attach to the front of the card. 
  9. Glue the Petal Pink to the inside.
  10. Attach the cute hippo with dimensionals to the front near the rolled paper. 

Facebook Live Video


Happy Stampin' Everyone!!!


Thursday, June 23, 2022

Stamp & Share Crew Tutorial- Sweet Candy Cane


Is it too early to be crafting for Christmas??? Never! The secret to a smart stamper is to stamp year round when it comes to Christmas! That way when the busy months of November and December roll around you aren't last minute stamping but can really enjoy the time with your family and send out LOTS of Christmas Cards! 

This fun stamp set will be available on July 1st in the Mini Catalog OR you can order it now as a Stampin' UP! Demonstrator (extra perk is early ordering)!!!

Sweet Candy Canes

All images © 1990-2022 Stampin’ Up!®


Supplies:

·       Stamp Sets: Sweet Candy Canes (159560);

·       Card Stock and Paper:  Basic White (159276), Sweetest Christmas 12” x 12” Designer Series Paper (159559), 2022-2024 In Color 6” x 6” Designer Series Paper (159253)

·       Stamp Pads: Tuxedo Black Memento (132708); Sweet Sorbet (159216)

·       Tools: Candy Cane Dies (159569);

·       Miscellaneous: Sweet Sorbet Stampin Blends Combo (159224); White ¼” Crinkled Seam Binding Ribbon (151236); Stampin’ Dimensionals (104430); Stampin’ Seal Adhesive (152813)


Measurements:


·       Basic White Card Stock: Card Base: 8 ½” x 5 ½”, scored and folded at 4 ¼”, 4” x 4” for die cut, ½” x 4 ¼” for sentiment

·       Sweetest Christmas Designer Series Paper   5 1/4” x 4”, 4 x 3 ¼””

·       2022-2024 In Color Designer Series Paper (Parakeet Party) 3 ¾” x 3”

·       White ¼” Crinkled Seam Binding Ribbon:  12”


Instructions:


1.     Adhere 5 ¼” x 4” Sweetest Christmas Designer Series to card base.

2.     Adhere 4” x 3 ¼” Sweetest Christmas Designer Series paper slightly angled as shown.

3.     Adhere Parakeet Party In Color Designer Series Paper.

4.     Stamp the candy canes with Sweet Sorbet Stamp Pad.

5.     Die Cut the candy canes and adhere on top of the Parakeet Party DSP using Stampin Dimensionals.

6.     Using the Dark Sweet Sorbet Stampin Blends color the Crinkled Seam Binding Ribbon to make stripes on the diagonal.

7.     Adhere ribbon to candy canes.

8.     Stamp the sentiment and adhere to card.


Wednesday, June 22, 2022

Wonderful Wednesday- Last Chance Sale


It is Wonderful Wednesday! Order from me today and I'll send you the Pebbles Enamel Shapes as your Wonderful Wednesday Gift! 

Visit my website to order

Today I am sharing something WONDERFUL...The Last Chance Sale! 
I am always super sad to see my favorite stamp sets and dies retire, but I do LOVE a great Sale and this one is one of the greatest! 


Watch my video to see some of my favorite stamp sets and dies that will be retiring June 30th! You don't want to miss this Sale! It is all while supplies last and so much is already gone! I only show some of the retiring items, be sure to visit my HERE to see it all. 

Facebook Live Video


Happy Stampin' Everyone!!!


Tuesday, June 21, 2022

Tuesday's Tip at Ten: How to Make Your Own Ombre Paper


You can make your own Ombre Paper with ease with 3 Stampin' UP! Products:

Cardstock
Ink
Blending Brush

Use the same color of cardstock with the same color of ink and pick a side off the paper that you want to create the Ombre look. Ink up your blending brush and blend from the bottom up (making the bottom the darkest). It is such a subtle but really nice look and doesn't take much effort. 

Happy Stampin' Everyone!!!

Monday, June 20, 2022

Miss Monday- Creativity Now Splendid Thoughts Projects


On Saturday, June 18th, Stampin' UP! held an Demonstrator Online Event where we got to order early and stamp with a set that is coming out in the Mini Holiday Catalog in July! We used a Product Suite called Splendid Day that includes the Splendid Thoughts Stamp Set, Splendid Stems Dies, Soft Seafoam Ribbon, Open Leaf Trinkets and the AMAZING Splendid Day Specialty Foil Designer Series Paper. 

Look through these cards I made but designed by Stampin' UP! to get just a taste of this Suite that is soon to come! I'll tell you what I like most about each card/project. I would LOVE to hear which is your favorite in my comments section below. 


This one I loved how we made a watercolor look with the Stampin' Blends for the background. 


This card really featured showing of the DSP's Foil side and how simple it is to create a background look with the single lined images. 


This card was all about the dies! It shows how you can stamp and then die cut out the image or just die cut out the leaf outlines. Both are just stunning and don't you love that brick embossed background???


This card was fun and included some heat embossing and used the "scraps" from the card above with the "let's celebrate". 


We also made a bag with the DSP that could hold the cards we made (super cute idea)! 


Since I was stamping LIVE with the event I had an oops moment, but LOVE how the bag turned out with showing off both sides of the DSP!!!


This foil paper is just amazing and it comes in different SU colors that it has never came in before (Soft Seafoam, Fresh Freesia, Pool Party, Calypso Coral)!!!

I sure loved this Demonstrator event and hope you loved this sneak peek too! 
(Ask me how you can become a Demonstrator too this month)

Happy Stampin' Everyone!!!


Friday, June 17, 2022

Fun Fold Friday- He's All That Father's Day Card


Fun Fold Friday with the He's All That Stamp Set and Dies! 
This fold is called a Miara card and I was inspired by Vy Tran's video on Pinterest. I just change it up by leaving out some extra DSP panels and using different sayings on the belly band. 


What makes this card so much fun is all of the score lines that create a fun twist when opening. Mind you, these score lines can be tricky to fold just right. Watch my video to get some bonus tricks. 


The secret number for this card is 1 7/8 (almost 2 inches). That is where you mark on the score line with a pencil and score to the corner or to the next score line. It is also the measurement on the DSP to cut off at an angle. 


My boys are going on a major 3 day campout with my husband this Summer and so this card is perfect for him. But there are lot of DSP combos you can make for this Fun Fold using the He's The Man paper. 

Supplies
He's All That Stamp Set
All That Dies
He's The Man Designer Series Paper (DSP)
Paper- Early Espresso, Soft Succulent, Basic White, Sahara Sand
Ink- Early Espresso
Adhesive- Dimensionals, Multipurpose Liquid Glue
Stampin' Cut & Emboss Machine
Paper Trimmer
Bone Folder
**Patience

Measurements
Early Espresso Cardbase: 10 1/2 x 5 1/2 scored @ 3 1/2 & 7
Soft Succulent Belly Band: 8 1/2 x 1 scored @ 2 & 5 3/4
DSP (2): 3 1/4 x 5 1/4
Basic White: 3 1/4 x 5 1/4
Sahara Sand: 3 x 3 (die cut)

Steps
  1. Measure, score, and cut your paper. 
  2. For your cardbase you will need to score from the 3 1/2 score line by marking it at the TOP at the 1 7/8 spot. Use your paper trimmer or scoring tool to score from that mark to the corner and to the other score line corner. Do the same thing on the BOTTOM of the 7 inch score line. Watch the video to see how to fold along the score lines. 
  3. For the DSP and Basic White you will need to make some extra cuts. Measure on the front DSP on the top right 1 7/8 down and cut it at an angle to the corner. Do the same thing with the inside DSP just mark on the bottom left side of the DSP. For the Basic White, you need to mark on both sides. Top left and bottom right. 
  4. Die cut in Sahara Sand the shape you want to fit the saying you are using. 
  5. Stamp in Early Espresso your saying onto the die cut paper. Stamp onto the Basic White as well. 
  6. Glue on the DSP and Basic White to the inside of the card. 
  7. Attach the belly band by using dimensionals to attach the label saying (see video). 


Facebook Live Video


Happy Stampin' Everyone!!!


Tuesday's Tip at Ten- Cleaning Your Stampin' Cut & Emboss Machine

  Stampin' UP! has wonderful Products and one of my most loved and used item is my Stampin' Cut & Emboss Machine. This is what I...