t> The Joy of Stampin' with Rachael: December 2020

Thursday, December 31, 2020

Throwback Thursday- Hey Love


I still can't get over how cute this little skunk is! This card was made by my friend and team member, Stefanie Wilcox, a couple of years ago. At the time I had a love/hate relationship with skunks because my dog had been sprayed twice and underneath my Ohio home was sprayed (which made the whole house stink). But I love this little stinker! This "Hey Love' stamp set is a keeper for me and if you have this stamp set still can create this fun, simple card too! 


Happy Stampin' Everyone!!!


Tuesday, December 29, 2020

Tuesday's Tip at Ten- Use different colors for the inside of your cards


Tuesday's Tip at Ten! When you use a black card base, switch it up and add a color piece for the inside of the card. Just be sure to keep it light enough to write on. :) 

** This card features NEW items coming out in the Sale-a-bration flyer and is available on January 5th. 

Happy Stampin' Everyone!!!


Monday, December 28, 2020

Manly Monday- Hide Tide


Four Manly Monday with High Tide stamp set. I made a goal for 2020 to make more Manly cards by making Four Manly cards each Monday. I am happy to say that I've made 208 Manly cards for the year 2020! In fact, the first one I did I also used the High Tide stamp set (scroll down to see that one). I love how these cards turned out and have directions below so you can make them too. 
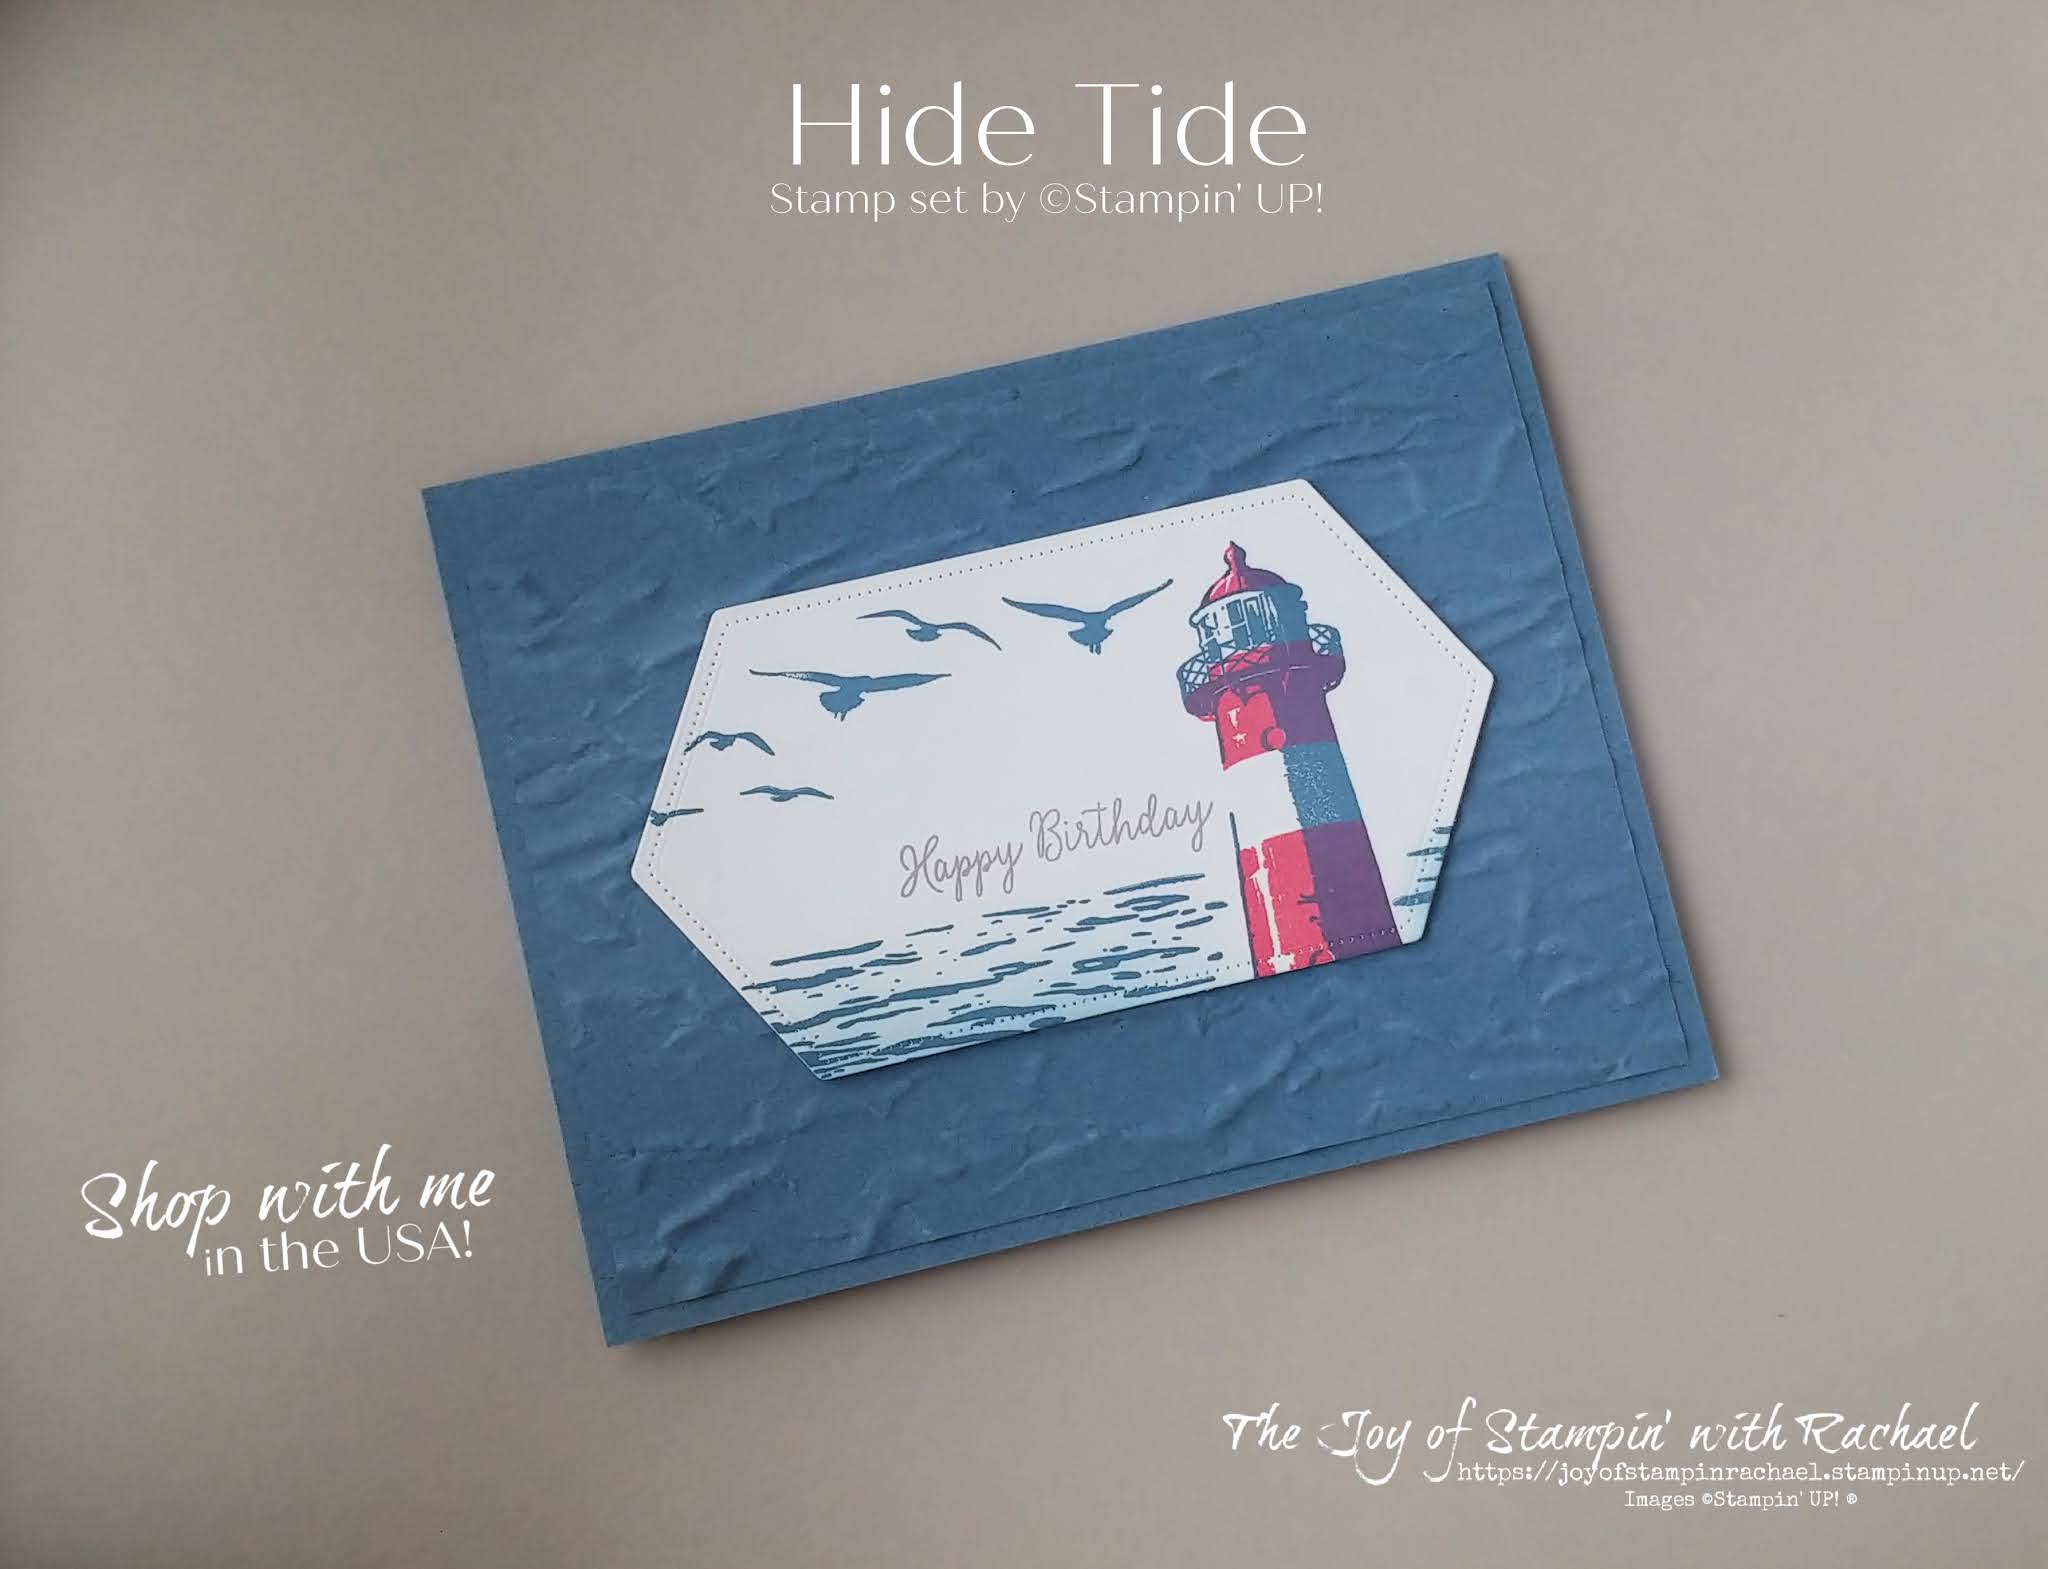
Hide Tide Stamp Set

This is my last Four Manly Monday post. I have reached my goal and have increased my supply of masculine cards. However, I have found out that I don't have a lot of "girlie" cards. So for 2021 I am doing a Miss Monday. Where each Monday I make 2 Birthday cards that are super girly! Miss Monday could be for any age and I am excited to make all sorts of cards! 

I used Misty Moonlight, Real Red, and Sahara Sand.


I even stamped the inside with the cute birds and little sand pile. 

You can see the inside of the card peek-a-booing right there.

Here is a sneak peek to a new Stampin' UP! tool. A blending brush!!! It is so soft and blends so well. I used it to make the ocean blue. My 10 year old loved it and said, "You can use it for makeup!" It is that soft and can washed out and used again, and again! 


Here is my last Four Manly Monday cards above and my 1st Manly Monday cards below! I love seeing how far I've come (photo taking and even stamping skills).  Which do you like better?


You can make this High Tide too! 

Supplies
High Tide Stamp Set
Nested Label Stitched Dies
Old World Embossing Folder
Misty Moonlight Ink and CS
Whisper White CS
Real Red Ink
Sahara Sand Ink
Blending Brush
A Special Someone Stamp set (for Happy Birthday)

Always Recommended
Paper Snips
Trimmer
Simply Shammy
Die Cutting Machine
Bone Folder
Adhesives

Measurements
Misty Moonlight Cardbase: 5 1/2 x 8 1/2 scored @ 4 1/4
Misty Moonlight: 4 x 5 1/4

Steps
  1. Measure, score and cut your paper. 
  2. Die cut in Whisper White a Nested Label
  3. Stamp on the label in Misty Moonlight, Real Red, and Sahara Sand. 
  4. Use the blending brush and blend over the stamped ocean on the bottom. 
  5. Emboss your 4 x 5 1/4 Misty Moonlight paper with the Old World Embossing folder and glue to your card base.
  6. Attach the High Tide label with dimensionals and you are done! 


Happy Stampin' Everyone!!!


Saturday, December 26, 2020

Fun Fold Friday-Hippo Happiness Card


I hope Hippos make you smile like them make me! I really enjoyed making this Hippo Happiness Fun Fold Card! 


This Fun Fold sure is unusual but that is what makes it fun! The "cardbase" isn't what you expect! Be sure to watch to video to see how I put this card together! 

Supplies
Hippo Happiness Stamp Set
In Color DSP
Stitched Rectangle Dies
Pretty Peacock CS
Whisper White CS
Gray Granite Ink
Pretty Peacock Ink
Memento Ink

Always Recommended
Paper Snips
Trimmer
Simply Shammy
Die Cutting Machine
Bone Folder
Adhesives

Measurements
2 Pretty Peacock: 4 1/4 x 5 1/2
Whisper White: 4 x 10 1/2 scored @ 5 1/4 & 2 5/8 (picture measurement is wrong)
DSP: 4 x 5 1/4

Steps
  1. Measure, score, and cut your paper. 
  2. Die cut your stitched rectangles.
  3. Stamp your Hippo on Whisper White and Die cut out. 
  4. Stamp you Hippo Birthday on the small stitched rectangle. 
  5. Glue your card front pieces together and use dimensionals to pop up your hippo and label. 
  6. Glue your Whisper White to the other card front and watch video to see how to attach to the card front with the images. 
  7. Be sure to use your bone folder to help with the score lines 


Facebook Live Video


Happy Stampin' Everyone!!!

Thursday, December 24, 2020

Throwback Thursday-Nailed It


I love this stamp set! Throwback Thursday with one of my favorite cards and favorite Masculine stamp sets! This stamp set is the "Nailed It" stamp set from Stampin' UP! Stampin' UP! has a shortage on Manly stamp sets and so when they come out with a great one, keep it!!! Do you have this set? If so, give this layout a try!


Happy Stampin' Everyone!!!


Wednesday, December 23, 2020

Wednesday's Kit Class- Winter Thank You Cards


Wednesday's Kit Class is all about making Thank You cards for Christmas! Learn how to make this simple card using some of your favorite Winter paper. Order from me using the hostess code or the link below $35 worth by Friday and I'll send you a paper kit to make 4 cards. You'll just need ink, adhesive, and your favorite stamp set. Below are some suggested items you could order to help you finish the kit and get to the $35 order total. 


Suggest Items to Order
Beautiful Autumn Stamp set $17

Snowflake Splendor DSP $9.20

Blue Adhesive Backed Gems $8


Supplies
Beautiful Autumn Stamp set
Snowflake Splendor DSP
Blue Backed Adhesive Gems
Whisper White CS
Pool Party CS
Misty Moonlight Ink
Tasteful Labels Dies

Always Recommended
Paper Snips
Trimmer
Simply Shammy
Die Cutting Machine
Bone Folder
Adhesives

Measurements
Whisper White Cardbase: 8 1/2 x 5 1/2 scored @ 4 1/4
DSP: 4 x 1 1/4

Steps
  1. Measure, score, and cut your paper. 
  2. Die cut your label in Pool Party and stamp the thank you in Misty Moonlight ink. 
  3. Glue 4 strips of your DSP at a slant on your cardbase and add the label with dimensionals
  4. Embellish with the blue backed gems.  

Facebook Live Video


Happy Stampin' Everyone!!!


Tuesday, December 22, 2020

Tuesday's Tip at Ten- Score First, Then Cut

 Tuesday's Tip at Ten- Score First, Then Cut
When you want to make 2 cards from one piece of 8 1/2 x 11 cardstock, SCORE first! This is one of my favorite tips that I used daily because I am never making just one card! It is great when I am making swaps, team cards, and mass producing for Christmas cards! Depending which way you want your card to open with will determine which number you score and which you cut. Your magic numbers that card makers have memorized is 4 1/4 and 5 1/2. Score at 4 1/4 and cut at 5 1/2 OR score at 5 1/2 and cut at 4 1/4! This is such a simple step, but really "cuts" down on time! #TuesdaysTipatTen


Monday, December 21, 2020

Manly Monday- Stitched Stars


Four Manly Monday cards with the Stitched Stars dies by ©Stampin' UP! I love how these cards turned out! I used the Color Family Brights and attached the stars 2 different ways. I used the Zany Zebras stamp set for my "Happy Birthday" but any Happy Birthday would work as long as it fits in the space. 

Click here to order these Stitched Star Dies

All Four Together

Can you tell the difference in these stars? The one on the left are popping up with dimensionals and the one on the right is sunken in while the Whisper White is being popped up! I LOVE the look of both! 

Whisper White popped up. 

Stars are popping except for the little ones. I just glued those ones down. 

Which method do you like best? Stars in or stars out? 

Stars Popped Out 


Stars Sunken in

Stars Sunken in

Stars Popped Out 

These cards are really easy to make and the best part is that they use mostly just scraps of paper for the stars. You can make these too by shopping at my online store and following my steps below. 

Supplies
Stitched Stars Dies
Zany Zebras
Thick Whisper White
Pacific Point Ink
Brights Family Scraps: Poppy Parade, Melon Mambo, Flirty Flamingo, Mango Melody, Daffodil Delight, Granny Apple Green, Costal Cabana, Bermuda Bay, Pacific Point

Measurements
Thick Whisper White Cardbase: 4 1/4 x 11 scored at 5 1/2
Thick Whisper White: 4 x 5 1/4


Steps
  1. Measure, score, and cut your paper.
  2. Using your Stampin' Cut and Emboss Machine, die cut the stitched stars. Start from the bottom with the medium star. Cut out 1 large, 2 medium, 2 small, and 3 tiny stars. Set aside this Whisper White stars and use them for another project. 
  3. Stamp your Birthday saying on the bottom of the right corner. 
  4. Pop Out Stars- use Tombow and glue down the Whisper White 4 x 5 1/4 piece with all the cut out stars to the card base. Use dimenionals to pop up the large, medium, and small stars. Glue down the tiny stars. 
  5. Sunken In Stars- add dimensionals to the back of the 4 x 5 1/4 Whisper White with the cut out stars. Place glue on the cardbase through the missing star spots and add your stars. 
  6. Use a bone folder and crease all of your cards! :) 


Happy Stampin' Everyone!!!


Friday, December 18, 2020

Fun Fold Friday- Triple Banner Gate Fold


Fun Fold Friday with a Triple Banner Gate Card using the Pattern Play stamp set and matching Designer Series Paper (DSP)! I love the soft colors in this card and this color combo is so sweet that I think it would make for a great Baby Shower card even. 


It is however, hard to keep closed all by it self. 


Here are some quick measurements but to make this card yourself go ahead and order the supplies below and follow my steps. 

Supplies
Pattern Play Stamp Set
Playing with Patterns 6 x 6 DSP
Purple Posy Cardstock
Playing with Patterns Ribbon Combo Pack
Rhinestones
Banner Triple Punch
Banners Pick a Punch
Highland Heather Ink


Measurements
Purple Posy Cardbase: 8 1/2 x 5 1/2 scored @ 2 1/8 on each end of the "long" side
DSP: 2 x 5 3/8
3 Banner: 1 1/2 x 3
3 DSP 1 x 2 1/4

Steps
  1. Measure, score and cut your paper. 
  2. Stamp on a scrap of Purple Posy in Highland Heather ink "Cue the Confetti" and fussy cut it out and put dimensionals on the back of it. 
  3. Use the Triple Banner Punch on the Purple Posy banners and use the Banners Pick a Punch for the DSP banners. Glue them together.
  4. Glue your DSP to the front of the cardbase.
  5. Glue your banners with the top and bottom first on the left side. Then center the middle one on the right gate. Attach the saying to the right side banner.
  6. Use the Purple Posy ribbon from the combo pack to tie a bow around the left gate. 
  7. Embellish with a rhinestone. 

Facebook Live Video


Happy Stampin' Everyone!!!

Thursday, December 17, 2020

Throwback Thursday- Coffee Café Snowman Card


Throwback Thursday with Coffee Café stamp set by Stampin' UP! I love using stamp sets in different ways then it was intended. Take this coffee cup for example. I was able to use the coffee beans for eyes, the hearts for buttons, and the straw for a carrot nose to make this cute snowman! This stamp set is no longer available (it is retired) but even though I don't drink coffee I'll keep this set because there are so many things I could create with it. If you have it too, give this snowman coffee cup a try!


Happy Stampin' Everyone!!!


Wednesday, December 16, 2020

Wednesday's Kit Class- Pattern Play Easy Shaker Card


Ready to shake up the New Year with a Easy Shaker Card? Make and send out New Year's cards or this would make a GREAT Graduation card as well. Take out the numbers and you could use this card to celebrate just about anything! The best thing about this shaker card is that it is EASY! And because it is part of my Wednesday's Kit class you can get all the supplies (minus the stamp set) to make 4 of these cards for FREE when you order $35 worth by Friday the 18th of December. Just click on the link below to get shopping! Be sure to scroll down for the video!

Here are some suggested items to help you reach the $35 order

Patterned Play Bundle $45

or

Patterned Play Stamp Set $16

Playing with Patterns DSP $11.50

Clear Envelopes $6

Flowers For Every Season Gems $6.50


Shaker cards are known for being a little tricky and have lots of steps. Well the Amazing Demonstrator named Rosemarie Gonzalez (also from California) taught us at Onstage how to make this easy shaker card by using Stampin' UP!'s clear envelopes! 


I love everything about this card! It is so playful and bright! But you could make this with any stamp set, confetti/sequins,  and DSP of choice by following my directions below. 

Supplies
Patterned Play Stamp Set 
Playful Alphabet Dies
Layering Circle Dies
Just Jade CS & Ink
Whisper White CS
Playing with Patterns DSP
Flowers for Every Season Gems
Just Jade Ribbon
Clear Envelopes
Tear Tape
Dimensionals
Tombow Glue
*scotch tape
**Stampin' Cut and Emboss Machine

Always Recommended
Paper Snips
Trimmer
Simply Shammy
Die Cutting Machine
Bone Folder
Adhesives

Measurements
Just Jade Cardbase: 5 1/2 x 8 1/2 scored @ 4 1/4
DSP & Whisper White- 4 x 5 1/4

Steps
  1. Measure, score, and cut your paper. 
  2. Using the Layering Circle, die cut out in Whisper White and Just Jade using the circles that fit the saying size best. 
  3. Stamp on the Whisper White circle the "Cue the Confetti" and the little burst images. Glue to the Just Jade scalloped circle and add dimensionals to the back. Set it aside. 
  4. Stamp on the 4 x 5 1/4 Whisper White and glue to the inside of your cardbase. 
  5. New Year's or Graduation Card- Die cut out the numbers for the year and glue to the bottom of the DSP. 
  6. Put the DSP inside the clear envelope. Fill with the gems and seal it shut. Using scotch tape, tape down the top that is too big to the back side (see video). 
  7. Put tear tape all along the edges of the back of the envelope. Don't remove the backs yet. 
  8. Use Just Jade Ribbon (about 18 inches) and tie around and make a bow. 
  9. Add the Cue the Confetti circle over the ribbon. 
  10. Peel off the tear tape and glue to cardbase and SHAKE!!! 

Facebook LIVE Video


Happy Stampin' Everyone!!!


Christmas Boutique Items-2020


On November 15th I was invited to be part of an Outside vendor event at church parking lot only 2 1/2 miles away from me. I was hesitant to do it because I had not planned on doing an event this year due to the Covid19 restrictions but with only 3 weeks to prepare, I went to work! I am so glad I did this event and was able to sell some of my homemade crafts and meet some local people who may be interested in stamping with me in the future. Below are just some of my creations and hope they inspire you to make some hand stamped Christmas gifts as well! 

I used the Perfectly Plaid stamp set and Pine Tree punch to create this fun mint truffle clear chocolate boxes. 


I made these cute tags using the Warm Hugs stamp set and dies. 

These were favorites and I made a video on how to make these. 


These nail file holders weren't very popular until my online sale but I love them! Perfect stocking stuffers! 


This was a new one for me and was a Santa Kisses Count down! I love that Santa from the Don't Stop Believin' stamp set and the Celebration Label Dies (both retiring). 

Hope you loved seeing some of these and try to make them too!

Happy Stampin' Everyone!!!


November Demo Swap- Christmas Cards

Demo Swap is one of my favorite things. It started over 5 years ago with just a handful of ladies. All of these ladies have a love for card making and love sharing it with others. We "meet" every other month and have a theme or color rules. We swapped in November and I'm just now sharing. Lucky for you they are all Christmas cards! Look through this gallery of cards and click on the link to take you to my online store.  Many are retiring and are on sale right now! Which means they will be gone by January 5th, 2021.

Here are all cards from this swap! Scroll down to see one by one. 
*Photo by Natalie Woll 
***I sent out the Peaceful Nativity card before I took a picture and that one was made by Stefanie Wilcox. This one is retiring but not at a discount. 

By Mandy Whitfield

Mandy did a wonderful job making the words from the set the focal point of the card! This stamp set is retiring and has even more great sayings! 

By Julie Miller

Julie made this amazing card using the great DIES and Tree Angle stamp set. Tree Angle is retiring and is on sale for $13.60. 

By Marjeen Nation
She did a great job making a snow covered scene. This stamp set is retiring along with it's matching dies. 

By Natalie Woll

I love this set that Natalie used and am sooo sad to see it go! However, the dies for this set is all sale at the low price of $22.40

By Susan

Susan used another favorite stamp set of mine, the Don't Stop Believin' will be retiring as well when January rolls around! She even used the dies from the Joy & Peace set for her greeting. 

By Cheryl Holden

She used the Snowman Season stamp set to create her card and luckily it is found on the pages of the annual catalog and will NOT be retiring yet! But that awesome DSP, Snowflake Splendor she used will be! 

By Cindy Hafner

This stamp set and dies are STUNNING and I am happy to say are not retiring but will be carrying over!!! Cindy made this super FUN fold where it slides underneath from the center to make an easel card.  So it is dark when laying down and it is white center when standing up. 


I hope you have enjoyed this Christmas Gallery of cards! 

Happy Stampin' Everyone!!!


Tuesday's Tip at Ten- Cleaning Your Stampin' Cut & Emboss Machine

  Stampin' UP! has wonderful Products and one of my most loved and used item is my Stampin' Cut & Emboss Machine. This is what I...