Today's Fun Fold using the Wonderful World Stamp Set and Designer Series Paper from the Summer Sale-a-bration. You get both of them for FREE when you order $100 worth from my online store!
Here is the inside of the card, which tells the secrets on how this card is made. The stamping I did inside does not have to be included, I just wanted to share how the stamped image looked.
I left this card blank so it can be used for any occasion. I think it would make a lovely thank you card for my monthly shoppers! Everyone who orders from me gets a hand stamped card with some DSP to add to their collection.
Die cut your Stylish Shapes Squares from the Basic White and Orchid Oasis.
Stamp on the 4 x 5 1/4 Basic White the floral image you want.
Fussy cut from the Designer Series Paper (DSP) the flower you want.
Glue the 3 x 5 1/2 Basic White to the cardbase (see video).
Glue the DSP to the front of the cardbase onto the Basic White. Glue the DSP for the inside of the card onto the Basic White and glue that to the cardbase.
Glue squares together and attach to card front with a dimensional in each corner but not the far right one.
Attach the fussy cut flower with dimensionals.
Make a bow and attach with glue dot.
Embellish with Pearls.
Facebook Live
*Video starts at the halfway point, to see full video, visit my Facebook page with this link below.
Demo Swap Cards! These cards were made from a group of Stampin' UP! Independent Demonstrators who are mostly Hobby Demos (demos you order their favorites at a discount but don't sale to others). These stampers are super talented and I hope you enjoy their creations and are inspired!
Each time we swap we have a theme or have to use at least two colors from the list. Here were July's requirements, "Our color challenge is to use at least 2 of the following colors: Orchid Oasis, Parakeet Party, Daffodil Delight, Pool Party and Sweet Sorbet. (We tried to pick some summery colors!) Use anything from the new Annual Catalog."
This card is exactly really simple. No embellishments and just nice layers. But the really cool part is how I made the birds.
In the kit you get a sheets of dies. Using the "negative" of the die cuts I was able to create more birds. This method could work for any shape from the sheet. I even made one with the bottle (see video).
The main importance with this one is the "masking". Covering up spots you don't want to have ink on it. You can make this card too or even make your own masks when you die cut or punch out paper.
·Card Stock and Paper: Shaded Spruce (146981); Mint
Macaron (138337); Basic White (159276); Gingham Cottage Designer Series Paper (159651)
·Stamp Pads: Early Espresso (147114);
Cherry Cobbler (147083); Mint Macaron (147106); Shaded Spruce (147088)
·Tools: Timeworn Type 3D Embossing
Folder (156505); Stylish Shapes Dies
(159183); Paper Trimmer (152392); Bone Folder (102300); Paper Snips
(103579); Take Your Pick Tool (144107)
·Miscellaneous: Festive Pearls 159963); Blender
Pens (102845); Wink of Stella Glitter Brush (141897); Mini Stampin’ Dimensionals
(144108); Stampin’ Seal Adhesive (152813); Stampin’ Cut & Emboss Machine (149653)
Measurements:
·Shaded Spruce: 8½” x 5½” (scored at 4¼”); 3¼” x 4¾”
·Mint Macaron: 1¼” x 3¾”
·Basic White: 3” x 4½”; scrap for sentiment and flower
·DSP: 4” x 5¼”
Instructions:
1.Stamp DSP using Mint Macaron
and apples stamp. Emboss. Adhere card front.
2.Stamp apples and flower
using Early Espresso ink. Allow to dry. Color using Classic Stampin’ Pads and Blender
Pens. Allow to dry. Emboss apples/artwork piece. Adhere to Shaded Spruce.
Adhere to card front using Mini Stampin’ Dimensionals. Fussy cut single flower.
3.Using Basic White and Mint
Macaron, die cut. Stamp sentiment using Shaded Spruce. Adhere to card front
using Mini Stampin’ Dimensionals. Add flower using Mini Stampin’ Dimensionals.
4.Sprinkle Festive Pearls on
card front using Take Your Pick Tool.
5.Add a Wink of Stella Glitter
Brush to apples and flower.
It is Wonderful Wednesday! When you order from me on a Wednesday in July using the Hostess Code CYV9WKTP
I'll send you the Fine Sparkle Gems! Start shopping by clicking here.
For Wonderful Wednesday this week I am sharing with you my Stamp Set of the Month Kit using the Hippest Hippos! You can get this kit for FREE this month when you select the Hippest Hippos Stamp Set for your Sale-a-bration item! See the full stamp set by clicking here.
You'll notice that in this kit I really wanted to show how diverse this stamp set can be. From Summer Fun to Christmas Hippos!
Supplies
*Hippest Hippos
*Hippo Dies
Paper- Basic White, Basic White Thick, Orchid Oasis, Tahitian Tide, Starry Sky, Sweet Sorbet, Parakeet, Party, Petal Pink, Smoky Slate, Real Red, Garden Green, Old Olive, Soft Suede, Balmy Blue, Daffodil Delight, Crumb Cake, Shimmer White
Embellishments- In Color Matte Decorative Dots, Red Rhinestones, Pearl Basic Jewels
Designer Series Paper- *Sale-a-bration Silver & Gold, Hostess Design A Daydream
Dies- Stylish Shapes, Basic Border, Waves, Give It A Whirl, *Tree Lot
Cloud Embossing Folder
Stampin' Blends- Petal Pink, Smoky Slate
Watercolor Pencils
Blender Pen
*Sale-a-bration item, can only get with a $50 or $100 order for FREE
Measurements
Thick Basic White Cardbase: 5 1/2 x 8 1/2 scored @ 4 1/4
Basic White: 4 x 5 1/4
6 x 1/2
Orchid Oasis: 1 x1
Tahitian Tide: 1 x 1
Starry Sky: 1 1/4 x 3/4
Sweet Sorbet: 1 x 1
Parakeet Party: 1 1/4 x 1 1/2
Steps
Measure, score and cut your paper.
Die cut out of the 4 x 5 1/4 Basic White all at once the 5 summer shapes from the Hippo Dies. Save the die cut items to glue on later.
Glue on behind each die cut shape the color of your choice.
Glue on the goggle inside and sunglasses inside.
Attach to cardbase with dimensionals and glue the matching cut out dies to their match.
Stamp on the scrap of Basic White the saying 3 times but each time in a different color. Cut out a line from each stamp saying and glue onto the front of the card in a line or use dimensionals to attach.
Embellish with the In Color Matte Dots.
Measurements
Balmy Blue Cardbase: 5 1/2 x 8 1/2 scored @ 4 1/4
Basic White: 4 1/8 x 5 3/8
1 x 3 1/2
1 x 1
3 1/2 x 3 1/2
Balmy Blue: 4 x 3 1/4
3 1/2 x 3 1/2
scrap
Daffodil Delight: 1 x 1
Smoky Slate: 2 x 3
Steps
Measure, score and cut your paper.
Emboss with the Clouds Embossing Folder the Basic White.
Die cut out the largest Stylish Shapes circle from the Basic White & Balmy Blue.
Die cut the waves out of the top of the 4 x 3 1/4 Balmy Blue and the splash out of a scrap.
Die cut the waves out of the circle Balmy Blue (watch video to see how).
Die cut the Basic White label and stamp in Balmy Blue. Die cut out the life preserver and embellish with the Red Rhinestones.
Die cut the Crumb Cake boat.
Stamp the hippo onto the Smoky Slate and die cut it out.
Assemble: Glue the Balmy Blue wave to the Basic White Cloud and attach to the cardbase. Glue your big wave onto the circle and the smaller wave attach with glue dots at the side (so you can slide in the boat). Attach hippo with dimensional and glue in the boat and life preserver. Attach circle and label with dimensionals. Glue on the Daffodil Delight hearts.
*Optional: Use Blending Brush or sponge to create a sunset look with the Daffodil Delight onto the Basic White clouds and circle.
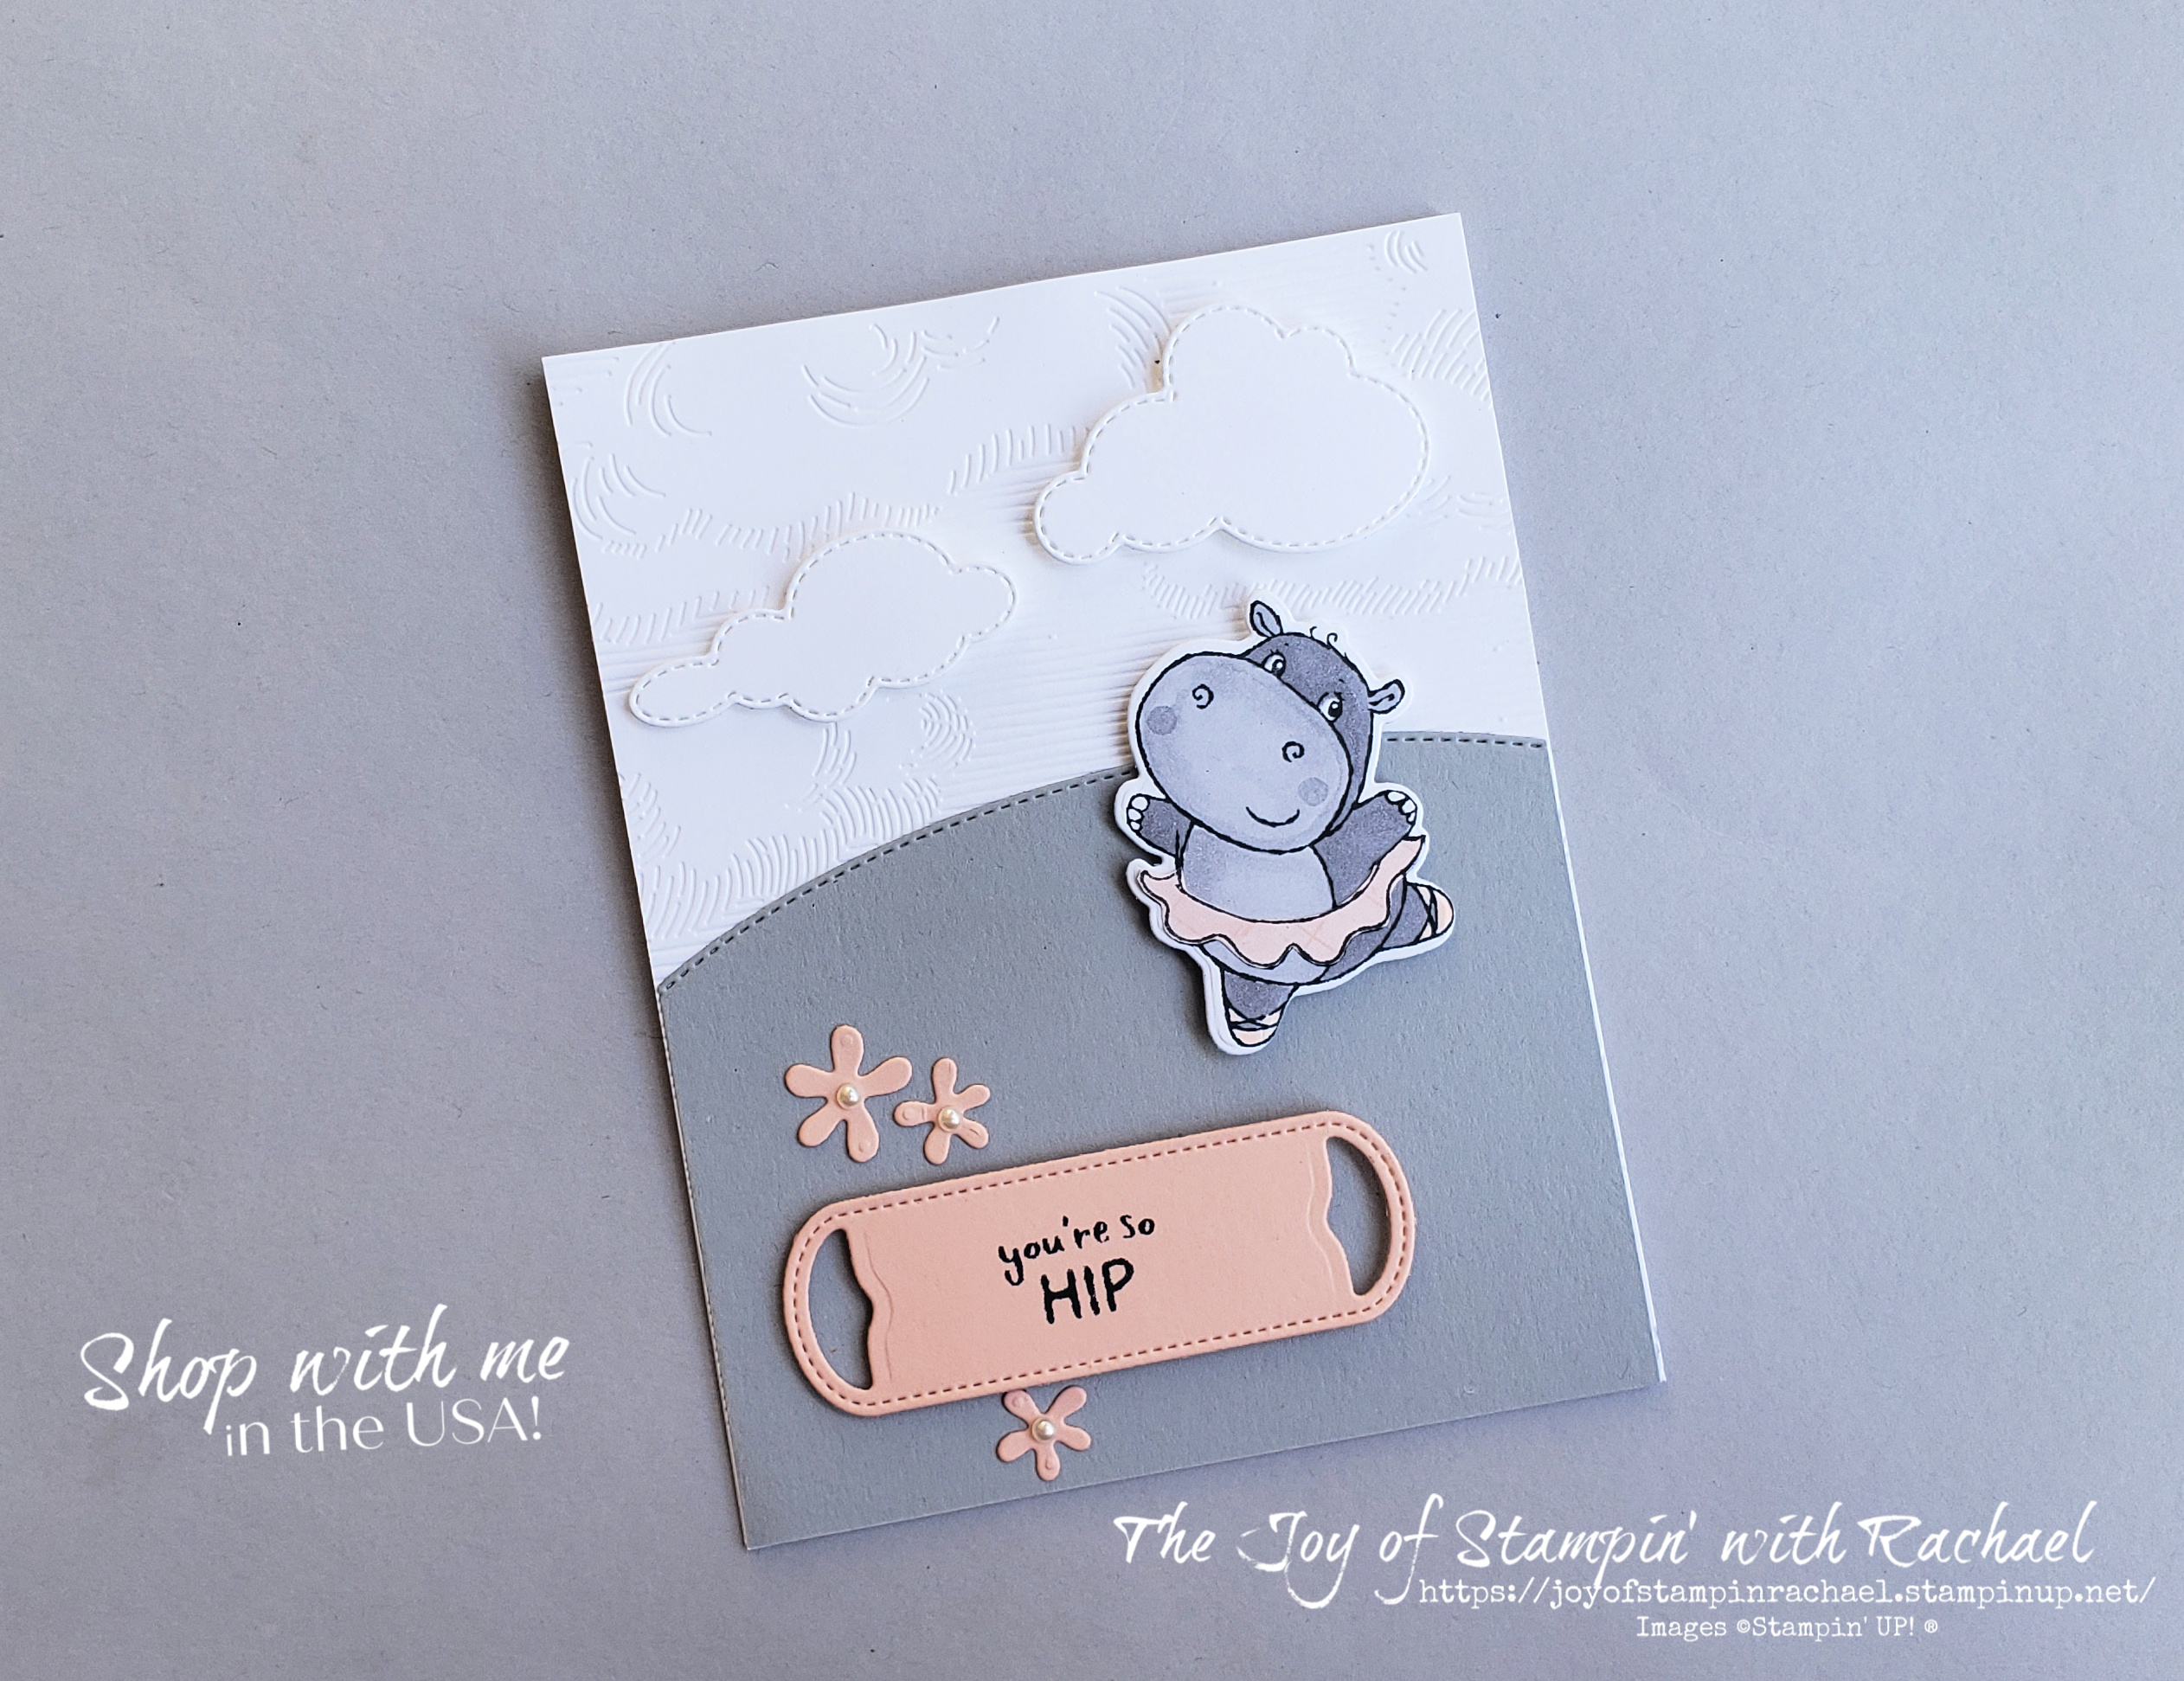
Measurements
Thick Basic White: 4 1/4 x 11 scored @ 5 1/2
Basic White: 4 1/4 x 5 1/2
4 x 4 (die cut hippo and clouds)
Petal Pink: 3 1/2 x 2
DSP: 1 x 2
Smoky Slate: 4 1/4 x 3 1/4
Steps
Measure, score and cut your paper.
Die cut the Basic White Clouds.
Die cut Basic Gray with the Border Dies just on the very top.
Die cut out the Petal Pink label (Wave Dies) and the flowers from the Hippo dies.
Stamp on the Basic White in Memento Ink the hippo and die cut her out. Color her in with your Stampin' Blends.
Stamp the hippo (mostly the skirt) onto the DSP and fussy cut that out (might have to use tweezer to hold the paper). Glue skirt to the hippo.
Emboss the Basic White with the Clouds Embossing Folder and attach to the front of the cardbase.
Assemble: Glue the Smoky Slate hill. Attach the clouds, hippo, and label with dimensionals. Glue the flowers with liquid glue.
Embellish the flowers with the Pearl Jewels.
Measurements
Real Red Cardbase: 5 1/2 x 8 1/2 scored @ 4 1/4
DSP: 4 x 5 1/4
Garden Green: 3 1/4 x 4 1/4 (die cut and matte)
Shimmer White: 3 x 4
Old Olive: 1 1/2 x 3
Soft Suede: 1 x 1
scrap of Real Red
Steps
Measure, score, and cut your paper.
Die cut from the Garden Green matte the tree and the wreath.
Die cut the back of the tree from Old Olive.
Die cut the Soft Suede for the tree stand.
Die cut out the Real Red bow.
Stamp in Stazon Ink onto the Shimmer White the hippo. Use your Watercolor Pencils and Blender Pen to color him in.
Glue the DSP onto the cardbase front.
Glue the tree together with the stand next to the hippo. Glue on the Wreath.
Attach to the Garden Green matte and attach with dimensionals.
This card I made for the Queen's July Swaps and so I always try to mass produce in batches. I stamped all the die cut images onto one sheet all at the same time and then die cut them out all at the same time. It helps it go faster when making lots of cards.
This sending hugs card would be great for someone who is sick or to send to someone who has a loved one that has passed away.
You can make this card too when you shop from my online store and follow the steps below.
Supplies
Splendid Thoughts Bundle (dies and stamp save to save 10%)
Stamp in Evening Evergreen onto the Basic White
the 2 leaf images. Stamp inside them with Pool Party and Soft Sea Foam. They
are not supposed to line up, so don’t worry about it being perfect.
2.Die cut out your stamped images.
3.Die cut the Pool Party and Soft Sea Foam leaf
outs.
4.Die cut the DSP with the Deckled Rectangle
Dies.
5. Die cut your Crumb Cake half circle and stamp in
Evening Evergreen onto it. Wrap linen thread around the top of the half circle
and tie a knot. Fray the ends.
6.Assemble onto the card base with using liquid glue to attach the DSP . Use multipurpose liquid glue to attach
the outline dies. Use dimensionals to attach the stamped images and the Crumb
Cake half circle.
7.Embellish with the Pearl onto the Crumb Cake
pot.
Fun Fold Friday with this super cute Camper Card using the Tree Lot Dies from Sale-a-bration!
Get these dies for FREE with you place $100 order in July or August or while supplies last!
There are a lot of fun extras with these dies. From trees, to puppies, to decorating the camper to stringing lights! The ideas are endless when it comes to creating with it!
This Fun Fold looks tricky but is easier than it looks. Be sure to watch my video below to see how it all comes together. This Fun Fold was inspired by a swap I recently received. Visit my blog to see that card here.
These dies pair so well with the He's The Man Designer Series Paper found in the Annual Catalog!
Mint Macaroon Cardbase: 5 1/2 x 8 1/2 scored @ 4 1/4
Mint Macaroon: 5 1/4 x 6 scored @ 2 & 4
2- 4 x 1/2 scored @ 2
DSP: 5 1/4 x 2
Basic White: 3 x 3
scraps of Mint & Espresso to die cut camper
Steps
Measure, score, and cut your paper.
Die cut all the pieces for the camper and glue together. See video for tire trick.
Die cut with the Stylish Shapes the Basic White square. Die cut in Early Espresso the square frame.
Glue to DSP to the front of the cardbase and die cut out the medium square from the top center.
Stamp in Early Espresso the greetings you want for the inside on one side and on the other side attach the Mint scored scraps at the bottom and the top of the back of the 5 1/4 x 6 piece.
Use tear tape to glue those scored pieces to the top and bottom of the back of the card front (see video).
Fold the inside piece and add glue to the back of the other side. Close the card onto it attach it.
Glue Basic White square through the front of the card with adhesive only on the right half. Glue the camper to the square.
Glue on the Early Espresso frame around the open square.
Embellish with 3 Rustic Metallic Dots to the front of the card.
Today's share is a fun Summer Camper using the Sale-a-bration's Tree Lot Dies! Those dies are for FREE with an $100 online order! Shop with me by clicking here.
·Stamp Sets: Trees for Sale (159785); Rays of Light
(158925); Very Best Occasions (159871)
·Card Stock and Paper: Thick Basic White (159229);
Bermuda Bay (131197); Parakeet Party (159259)
·Stamp Pads: Mango Melody (147093);
Granny Apple Green (147095); Tuxedo Black Memento Ink (132708)
·Tools: Stampin’ Cut & Emboss
Machine (149653); Paper Trimmer (152392)’ Stylish Shapes Dies (159183); Tree
Lot Dies (159938)
·Miscellaneous: Stampin’ Blends Combo Packs
Pool Party (154894) and Basic Black (154843); Stampin’ Dimensionals (104430);
Stampin’ Seal Adhesive (152813); Multipurpose Glue ( 110755)
Measurements:
·Thick Basic White: 8 1/2” x 5 1/2” and scraps for circle & trailer
pieces.
·Bermuda Bay: scraps for trailer.
·Parakeet Party: scraps for trees.
Instructions:
1.Cut largest circle using the
the Stylish Shapes Dies and stamp the Rays of Light background on it with Mango
Melody ink.
2.Stamp trees on sides of card
so they will peek through the sun using Granny Apple Green ink.
3.Attach stamped circle to
card base with Stampin’ Dimensionals, over the trees.
4.Cut a small and medium tree
using the Tree Lot Dies. Cut the coordinating detailed dies for the small and
medium trees.Attach to each other with
Multipurpose Glue and then to the card base on both sides of the stamped
circle, using Stampin’ Dimensionals.
5.Cut trailer from Bermuda Bay
Cardstock.Color the tire and hitch with
Basic Black Stampin’ Blends.
6.Cut windows from Thick Basic
White cardstock and color using the Pool Party Stampin’ Blends.Slip into open spaces on Bermuda Bay trailer
and hold in place with Stampin’ Dimensionals on the back.
7.Cut top and bottom details
of trailer from Thick Basic White cardstock and attach to trailer using
Multipurpose Glue.Attach to stamped
circle using Stampin’ Dimensionals.


.jpg)


.jpg)