Miss Monday cards with Catching Butterflies Sale-a-bration stamp set! I am making these for my Team Cards for February and am making each one custom to them by changing her hair color.
The card it self is very simple.
I colored the butterflies, net, hair and skin with Stampin' Blends.
I used the Daffodil Afternoon to stamp the girls dress onto and fussy cut it out.
For the dress I did it in two different ways. One I used Pale Papaya Ink and Black Memento Ink for the other. I can't decide which one I like more.
I also used the blending brushes for the background and embellished with the Brushed Brass Butterflies.
You can get this stamp set for FREE with a $50 order during Sale-a-bration.
Supplies
Catching Butteflies Sale-a-bration Stamp Set
Stitched with Whismy Dies
Blending Brushes
Daffodil Afternoon Sale-a-bration DSP
Ink- Memento Black Ink, Granny Apple Green, Pool Party, Pale Papaya
Stampin' Blends- Ivory, Blonze, Pale Papaya, Pool Party, Balmy Blue, Mango Melody, Bermuda Bay
Brushed Bass Butteflies
Always Recommended
Paper Snips
Trimmer
Simply Shammy
Die Cutting Machine
Bone Folder
Adhesives
Measurements
Pale Papaya Cardbase: 5 1/2 x 8 1/2 scored @ 4 1/4
Basic White: 4 x 5 1/4
Steps
Measure, score and cut your paper.
Die cut onto the Basic White a Stitched with Whimsy outline.
Stamp in Memento Ink the girl with the net and butterflies.
Stamp in Granny Apple Green the saying on the bottom left corner and a little grass patch on the girls foot.
Stamp in Memento Ink or Pale Papaya onto the DSP and fussy cut only the dress out. Glue that dress to the stamped image.
Color with the blends the hair, skin, butterflies, and net.
Use the blending brushes to create a sky (Pool Party) and grass (Granny Apple Green).
Glue to the cardbase and embellish with Brushed Brass Butterflies.
I am so excited to share with you these four cards! These were made for my Royals Team Kit and for my Spotlight Stamp Set for January! If you are on my team you can order this kit from me for just $10. If you are a Stampin' Friend and order the Nuts & Bolts stamp set in January, I'll send you this card kit for FREE!!!
Just use this link below with the Hostess Code to shop
Stampin' Blends- Night of Navy, Granny Apple Green, Mango Melody, Bermuda Bay, Mint Macaron
Ink- Memento Black, Stazon, Poppy Parade, Granny Apple Green, Bermuda Bay, Versamark,
White Embossing Powder
Blender Pen
Always Recommended
Paper Snips
Trimmer
Simply Shammy
Die Cutting Machine
Bone Folder
Adhesives
For this cute robot card I used my watercolor pencils to give it a more "kid like" look and then used my Blender Pen over it to smooth out my color lines.
I added the cute little hexagons for his eyes and just LOVE the way it changed his look.
Stamp the robot with Stazon Ink and use your watercolor pencils on the robot. Then smooth out the lines with a Blender Pen.
Stamp in Poppy Parade the saying.
Cut the Home & Heart Doilies in half and glue to the back of the stitched scallop.
Glue the DSP to the cardbase and attach the scallop rectangle with dimensionals.
This one is great because it uses the robot as a background image as well as up front.
This robot was colored with Stampin' Blends but looks water colored because I left some "white spots".
Measurements
Bermuda Bay Cardbase: 5 1/2 x 8 1/2 scored @ 4 1/4
Costal Cabana: 4 x 5 1/4
Basic White: 3 x 3
1/2 x 6
Steps
Measure, score, and cut your paper.
Stamp in Memento Ink your robot and color him in with your blends. Fussy cut him out with your paper snips.
Stamp in Bermuda Bay robots all over the Costal Cabana.
Stamp on the Basic White strips one in Bermuda Bay and one in Mango Melody. Fussy cut each strip.
Glue the Costal Cabana onto the cardbase and attach the words & robot with dimensionals.
This cute robot is colored in with Stampin' Blends and uses the White Embossing Powder for the "HB2U".
This blue one is easy to make by picking out 4 of your favorites shades of blue. You could do this with any color using the measurements below.
Measurements
Balmy Blue: 5 1/2 x 8 1/2 scored @ 4 1/4
Panels of Blue: 3 3/4 x 1 5/8
Basic White: 3 1/2 x 2 1/2
2 x 2
Basic Black: 1/2 x 3
Steps
Measure, score, and cut your paper.
Stamp in Memento Black in the robot and color him with the Light Night of Navy Blend.
Stamp in Memento Black hearts onto Basic White square and fussy cut them out. Color them with your blends.
Use Versamark and White Embossing Powder onto the Basic Black to stamp the "HB2U".
Glue the Blue panels onto the cardbase. Then glue the robot and attach the Basic Black label with dimensionals. Glue the hearts with liquid glue.
Embellish with Holiday Rhinestones.
This guy was created by stamping on cardstock instead of coloring him. This is a fun card to make with kids who love to use scissors.
Give this card a try by following the steps below and be sure to watch my video on YouTube!
Measurements
Thick Basic White: 5 1/2 x 8 1/2 scored @ 4 1/4
Basic White: 2 1/2 x 3 1/2
DSP: 2 3/4 x 3 3/4
4 1/4 x 2
Granny Apple Green: 4 1/4 x 3/4
Gray Granite: 3 x 3
Basic Gray 3 x 3
Steps
Measure, score, and cut your paper.
Stamp in Memento Ink onto the Gray Granite and Basic Gray your robots and fussy cut them out.
Stamp in Granny Apple Green the saying onto the Basic White.
Glue the 2 3/4 x 3 3/4 DSP first onto the cardbase. Glue the second DSP over and then the Granny Apple Green. Use dimensionals to attach the Basic White rectangle and add the robots with dimesnionals.
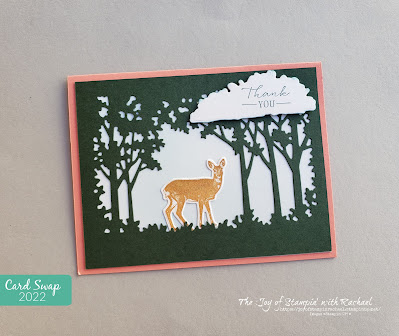
Fun Fold Friday with the Sale-a-bration Designer Series Paper called Daffodil Afternoon, which is for FREE with a $50 order! I paired it with my favorite Hybrid Bundle, Love & Happiness!
I wanted to make a card that shows off the Designer Series Paper (DSP) and yet make it more masculine. That is why this accordion style Fun Fold is perfect for this paper!
When it opens up it shows 3 different panels of DSP.
Instead of using the floral embossing folder part of the bundle I used the NEW Gingham Folder. It added just the right amount of texture to the card and yet still kept it looking masculine.
Use the list below to shop from my online store.
Supplies
Love & Happiness Bundle
Stitched So Sweetly Dies
Daffodil Afternoon Sale-a-bration DSP
Paper- Very Vanilla, Pear Piazza, Evening Evergreen
Die cut a Stitched So Sweetly Very Vanilla scalloped rectangle.
Die cut a Pear Pizzaz heart and emboss it with the Gingham folder.
Die cut an Evening Evergreen label and stamp and emboss with White Embossing Powder.
Glue on your Very Vanilla and DSP panels (see video).
Attach the scallop rectangle with 2 dimensionals on the back of the far left side and attach to the smallest panel on the front. Attach the heart and label with dimensionals.
Tuesday's Tip at Ten: Use Stampin' UP! Stitched Rectangle Dies to create a frame for the front of the card and at allow the DSP to peek-a-boo through the front using your Die of choice (heart).
For me, it is always easier to run the dies through together when creating the frame. This helps me see the spacing.
Once cut, this is what it will look like.
Remove the center and save for another card. By removing the center it allows you to replace it with the DSP.
Die cut your cardbase from the inside on the left side of the score line with the shape of your choice.
Glue on the frame and die cut the DSP to put in the center (use the same die so it matches). Embellish the front and you've got a fun Inside Window Peek-a-boo card!!!
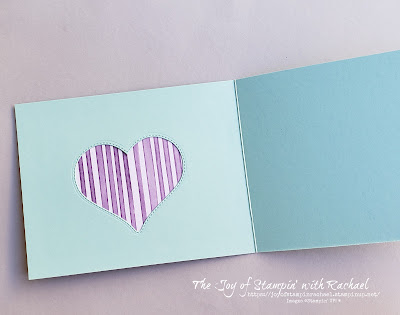
I love nothing more than taking a simple card and giving it a surprise factor! I used some less traditional Valentine colors and you'll find a surprise heart once you open the card!
Here is how...
I die cut a heart from the inside of the card base. This created that awesome stitch line and allowed the DSP from the front to shine through!
Here are the pieces that I used to create this card.
Add a little bow and this card is perfect!
You can make this card too when you shop from my online store.
Die cut out of the center of the front of the cardbase. Take that heart and emboss it.
Die cut your Basic White Label and stamp in Highland Heather "Valentine Greetings".
Die cut your Highland Heather and DSP with the Stitched Rectangle Dies. Use 2 sizes smaller for the DSP one.
Assemble: Glue on the Highland Heather frame to the cardbase. Place glue around the cut out heart and attach the DSP there. Attach the heart with dimensionals and the label with dimensionals too.
Tie a bow with the Baker's Twine and attach with a glue dot under the label.
It was my Love & Happiness Stamp Camp today and was so much fun! We made Valentine's Day, Wedding and Anniversary Cards. Below you will see the cards that were made for the event, gifts, and information about my next Stamp Camp!
One game was to write down as many love songs as you could in one minute and cross off if you had any repeats as another person. The other game was all done by luck. I had my son pick out one of the Abstract Beauty DSP and if it matched your treat holder (see above) you were the winner!
Next Stamp Camp
If you missed out this time, don't worry, you can join me for my Birthday Stamp Camp in March!!! This one we will make 20 cards in 5 designs!!!
Just click on the form below to register and send payment by March 1st!