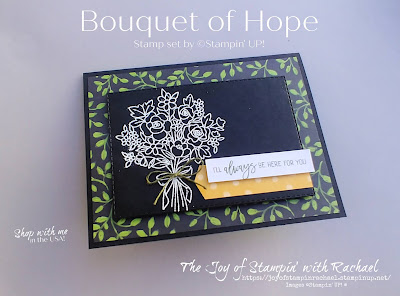
Today's Wednesday's Kit Class is a special edition as I use the stamp set Bouquet of Hope from February's Paper Pumpkin Kit. I give you 3 different ways on how to use the stamp set after you made all the cards in the kit. When you order $35 worth by Friday the 26th you'll get this kit (with all the paper items and embellishments) for FREE! Just order with the link below or use the Hostess Code RXXRTQH6
Suggested Items to Order
Bouquet of Hope Refill Kit $10
Jar of Flowers & Punch $36.75
**If you don't have the Bouquet of Hope stamp set I suggest the Jar of Flowers stamp set or any large floral image could be substituted in.
Supplies
Bouquet of Hope Stamp Set
Jar Punch
Banners Pick a Punch
Story Label Punch
Stitched Rectangle Dies
Flower & Field DSP
Basic Black Cardstock
Basic White Cardstock
Mossy Meadow Cardstock
Vellum
White Embossing Powder
VersaMark Ink
Mossy Meadow Ink
Memento Black Ink
Stampin' Blend Markers: Poppy Parade, Daffodil Delight, Granny Apple Green, Basic Black
Mossy Meadow Thread
Daffodil Delight Ribbon
*Flowers from kit
Always Recommended
Paper Snips
Trimmer
Simply Shammy
Die Cutting Machine
Bone Folder
I just love the stark contrast of the White embossed powder on the Basic Black!
Measurements
Basic Black Cardbase 5 1/2 x 8 1/2 scored @ 4 1/4
DSP: 4 x 5 1/4
3/4 x 4
2 1/2 x 3/4
Basic White: 4 x 5 1/4
2 3/8 x 1/4
Steps
- Measure, score, and cut all your paper.
- Die cut a stitched Rectangle in Basic Black. Pick the one largest enough to fit your bouquet.
- Heat emboss with VersaMark ink, white embossing powder, and your heating tool the bouquet onto the stitch rectangle.
- Stamp on the Basic White strip in Mossy Meadow.
- Use your Banner's Pick a Punch for your 2 1/2 x 3/4 DSP.
- Glue the 3/4 x 4 DSP to the 4 x 5 1/4 Basic White and glue inside your cardbase.
- Glue your DSP to the card front and attach your Black Stitched Rectangle with dimensionals. Glue on your bannered DSP and use dimensionals to pop up the stamped greeting.
- Make a bow with the Mossy Meadow thread and attach with a glue dot.
This card using the bouquet of flowers as a background look instead of the focus.
Measurements
Basic White Cardbase: 5 1/2 x 8 1/2 scored @ 4 1/4
Mossy Meadow: 4 1/8 x 5 3/8
Basic White: 4 x 5 1/4
Steps
- Measure, score, and cut all your paper.
- Die cut a medium size Stitched Rectangle in Basic Black and heat emboss the saying with White Embossing Powder in the center.
- Stamp in Mossy Meadow Ink the bouquet all over the Basic White and then glue to the Mossy Meadow layer. Attach to the cardbase.
- Using dimensionals attach the embossed rectangle.
- Glue on 3 flowers from the kit or use the medium Daisy Punch to create flowers and add to 3 of the corners.
This card shows how you can color in the floral image to add the pop of color. The vellum jar is a fun bonus, but you could leave it off this card and it would look just fine.
Measurements
Basic White Cardbase: 5 1/2 x 8 1/2 scored @ 4 1/4
DSP: 4 x 5 1/4
Basic Black: 2 3/4 x 4 1/8
Steps
- Measure, score, and cut your paper.
- Die cut a stitched rectangle in Basic White.
- Stamp in Memento ink onto the stitched rectangle and use your Stampin' Blends to color and add a little wink of stella to the center of the flowers. Attach the Basic Black layer after you are done coloring.
- Punch out a Vellum Jar. Wrap a small piece of ribbon at the top and glue over the bottom of the flowers. Make a bow with the Daffodil Delight ribbon and attach with a glue dot.
- Glue your DSP to the card front and attach the rectangle image with dimensionals.
- Bonus Label: Create a label with the Story Label punch and stamp the saying on there and the mini flowers from the kit. Attach to the front or glue onto the inside of the card.
Facebook Live Video
Happy Stampin' Everyone!!!


No comments:
Post a Comment
Thank you so much for leaving me a comment! It really makes my day and I love hearing from you! <3