t> The Joy of Stampin' with Rachael: January 2025

Friday, January 31, 2025

February Card Class Club- Water coloring


New Year, New Style of Card Classes!

February’s class will included the items for Water Coloring!

For 2025 we are giving you a choice between 2 stamp sets and are featuring different Techniques with each card class! You can add the bundles to your kit or order separately. 


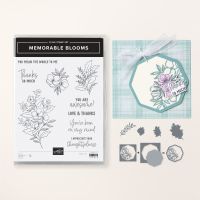
Memorable Blooms Bundle with Kit $91


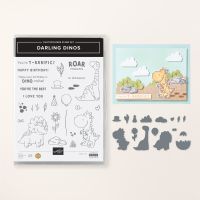
Darling Dinos Bundle with Kit $76


When you order the bundle with the kit, you can pick one Sale-a-bration product from the $60 list!

This club you can join at any time and pick and choose what classes to attend. There are club perks (see below)!

This club is being co-created by Lynda Day, one of my most talented Stampin' Friends! We will take turns designing each month. If you attend her class, you will be getting the exact some thing, just a different video. 

Below are some answers to some frequently asked questions. 

How Card Class Club Works?

Each month starting on the 1st I will open up registration for the next class. You have until the 10th to register and send payment. To sign up you use the monthly link: CLINK REGISTER BUTTON BELOW:https://forms.gle/UjgwwRbFerEkCmRD6

After the 10th I order all of the supplies, make the kits, and send out by the 25th of the month. You will get a pdf with the Tutorial (which you will be asked not to share) and a video showing how to make the cards (that you can share). 

There will be a Facebook Group option if you want to join to share your card creations and to see others cards made.

What Comes in the Kit?

In the kit you will get the paper product supplies to make 8 cards in 4 different designs.

Kit Includes

- 8 cardbases & envelopes

- died cut shapes

-$20 worth of Stampin' UP! products (embellishments, tools, ribbons, DSP, etc.)

Not in the Kit

-Inks

-Stamp Sets (unless you order it part of your class)

-Adhesives

-Scissors

-Clear Blocks


As a club member (you join my card club just by attending your first class) there are some extra perks! 

When you sign up for your 6th class (doesn't have to be in a row), you earned the stamp set from that class for FREE. 

Example: You attend 1. January 2. February 3. March 4. April 5. May 6. June 

Your JUNE kit would come with the stamp set used for the kit for FREE that month. 

There are BONUS Perks for Royal Hearts Stampers Team Members. Let me know if you want more details about that when you sign up for the class. 

Join by February 10th!

Happy Stampin' Everyone!!!


Double Feature Friday- Butterflies


Double Feature Friday with Stampin' UP! Butterfly Stamps!
Here are two different Butterfly stamp sets made by Stampin' UP! to help you make the perfect butterfly card! These cards were made by the Stamp & Share Design Crew. 


Sketched Butterflies

All images © 1990-2025 Stampin’ Up! ®


Supplies:


·       Stamp Sets: Sketched Butterflies (163491)

·       Card Stock and Paper: Summer Splash (1637970), Basic Black (121045), Basic White (159276), Shades & Hues Designer Paper (166260)

·       Stamp Pads: Versmark Pad (102283), Basic Gray (149165), Summer Splash (163809)

·       Tools: Summer Splash Stampin’ Blends (163826), Basics Wow! Embossing Powder (165679), Wink of Stella Glitter Brush (141897), Spotlight on Nature Dies (163580), Heat Tool (129053)

·       Miscellaneous: Summer Splash Bordered Ribbon (163786), Stampin’ Dimensionals (104430); Stampin’ Seal Adhesive (152813)


Measurements:


·       Summer Splash 8 ½ x 5 ½

·       Basic Black 5 ¼ x 4

·       Designer Paper 5 1/8 x 3 7/8

·       Summer Splash for diecutting

·       Basic White for stamping/diecutting


Instructions:


1.     Stamp butterflies in Summer Splash on DSP

2.     Add DSP to Basic Black- wrap ribbon around and add to Summer Splash card base

3.     Stamp sentiment in Versamark on diecut circle and emboss with black embossing powder.  Attach to card with Dimensionals

4.     Stamp butterfly in Basic Gray on Basic White and color with Stampin’ Blends

5.     Diecut and add to card with Dimensionals

6.     Color butterfly with Wink of Stella 


BeautifulButterflies

All images © 1990-2025 Stampin’ Up!®


Supplies:


·       Stamp Sets: Beautiful Butterflies (164608)

·       Card Stock and Paper: Thick Basic White Card Stock or (CS) (159229); Balmy Blue Card Stock (146982); Blueberry Bushel Card Stock (146968); Daffodil Delight Card Stock (119683); Basic White Card Stock (159276); Beautiful Bokeh Designer Series Paper (DSP) (164607); Bloom Impressions DSP (164944)

·       Stamp Pads: Tuxedo Black Momento Ink (132708)

·       Tools: Beautiful Butterflies Hybrid Embossing Folder & Dies (164614); Starstruck Embossing Folder (164972)

·       Miscellaneous:  Purple Adhesive-Backed Sequins (164970); Stampin’ Dimensionals (104430); Stampin’ Seal Adhesive (152813); Multipurpose Liquid Glue (110755)


Measurements:


·       Thick Basic White Card Stock: 8 1/2” x 5 1/2”

·       Balmy Blue Card Stock: (3) - 1 5/8” x 3 7/8”

·       Blueberry Bushel Card Stock: 1 1/2” x 4 1/2”, 1 5/8” x 4 5/8”

·       Daffodil Delight Card Stock: scrap for antenna body

·       Basic White Card Stock: 3 1/4” x 4 1/4” (butterfly layer), 1/2” strip for greeting

·       DSP: (3) - 1 1/2” x 3 3/4”, 3 1/4” x 4 1/4” (butterfly), 2 3/8” x 6” (envelope flap)


Instructions:


1.     Score & burnish Thick Basic White Card Base @ 4 1/4”

2.     Adhere the 3 designer paper pieces to the 3 card stock mats, adhere to card base.  Start with the outer ones first then the middle piece

3.     Emboss the smaller Blueberry Bushel card stock piece with Starstruck embossing folder, adhere to remaining Blueberry Bushel piece, adhere to card front

4.     Die cut 1butterfly each from designer paper & basic white card stock, adhere the two together, adhere to card front with dimensionals

5.     Die cut antenna body from daffodil delight, adhere to center of butterfly

6.     Stamp greeting on 1/2” strip, flag ends, adhere to center of butterfly

7.     Embellish with Purple Adhesive-Backed Sequins

8.     Adhere remaining designer paper to envelope flap, trim off excess paper


January 2025 Rewards
Use Host Code ZPY6A2J7 and as a thank you for ordering here are the rewards!

πŸ’š Spend $15 and get the October Layout Love pdf 
πŸ’š Spend at least $50 and get my Happy Mail Gift & Card 
πŸ’šSpend $150 or more and receive Stampin’ Rewards

Happy Stampin' Everyone!!!

Fun Fold Friday- Demo Swaps Z Fold


Here are the Demo Swaps for January!
These cards were made by my group of friends in Utah who are all connected through one Team Leader. We have been swapping for about 10 years now. This month they decided to make Z Fun Folds. It is really fun to see all of the different kids of Z folds there are. 
Please leave me a comment and tell me which is your favorite or the one you want me to show you how to make in February.  
Here was the criteria for the Swaps:
πŸ—Ή Thank You Card
πŸ—Ή Use an Embossing Folder
πŸ—Ή Neutrals for main colors
πŸ—Ή Z Fold
πŸ—Ή Use Masking Technique 

Made by Cindy Hafner with the 

Inside of Cindy's card

Made by Natalie Woll using the 

Inside of Natalie Woll's card. 

Made by Marjeen Nation with the

Inside of Marjeen's card. 

Made by Cheryl Holden using the 
Friendly Seagulls & Wintry Tree Tops

Inside of Cheryl's card. 


Bonus Card made by Natalie Woll using
Sale-a-bration Friendly Seagulls

First layer inside shows fun stamped saying!

Second layer inside (to write on). 

Here is my Swap! You can see how to make it when you click HERE. 

Video


Happy Stampin' Everyone!!!

Friday, January 24, 2025

Double Feature Friday- Hugs For Love


Double Feature Friday with Hugs for Love Bundle! 


You can order the stamp set or get the punch bundle and save 10%. 

These cards were designed by the Stamp & Share Design Crew! 


Hugs for Love

All images © 1990-2025 Stampin’ Up!®


Supplies:


·       Stamp Sets: Hugs for Love (164559); Bundle with punch (165738)

·       Card Stock and Paper: Cherry Cobbler (119685); Melon Mambo (115320); Basic White (159276); Marbled Elegance Specialty Designer Series Paper (DSP) (164919)

·       Stamp Pads: Memento Black (132708); Melon Mambo (147051)

·       Tools: Plaster Painting 3D Embossing Folder (164656); To the Point Punch (164568)

·        Miscellaneous: Adhesive-Backed Metallic Gems (163780); Large Check Ribbon (161982); Paper Snips (103579); Stampin’ Dimensionals (104430); Mini Glue Dots (103683); Stampin’ SEAL (152813)


Measurements:


·       Cherry Cobbler: 4 ¼” x 11” card base

·       Cherry Cobbler: 3” x 4 ¼” layer

·       Basic White: 2” x 2 ½”

·       Melon Mambo: 2 ¾” x 4”

·       Marbled Elegance DSP: 4” x 5 ¼”


Instructions:


1.     Score the Cherry Cobbler card base on the long side at 5 ½” and fold.

2.     Attach the piece of DSP to the card front using Stampin’ SEAL.

3.     Wrap a piece of Large Check Ribbon around the center of the card front adhering it to the front of the card with Stampin’ SEAL. This will be hidden with the next layer.

4.     Emboss a piece of Melon Mambo cardstock using the Plaster Painting Embossing Folder and attach to the 3” x 4 ¼” layer of Cherry Cobler cardstock.

5.     Pop this layer up using Stampin’ Dimensionals in the center of the card front over the seam of the ribbon.

6.     Stamp the border image on Basic White cardstock using Melon Mambo ink. Then, stamp the sentiment using Memento Black ink on the inside of the border.

7.     Stamp two lined hearts using Melon Mambo ink stamping off once on scrap paper for a lighter shade for each one.

8.     Punch out the sentiment using the To the Point Punch. Then, pop the sentiment piece on to the card front using Stampin’ Dimensionals.

9.     Add a bow to the left side of the sentiment using Mini Glue Dots.

10. Lastly, add three Metallic Gems to the card.  


Hugs for Love

All images © 1990-2025 Stampin’ Up!®


Supplies:

·       Stamp Sets: Hugs for Love (164559); or as a bundle with Hugs for Love dies (165738)

·       Card Stock and Paper: Blackberry Bliss CS (133675); Fresh Freesia CS (155613); Basic White CS (159276); Bloom Impressions Designer Series Paper (164944)

·       Stamp Pads: Blackberry Bliss (147092); Fresh Freesia (155611)

·       Tools: To the Point Label Punch (164568)

·       Miscellaneous: Purple Adhesive-Backed Sequins (164970); Fresh Freesia 3/8” Seam Binding Ribbon (164971); Dimensionals (104430); Stampin’ Seal Adhesive (152813)


Measurements:


·       Blackberry Bliss CS: 8 ½” x 5 ½”

·       Fresh Freesia CS: 4 ½” x 3 ¼”

·       Basic White CS: 5 ¼” x 4”, 4 ¼” x 3”, scrap

·       DSP: 3 ½” x 3 ½”

·       Ribbon: 20”, 2 ½”


Instructions:


1.     5 ½” x 4 ¼” Blackberry Bliss single layer is the card base.

2.     Adhere white panel to card base.

3.     Cut the DSP square in half, corner to corner.

4.     Adhere each triangle to card base. ADHERE SIDES AND BOTTOM EDGES ONLY, SO YOU CAN SLIDE THE OTHER SMALLER CARD IN AND OUT!

5.     Adhere smaller white panel to Fresh Freesia cardstock panel.

6.     Stamp a heart in the upper left corner of this piece, using Fresh Freesia ink.

7.     Fold smaller Fresh Freesia 3/8” Seam Binding Ribbon in half, and staple to top of Fresh Freesia panel.

8.     Stamp a scrap piece white cardstock, using a border image from the Hugs for Love stamp set, using Fresh Freesia ink.

9.     Stamp sentiment inside the stamped border, using Blackberry Bliss ink.

10. Punch out, using To the Point Punch.

11. Tie larger piece of Fresh Freesia 3/8” Seam Binding Ribbon around card, positioning bow towards the right side.

12. Adhere punched image to card front center, using Dimensionals. Be careful not to put Dimensional at the top center of the punched piece, or the 2nd card won’t be able to slide in and out of the card.

13. Add some Purple Adhesive-Backed Sequins to punched piece.


Visit my online store to by clicking HERE to order all of the supplies for these cards! 

January 2025 Rewards
Use Host Code ZPY6A2J7 and as a thank you for ordering here are the rewards!

πŸ’š Spend $15 and get the October Layout Love pdf 
πŸ’š Spend at least $50 and get my Happy Mail Gift & Card 
πŸ’šSpend $150 or more and receive Stampin’ Rewards


Order $60 to $120 worth and get FREE Sale-a-bration products. See all the options when you click HERE


Earn and EXTRA $30 of Hostess Rewards during Sale-a-bration when Sales hit $300. OR use the Hostess Rewards for your Starter Kit! 

Happy Stampin' Everyone!!!


Double Feature Friday- Delightful Wishes

  Double Feature Friday with Stampin' UP!'s Delightful Wishes Bundle!  Check out two amazing ideas created by the Stamp & Share ...