t> The Joy of Stampin' with Rachael: February 2025

Friday, February 28, 2025

Double Feature Friday- Easter Cards


Double Feature Friday with Easter Card ideas! 
I know it is still just February, but if you want to make and send your Easter cards in time, you will want to order products now! 
I'm sharing two ideas, one more whimsical and the other more spiritual. So however you celebrate Easter, there could be a card for YOU! 


Storybook Life
All images © 1990-2025 Stampin’ Up!®

Supplies:

Stamp Sets: Storybook Life (166635)
Card Stock and Paper: Basic White (159276)
Boho Blue (161724), Old Olive (100702) Pecan Pie (161717), Storybook Moments DSP (164662)
Stamp Pads: Boho Blue (161650) Craft White (147277)
Tools: Spotlight on Nature dies (163580)
Miscellaneous: Adhesive Sequins (161206)

Measurements:

Boho Blue: 5 ½” x 8 ½”
Old Olive: 3 1/8” x 3 7/8”
Basic White: 3” x 3”
Pecan Pie: 1 ¼” x 5”
Boho Blue Designer paper: 3” x 3 ¾”

Instructions:

1. Cut a 5 ½” x 8 ½” Boho Blue card base. Fold in half.
2. Stamp the sentiment onto the card front from top to bottom using Boho Blue ink.
3. Cut the Boho Blue floral pattern from the designer paper to 3” x 3 ¾”
4. Cut a 3 1/8” x 3 7/8” piece of Old Olive cardstock.
5. Adhere the designer paper to the Old Olive paper.
6. Adhere the panel to the center of the card front.
7. Cut a 2 ¾” circle from Basic White cardstock.
8. Choose the desired punch outs from the designer paper and adhere to the circle using Stampin’ Dimensionals.
9. Adhere the circle to the card front using Stampin’ Dimensionals.
10. Stamp the sentiment onto Pecan Pie cardstock using Craft White ink. Let dry completely. Cut apart.
11. Adhere the sentiment to the card front using Stampin’ Dimensionals.
12. Adhere (5) sequins randomly to the card front


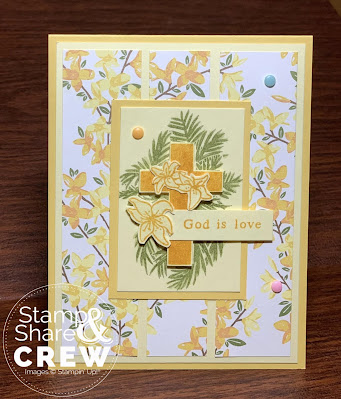
Faith Collection

All images © 1990-2025 Stampin’ Up!®


Supplies:

·       Stamp Set: Faith Collection (164793); Faith Collection Bundle (164796)

·       Cardstock and Paper: Daffodil Delight (119683); Lemon Lolly (161720); Floral Delight DSP (164700)

·       Stamp Pads: Daffodil Delight (147094); Old Olive (147090)

·       Tools: Faith Collection Dies (164795)

·       Miscellaneous: Party Dots (164602); Stampin’ Seal Adhesive (152813); Take Your Pick Tool (144107); Wink of Stella Glitter Brush (141897)


Measurements:

·       Daffodil Delight: 4¼” x 5½”; 2¼” x 3¼”

·       Lemon Lolly: 4” x 5¼” (2 pieces); 2” x 3”; ½” x 2”; scraps for cross and lilies

·       Floral Delight DSP: 1¼” x 5” (2 pieces on left and right); 1” x 5” (center piece)


Instructions:

1.     Adhere Lemon Lolly inside card and to card front.

2.     Adhere Floral Delight DSP strips to card front.

3.     Adhere Daffodil Delight to card front.

4.     Stamp palms on Lemon Lolly cardstock using Old Olive ink. Adhere to card front.

5.     Stamp cross and lilies on Lemon Lolly cardstock scraps using Daffodil Delight link. Die cut using Faith Collection Dies (or fussy cut). Adhere to card front (with cross using Mini Stampin’ Dimensionals).

6.     Stamp sentiment on Lemon Lolly cardstock using Daffodil Delight ink. Adhere to card front using Mini Stampin’ Dimensionals.

7.     Sprinkle Party Dots to card front using Take Your Pick Tool.

8.     Add Wink of Stella Glitter Brush to lilies and palms for added sparkle!


  February 2025 Rewards

Use Host Code ZPY6A2J7 and as a thank you for ordering here are the rewards!

💚 Spend $15 and get the February Layout Love pdf 
💚 Spend at least $50 and get my Happy Mail Gift & Card 
💚Spend $150 or more and receive Stampin’ Rewards

Happy Stampin' Everyone!!!


Friday, February 21, 2025

Double Feature Friday- Thank You Cards


Double Feature Friday with cards of gratitude!
Check out these FULL tutorials made by the Stamp & Share Crew design team! 


Spotlight On Nature

All images © 1990-2025 Stampin’ Up!®


Supplies:


·       Stamp Sets: Spotlight on Nature (163579)

·       Card Stock and Paper: Pool Party Card Stock or (CS) (122924); Basic White Card Stock (159276); Thick Basic White Card Stock (159229); Floral & Gingham Vellum Specialty Designer Series Paper (DSP) (164713)

·       Stamp Pads: Tuxedo Black Memento Ink (132708)

·       Stampin’ Blends: Pool Party (154894); Balmy Blue (154830); Granny Apple Green (154884)

·       Tools: Spotlight On Nature Dies (163580); Distressed Tile 3D Embossing Folder (162189)

·       Miscellaneous: Silver & White Sheer Ribbon (162149); Rhinestone Basic Jewels (144220); Stampin’ Dimensionals (104430); Multipurpose Liquid Glue (110755); Mini Glue Dots (103683)


Measurements:


·       Thick Basic White Card Stock: 4 1/4” x 11”

·       Basic White Card Stock: 4 1/4” x 5 1/2”, 3 3/4” x 3 3/4”, 3 1/2” x 3 1/2” (circle die cut), 1/2” strip for greeting

·       Pool Party Card Stock: 4” x 4”

·       Vellum: 3 3/4” x 3 3/4”


Instructions:


1.     Score & burnish card base @ 5 1/2”

2.     Emboss 4 1/4” x 5 1/2” Basic White Card Stock, adhere to card front

3.     Adhere vellum to Basic White CS - 3 3/4” x 3 3/4”, adhere to Pool Party CS, adhere to card base with dimensionals

4.     Die Cut circle with Basis White CS - 3 1/2” x 3 1/2”

5.     Stamp floral image on circle, color with Stampin’ Blends, adhere to card front with dimensionals

6.     Stamp greeting on 1/2” strip, flag end, adhere to circle

7.     Tie bow, adhere at end of greeting with mini glue dot

8.     Embellish with Rhinestone Basic Jewels

9.     Adhere remaining designer paper to envelope flap, trim off excess


Beautiful Butterflies, So Thankful

All images © 1990-2025 Stampin’ Up!®


Supplies:

·       Stamp Sets: Beautiful Butterflies Photopolymer Stamp Set (164608)

·       Cardstock & Paper: Daffodil Delight (119683), Basic White (159276), Beautiful Bokeh 6” x 6” Designer Series Paper (164607)

·       Stamp Pad: Daffodil Delight Classic Stampin’ Pad (147094), Berry Burst Classic Stampin’ Pad (147143)

·       Tools: To The Point Label Punch (164568), Take Your Pick Tool (144107), Bone Folder (102300), Paper Snips Scissors (103579), Paper Trimmer (152392), Clear Block D (118485)

·       Miscellaneous: Baker’s Twine Essentials Pack (155475), Itty Bitty Bokeh Mix (164618), Stampin’ Dimensionals (104430), Mini Stampin’ Dimensionals (144108), Stampin’ Seal (152813), Multipurpose Liquid Glue (110755)


Measurements:

·       Daffodil Delight: 5 ½” x 8 ½” scored at 4 ¼”, folded then burnished with the Bone Folder (card base)

·       Beautiful Butterflies 6” x 6” Designer Series Paper (DSP), Daffodil Delight bokeh print: 3 ¾” x 4 ½”, card front

·       Beautiful Butterflies 6” x 6” DSP, Berry Burst bokeh print: 2 ½” x 2 ½”

·       Basic White: 5/16” x 2 ¼”, 3 – 1 ½” x 3 ¾”

·       White Twine: 8”

·       Itty Bitty Bokeh Mix: 3


Instructions:

1.     Stamp small butterfly images randomly on the Daffodil Delight DSP (card front) using Daffodil Delight ink, then stamp dots image randomly. Cut card front piece into 3 - 1 ½” x 3 ¾” pieces.

2.     Adhere card front strips to the Basic White pieces of the same size and attach them to the card base using Stampin’ Dimensionals.

3.     Stamp sentiment using Berry Burst ink on the 5/16” x 2 ¼” Basic White cardstock. Trim ends of the sentiment piece at an angle.

4.     Separate the strands of an 8” piece of white baker’s twine and create a “nest” by wrapping the twine around two fingers. Adhere the “nest” to the back of the sentiment strip with a little Stampin’ SEAL. Then, adjust the strands to the desired look.

5.     Punch label from the Berry Burst DSP and attach the sentiment piece to it using Stampin’ Dimensionals.

6.     Adhere three Itty Bitty Bokeh Mix embellishments to the label and attach the entire label to the card front using Stampin’ Dimensionals.

  February 2025 Rewards

Use Host Code ZPY6A2J7 and as a thank you for ordering here are the rewards!

💚 Spend $15 and get the February Layout Love pdf 
💚 Spend at least $50 and get my Happy Mail Gift & Card 
💚Spend $150 or more and receive Stampin’ Rewards

Happy Stampin' Everyone!!!


Wednesday, February 19, 2025

New at SU Blog Hop- Make it Mini Bookmarks


Welcome to the NEW AT SU! Blog hop! We are a group of StampinUp! Independent Demonstrators from around the world who are full of creative paper crafting ideas to share with you and get you crafting!
Today's blog hop is all about
Make it Mini!
All of our projects will be "mini" in size.


I am sharing with you how to make a Mini Corner Bookmark with Designer Series Paper (DSP).
All you need is a 4" x 4" piece of DSP and a Bone Folder.


This is how the finished bookmark looks. It shows off both sides of the DSP and requires no adhesive. Watch my quick video to see how to fold the DSP.

Video


The bookmark slides right onto the corner you place it on.


It is great way to hold your spot or make lots to put onto your Stampin' Up! Annual Catalog pages. You could even glue them into your catalog to create a "flip to favorites" tab.

I hope you have loved seeing how to make this Mini Corner Bookmark with Stampin' DSP!
Please keep the "Make it Mini" hop going by visiting the next designer...
Creative Juice by Loni


I am happy to answer any questions about the techniques shown here! Please contact your StampinUp! demonstrator to make a product purchase. If you do not have a demonstrator, you can use the links below to order products from me or join my team.


  February 2025 Rewards

Use Host Code ZPY6A2J7 and as a thank you for ordering here are the rewards!

💚 Spend $15 and get the February Layout Love pdf 
💚 Spend at least $50 and get my Happy Mail Gift & Card 
💚Spend $150 or more and receive Stampin’ Rewards


Sale-a-bration ends February 28th or while supplies last! Be sure to place an order from my online store and get some of your favorite Sale-a-bration products (like the DSP I used).

Happy Stampin' Everyone!!!


Tuesday, February 18, 2025

Queens of the Stamp Age Masculine Card Swap


In January the Queens of the Stamp Age (aka Queens) did two card swaps! Both with a Birthday card theme using new products but one swap is all feminine cards and the other is all masculine
Below you will see 10 card ideas, the name of the stamper and the name to the stamp set they used with a link to that set! Be sure to watch the 1 minute video at the end to see the cards in motion!
***Some cards used Sale-a-bration products. There products are only available while supplies last or until February 28th. 


My Swap click HERE to learn how to make this Friendly Seagulls Card


Candice Anderson

Toni Wygant 

Cortney Alvord

Kristy Clayton

Jerilyn Lawson

Brook Wheatley

Cassie Johnston

Paula Skeen

Michelle Stampin' Angel

Video


Happy Stampin' Everyone!!!


New Stampin' UP! Rewards Program for Everyone!!!

  Stampin’ UP! New Rewards program for EVERYONE (not just hostess)! It begins tomorrow, April 15th after a 6 hour website shut down starting...