Double Feature Friday with the Terrific Toadstools stamp set!
These cards were designed and made by a Stamp & Share Crew member! I hope you enjoy this bonus ideas! This bundle is great because you can get the matching DSP for FREE with a $60 during Sale-a-bration.
*Sale-a-bration ends February 28th.
Terrific Toadstools
All
images © 1990-2025 Stampin’ Up!®
Supplies:
·
Stamp Sets: Terrific Toadstools (164783)
·
Card Stock and Paper: Basic White (159276); Granny
Apple Green (146990); Melon Mambo (115320); Peach Pie (163799) Toadstool
Gardens 6” x 6” Designer Series Paper (DSP) (Sale-A-Bration - 164942)
·
Stamp Pads: Granny Apple Green
(147095); Melon Mambo (147051); Peach Pie (163810)
·
Tools: Bone Folder (102300); Paper
Snips (103579); Paper Trimmer (152392)
·
Miscellaneous: Optional - Sunny Days
Iridescent Dots (1646960; Stampin’ Dimensionals (104430); Stampin’ Seal (152813);
Multipurpose Liquid Glue (110755)
Measurements:
·
Granny Apple Green: 3
7/8” x 11, score at 2 ¾” and 8 ¼”; 5 3/8” x 8”, scored at 4”
·
Melon Mambo: 3
1/8” x 4 ½”; 2 1/8” x 3 ½”; 2 3/8” x 3 ½” (cut 2); 2 ½” x 3 ¼”
·
Peach Pie: ½”
x 5 ¼”
·
Basic White: 2”
x 3 3/8”; 3 ¾” x 5 1/8”
·
Ombre Toadstools DSP: 3”
x 4 3/8”
·
Snails DSP: 2
¼” x 3 3/8” (cut 2)
·
Dots DSP: 2
¼” x 3”
·
Stripe DSP: ½”
x 5 1/8”
Instructions:
1. Fold
on the score lines of both Granny Apple Green pieces. Attach the back of the 5 3/8” x 8” piece to
the inside of the 3 7/8” x 11 piece, aligning at the bottom. Side flaps will be able to close inward and
then top flap down.
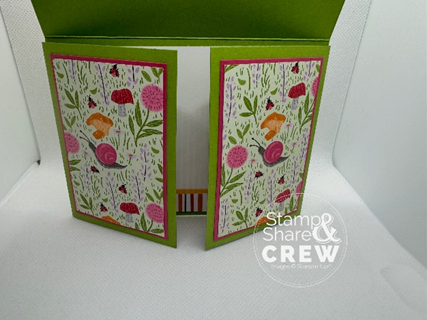
2. Attach
the Ombre Toadstools piece to the 3 1/8” x 4 ½” Melon Mambo piece and then to
the front of the card.
3. Cut
the 2 ½” x 3 ¼” Melon Mambo piece and the Dots DSP on the diagonal and attach
them together and then attach to the opened side flaps along the bottom and outsides
so it creates a pocket for sliding credit card or cash into.
4. Attach
the Snails DSP to the 2 3/8” x 3 ½” Melon Mambo pieces and then attach to the
closed side flaps.
5. Using
Granny Apple Green ink, stamp large stem onto Post It Note and cut out top to
create a mask. Stamp the stem on the 2”
x 3 3/8” Basic White piece at the bottom, ¾” in from the left side. Stamp the small stem 1 ¼” in from the left
side.
6. Place
the mask over the large stem and stamp the large toadstool cap using Melon
Mambo ink.
7. Using
Peach Pie ink, stamp the small toadstool cap.
Keep the mask in place just in case they overlap.
8. Using
Granny Apple Green ink, stamp sentiment in the top right.
9. Attach
stamped piece to 2 1/8” x 3 ½” Melon Mambo piece and attach to front of card
using Dimensionals.
10. Using
Granny Apple Green & Melon Mambo inks, stamp the toadstool trio stems and
caps approximately ½” up from the bottom left of the 3 ¾” x 5 1/8” Basic White
piece. Attach the Peach Pie piece to the
Striped DSP and attach to the bottom of the piece. Attach to inside of card.
Inside Photos

Terrific Toadstools
All
images © 1990-2025 Stampin’ Up!®
Supplies:
·
Stamp Set: Terrific Toadstools (164783)
·
Card Stock and Paper: Mossy Meadow (133676); Pumpkin
Pie (105117); Old Olive (100702); Basic White (159276); Country Woods Designer
Series Paper (163393); Floral Delight 12x12 Designer Series Paper (164700)
·
Stamp Pads: Real Red (147084); Mossy
Meadow (147111); Old Olive (147090); Pumpkin Pie (147086)
·
Tools: Labeled With Love Punch (163569);
Terrific Toadstools Builder Punch (164789)
·
Miscellaneous: Stampin’ Dimensionals (104430);Multipurpose
Liquid Glue (110755); Stampin’ Cut and Emboss Machine (149653); Natural Tones
Linen Thread (164971)
Measurements:
·
Mossy Meadow CS: 8½” x 5½”,scored at 4¼”
·
Pumpkin Pie CS: 3¼” x 4¼”
·
Basic White CS: scrap
·
Old Olive CS: scrap
·
Country Woods DSP: 4” x 5¼”
·
Floral Delight DSP: (yellow checked) 3” x 4”
·
Floral Delight DSP: (CrumbCake texture) 3” x 1½”
Instructions:
1.
Adhere the Country Woods DSP to the Mossy Meadow CS card base.
2.
Adhere the yellow check Floral Design DSP to the Pumpkin Pie CS.
3.
Tear the top of the crumbcake textured Floral Design DSP to expose
the white inside. Line up with bottom of yellow checked Floral Design DSP to
check height. Then stamp the stems of the mushrooms in Mossy Meadow ink so that
the bottom will be under the torn DSP.
Then adhere the torn Floral Design DSP.
Stamp the tops of the toadstools in Pumpkin Pie ink.
4.
Stamp the large toadstool tops in Real Red ink on Basic White
scrap and punch them out. Punch the small stem from the Old Olive CS scrap.
5.
Stamp the large stem in Mossy Meadow ink on Basic White scrap and
fussy cut.
6.
Adhere the toadstools with Stampin’ dimensionals. Add the small
stem with multipurpose glue at the base and on the toadstool. Adhere the large
stem with Stampin’ dimensionals.
7.
Punch the label from Basic White CS. Stamp the sentiment in Real
Red ink and then add the leaves to the bottom of the label using Old Olive ink.
8.
Add the Mossy Meadow twine from the Natural Tones Linen Thread and
use Stampin’ dimensionals to adhere the label over it.
9.
Adhere the Pumpkin Pie CS layer to the card front at a slant with
Stampin’ dimensionals.
February 2025 Rewards
Use Host Code ZPY6A2J7 and as a thank you for ordering here are the rewards!
💚 Spend $15 and get the October Layout Love pdf
💚 Spend at least $50 and get my Happy Mail Gift & Card
💚Spend $150 or more and receive Stampin’ Rewards
Happy Stampin' Everyone!!!