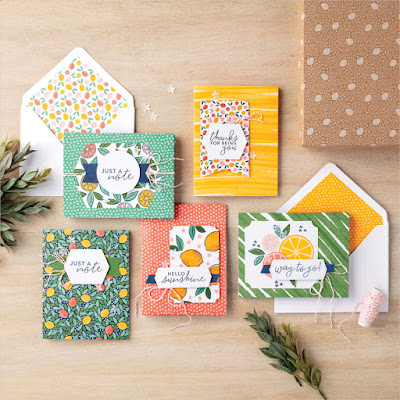
Wednesday's Kit Class using the Simply Citrus Kit stamp set. This kit comes with supplies to make 15 cards but the fun doesn't have to end once you've made them! Here are some Bonus Cards you can make using the stamp set from this kit!!
Order $35 worth from my online store using Hostess Code 36W6KSM2 between September 23rd-25th and you get all the paper, embellishments, and ribbons to make these cards FREE!
*Suggest to buy the Simply Citrus Kit for $32 and a clearance item or dimensionals for $4 OR one of the awesome stamp sets that are part of the 24 Hour Sale.
Supplies
Simply Citrus Kit
Tasteful Label Dies
Ornate Garden DSP
Bumblebee Cardstock and Ink
Terracota Tile Cardstock and Ink
Mint Macaron Cardstock and Ink
Old Olive Cardstock and Ink
Whisper White Cardstock
Elegant Gems
Whisper White Crinkle Ribbon
Bumblebee Ribbon
Ornate Garden Ribbon
Way to Go Card
Measurements
Mint Macaron Cardbase: 8 1/2 x 5 1/2 scored @ 4 1/4
Terracotta Tile: 4 1/4 x 3 1/4
DSP: 4 x 3
Steps
- Measure and cut your paper.
- Die cut in Whisper White the label and stamp "way to go!" on it in Terracotta Tile.
- Die cut in Terracotta Tile another label (different size) from the Tasteful Label Dies.
- Glue the White label to the Terra label.
- Glue your rectangle pieces together and tie the Terracotta Tile Ribbon around it twice and with just a knot. Glue to cardbase.
- Attach label over ribbon with dimensionals.
- Embellish with Elegant Gems.
Thanks for being you Card
Measurements
Old Olive Cardbase: 8 1/2 x 5 1/2 scored @ 4 1/4
Whisper White: 4 x 5 1/4
DSP: 5 1/4 x 1 1/2
Steps
- Measure and cut all your paper.
- Die cut your label and stamp in Old Olive "Thanks for being you".
- On a scrap of paper stamp your lemons and leaves and fussy cut them out.
- Glue your DSP the the far right of the Whisper White panel.
- Attach your Old Olive ribbon right where the dsp and Whisper White meet. Use tear tape on the front or attach it to the back.
- Use dimensionals to attach your label, and lemon slices.
- Embellish with the Elegant Gems.
Just a Note Card
Measurements
Whisper White Cardbase: 11 x 4 1/4 scored @ 5 1/2
DSP: 3 x 3
Terracotta Tile: 4 1/2 x 3 1/4
Steps
- Measure and cut your paper.
- Die cut your labels in Whisper White and Bumblebee. Stamp in Terracotta Tile on your white label.
- Glue your DSP to your Terracotta Cardstock and attach Bumblebee ribbon and a bow over that. (see video).
- Glue to cardbase and attach label with dimensionals.
- Embellish with Elegant Gems.
Hello Sunshine Card
Measurements
Whisper White Cardbase: 8 1/2 x 5 1/2
Mint Macaron: 5 1/2 x 3 1/4
DSP: 5 1/2 x 3
Steps
- Measure and cut your paper.
- Die cut 3 labels with the Tasteful Dies. One in Whisper White, one in Mint Macaron, and one in Vellum.
- Punch out a flower in Bumblebee using the Small Bloom punch.
- Stamp in Mint Macaron "Hello Sunshine" onto the white label.
- Cut your mint label in half and glue on the back of the Hello Sunshine label.
- Use dimensionals and attach the vellum label.
- Glue your Mint Cardstock with your dsp and then tie white crinkle ribbon around with a knot. Attach to card base.
- Attach label with glue dots and flower with a glue dot. Use a gold gem for the center.
Simple Citrus Kit and Stamp set
Order this kit by clicking on the link below
Bonus Cards! For my video I flipped over the DSP. So you now have 2 ways you could create this card in this kit! Tell me which do you like the best?
Happy Stampin' Everyone!!!


.jpg)


No comments:
Post a Comment
Thank you so much for leaving me a comment! It really makes my day and I love hearing from you! <3