I created this set of Pansy Patch cards for my Royals Hearts Stampers Team Kit! I show 4 different ways to feature the DSP and stamp set. These are made with expert stampers in mind and use "all the stuff". You can buy the whole suite by clicking on the link below.
Supplies
Pansy Patch Stamp Set
Pansy Petal Dies
Pansy Petals DSP
Bumblebee Trinkets
Contour Scalloped Dies
Stitched So Sweetly Dies
Layering Circle Dies
Stitched Rectangle Dies
Evening Evergreen Ink & Cardstock
Fresh Freesia Cardstock
Polished Pink Cardstock
Soft Succulent Cardstock
Pale Papaya Cardstock
In Color Shimmer Vellum
Thick Basic White Cardstock
Banner Pick a Punch
Silver & Clear Epoxy Essentials
Always Recommended
Paper Snips
Trimmer
Simply Shammy
Die Cutting Machine
Bone Folder
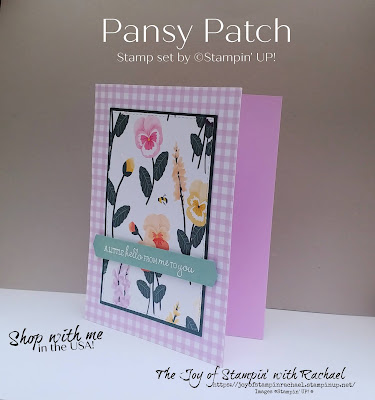
This Polished Pink cardbase was kept pretty simple. It shows off the Contour Scallop dies and how to stamp the pansy and die cut it out.
Measurements
Polished Pink Cardbase: 4 1/4 x 11 scored @ 5 1/2
Basic White: 4 x 5 1/4
Steps
- Measure, score, and cut your paper.
- Die cut with the Scalloped Contour dies onto the DSP.
- Die cut a smaller scalloped in Basic White. Stamp on it the stem in Evergreen.
- Die cut a Polished Pink tag from the Stitched So Sweetly dies and stamp your saying in Evergreen.
- Stamp with Polished Pink, Papaya, and Evergreen 3 pansies and die cut them out.
- Stamp in Soft Succulent and Evergreen the 2 leaves and die cut them out.
- Assemble: Glue your DSP onto the cardbase. Glue the scalloped basic white. Attach the pansies with dimensionals. Attach the leaves to the label and attach them all with dimensionals.
- Embellish with the silver epoxy shapes.
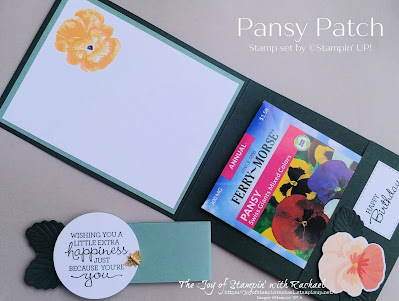
This is my WOW card! It has a belly band to keep it all together but when you open it up, WOW! I've created a pocket in the inside and use the top spot for where you can write a sweet message.
The Bumblebee Trinkets were so popular that they are are backorder right now. But be sure to check on it every so often to see when they are back on the shelves because they are cute and perfect!!
Measurements
Evening Evergreen Cardbase: 4 1/4 x 11 scored @ 5 1/2
2 Soft Succulent: 4 x 5 1/4
Basic White: 3 3/4 x 5
DSP: 3 3/4 x 5
Pocket Evening Evergreen: 4 1/4 x 2
Soft Succulent Belly Band: 1 1/2 x 11
Steps
- Measure, score, and cut your paper.
- Die cut a medium Basic White circle and stamp in Evergreen the saying.
- Die cut 2 large Evergreen leaves and 2 small Evergreen leaves.
- Did cut a pansy from the DSP.
- Die cut in Basic White a small stitched rectangle. Stamp on it your "Happy Birthday" in Evergreen.
- Stamp a pansy in the top right corner of the Basic White in Papaya.
- Assemble: glue your layers together (Soft Succulent with DSP and Soft Succulent with White). Glue your layers to the front of your cardbase and on the top inside. Attach your pocket with tear tape. Attach the DSP pansy with dimensionals and your leaves with liquid glue. Glue on your happy birthday to the pocket.
- Make your belly band by wrapping around the card front and using tear tape to form the band. (See video).
- Attach your circle to the belly band with dimensionals and glue large leaves underneath.
- Embellish with your the bumblebee trinket.
This card features the In Color Vellum and is so stinkin' pretty! Vellum makes such pretty flowers!
Here is the close up of the Pansy Vellum and just look at all that detail!
Measurements
Thick Basic White: 5 1/2 x 8 1/2 scored @ 4 1/4
Steps
- Measure, score, and cut your cardbase.
- Die cut the largest Scalloped Contour layer with you DSP. Glue to the card front.
- Die cut the pansy using the Papaya Vellum. Die cut out a Papaya center. Die cut 2 leaves in Evening Evergreen. Watch video to see how to assemble. Attach with glue dots to the front of right corner of your card.
- Die cut in Papaya the Stitched So Sweetly label and stamp in Evergreen your saying. Glue to the top left corner of your card.
- Use the silver epoxy circle shape for the center of your pansy or die cut a center piece in Coral.
I love this card, and it is so simple! I love how they DSP covers the whole front and creates this new look!
Measurements
Fresh Freesia Cardbase: 5 1/2 x 8 1/2 scored @ 4 1/4
DSP: 4 1/4 x 5 1/2
Evening Evergreen: 4 1/2 x 3 1/8
Soft Succulent: 1/2 x 4
Steps
- Measure, score and cut your paper.
- Die cut your DSP using the Stitched Rectangles. Glue to the Evergreen Matte.
- Stamp in Evergreen or emboss with the white embossing powder.
- Using the Banners Pick a Punch, punch arrow heads on both ends of the Soft Succulent.
- Glue the 4 1/4 x 5 1/2 DSP on to the card front.
- Glue the stitched rectangle to the card front.
- Attach the saying with dimensionals.
Facebook Live Video
Happy Stampin' Everyone!!!


No comments:
Post a Comment
Thank you so much for leaving me a comment! It really makes my day and I love hearing from you! <3