It is Wonderful Wednesday which means when you order from me today I'll send you the Wonderful Wednesday Gift!!! For March I'll send you the Rhinestone Waves Basic Jewels.
Just Shop with this link below!
Earn Bounce Back Bucks with every $50 you spend on my Online Store!
What do you do with all the cards you make? Do you store them in a shoe box? Have a card rack to display them? Do you ever give them away as gifts? If so, this would be a great way to make a set and give as a gift or have ready on you shelf in a nice organized way!
The box is pretty easy to make, but the secret is that you'll need a 12 x 12 piece of cardstock to create the bottom.
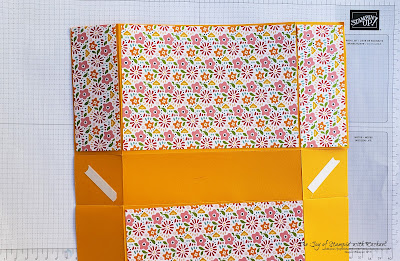
For the bottom you'll need tear tape and 4 pieces of DSP.
Here is what the DSP looks like for the lid and with the tear tape. Just follow the steps below and comment if you have any questions.
Supplies
12 x 12 Brights Cardstock
12 x 12 Pattern Party Designer Series Paper
Tear Tape
Multipurpose Liquid Glue
Measurements
Mango Melody Cardstock Bottom: 11 x 12
11 inch side scored @ 2 & 9
12 inch side scored @ 5 & 7
12 x 12 DSP: First: Cut two 6 7/8 x 4 7/8
Second: Cut the lid top 6 7/8 x 1 7/8
Third: Cut two lid front & backs 6 7/8 x 1 3/8
Fourth: Cut two lid sides 1 3/8 x 1 7/8
Fifth: Cut two bottom sides 4 7/8 x 1 7/8
See Diagram below
Mango Melody Lid: 10 1/16 x 5 1/16 scored @ 1 1/2 on each side
Steps
- Measure, score, and cut your paper. Use the diagram above for the DSP.
- For the bottom of the box cut along the 5 & 7 score lines on both sides and stop at the next score line. You will create two tabs.
- See photo above to know where to put the tear tape for the bottom.
- Glue the DSP on it and then remove the tear tape backing and form the bottom.
- For the lid cut on the long side at the score to the next score. Make a total of 4 cuts. Attach tear tape.
- Glue the DSP to the lid and remove backing of the tear tape to assemble the lid.
- Embellish the box with ribbon, tags, and embellishments on however you want!
Facebook Live Video
Happy Stampin' Everyone!!!


No comments:
Post a Comment
Thank you so much for leaving me a comment! It really makes my day and I love hearing from you! <3