t> The Joy of Stampin' with Rachael: April 2023

Tuesday, April 25, 2023

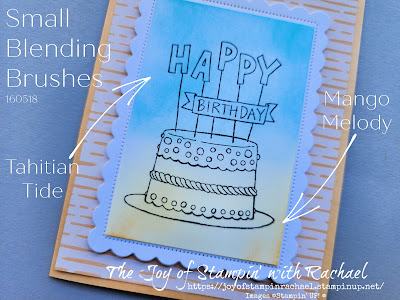
Tuesday's Tip at Ten- Blending Brushes Vs. Stampin' Blends

 There is a great debate on how to color stamped images. There is no wrong way, but here are some reasons why you would use Blending Brushes Vs. Stampin' Blends. 


For the card above I used my small Blending Brushes and quickly made a two-tone look. 
Pros:
1). Requires little supplies (3 inks, 2 blending brushes).
2). It is fast and easy to make in the masses. 
3). There are so many color options. 


This card above used the same cake image from the Best Day stamp set but I used Stampin' Blends to color it in. 
Pros:
1). Makes the stamped image very colorful!
2). Great for adding lots of little details and shading by using the light or dark blend. 
3).  Coloring can be very therapeutic because it takes time and attention to details. 

I would love to hear which card you like better and which method you prefer for yourself...
Brushes or Blends?

Happy Stampin' Everyone!!!


Monday, April 24, 2023

Manly Monday- Enjoy the Rhythm


Manly Monday with the Enjoy the Rhythm stamp set! I am so happy to say this stamp set is carrying over into the Annual Catalog. I made this card especially with my oldest brother in mind who has been a musician all of his life. He started on the piano, played the trumpet for Marching Band, has an amazing singing voice and picked up the electric guitar! So this card was perfect for him, as it tells a little bit of his musical story. 


You can make this card too when you shop from my online store and using the steps below! 

Enjoy the Rhythm

All images © 1990-2023 Stampin’ Up!®


Supplies:

·       Stamp Sets: Enjoy the Rhythm (160361)

·       Card Stock and Paper: Thick Basic White (CS) (159229); Parakeet Party (159259); Sweet Sorbet (159268); Orchid Oasis (159267); Tahitian Tide (159261); Basic Black (121045)

·       Stamp Pads: Parakeet Party (159208); Sweet Sorbet (159216); Orchid Oasis (159214); Tahitian Tide (159210); VersaMark (102283)

·       Tools: Something Fancy Dies (160424); Punch (222222); Heat Tool (129053)

·       Miscellaneous: Stampin’ Emboss Powders Basics (155554); Classic Matte Dots (158146); Stampin’ Dimensionals (104430); Stampin’ Seal Adhesive (152813); Multipurpose Liquid Glue (110755)


Measurements:


·       Thick Basic White: 5 ½” x 8 ½” scored @ 4 ¼”

·       Parakeet Party: 2” x 2 ½”

·       Sweet Sorbet: 2” x 2 ½”

·       Orchid Oasis: 2” x 2 ½”

·       Tahitian Tide: 2” x 2 ½”

·       Basic Black:1 1/4” x 2 ¼”


Instructions:


1.     Measure, score, and cut your paper.

2.     Die cut the Basic Black with the Something Fancy Dies and heat emboss the “happy birthday” with the Basic White powder.

3.     Stamp on to the Parakeet Party with Parakeet Party 3 guitars, starting with the center one first and flipping the next two.

4.     Stamp on the Sweet Sorbet with Sweet Sorbet the musical notes at an angle across the middle. Stamp it 3 more times.

5.     Stamp on the Orchid Oasis with Orchid Oasis piano keys at an angle.

6.     Stamp on the Tahitian Tide with Tahitian Tide the drum set.

7.     Glue on each square to the cardbase, leaving space between each piece. Use Stampin’ Dimensionals to attach the Basic Black label to the center.

8.     Embellish with 3 of the Classic Matte Dots.


Product List


Happy Stampin' Everyone!!!


Friday, April 21, 2023

Fun Fold Friday- Mother's Day Tulip Peek-a-boo Card


Fun Fold Friday with this Tulip Dies Mother's Day Card! 


Today's Fun Fold is featuring so many soon to be retiring products as my way of saying "goodbye". 
Goodbye to...
Flowering Tulips Stamp Set
Tulip Dies
So Saffron
Brushing Bride
Mint Macaron
Pear Pizzazz 


These dies are some of my favorites because tulips are my favorite flowers. The BEST thing about these dies right now is that they are on SALE!!! Use to be $35 and are now just $14! 


What mother doesn't like flowers for Mother's Day? So you really can't go wrong with these. 


I love the "peek-a-boo" front. Where we see the flowers through the circle in the front! 


After these products are gone, be sure to still use this Fun Fold layout! 


Be sure to shop my online store by May 1st to get some of these Last Chance favorites!!!


Supplies
**Flowering Tulips
*Tulip Dies
Layering Circles Dies 
Something Fancy Dies
Country Gingham DSP: 
Paper: Very Vanilla, Mint Macaron, So Saffron, Brushing Bride, Pear Pizzazz
Ink: Mint Macaron
Linen Thread

*Retiring May 1st
**Sold Out


Measurements
Mint Macaron Cardbase: 11" x 4 1/4" scored @ 5 1/2"
DSP: 5 1/4" x 4"
Very Vanilla: 5 1/4" x 8" scored @ 4" & 6"
2" x 2"
Mint Macaron: 1" x 3"
So Saffron: 2" x 2"
Blushing Bride: 2" x 2" 
Pear Pizzazz: 4" x 2" 

Steps
  1. Measure, score, and cut your paper. 
  2. Die cut the Something Fancy banner in Mint Macaron and stamp the Mother's Day greeting onto it with the Mint Macaron ink. 
  3. Glue the DSP the front of the cardbase but only place glue around the edges. Keep the center adhesive free. 
  4. Die cut a circle through the front of the card. Save the DSP circle to glue to the inside and the Mint circle for the flowers. 
  5. Die cut the tulips in So Saffron and Brushing Bride. Assemble with glue dots or liquid glue. 
  6. Die cut the stems from the Pear Pizzazz. 
  7. Die cut the Very Vanilla circle one size smaller then the one you cut out from the front. 
  8. Attach Mint circle to the Very Vanilla circle. Attach the tulips with dimensionals. Glue the stems and trim off the ends. 
  9. Glue the Very Vanilla to the inside of the card. Fold the score lines and close the card. Trace the circle with a pencil to the Very Vanilla. Glue the tulip circle to the Very Vanilla. Glue the DSP circle underneath the tulip circle (see video). 
  10. Make a Linen Thread bow and attach with a glue dot over the stems. 
  11. Attach the banner with dimensionals. 


Facebook Live Video


Happy Stampin' Everyone!!!


Wednesday, April 19, 2023

New at SU- Case The Mini Catalog


Welcome to the NEW AT SU! Blog hop! We are a group of StampinUp! demonstrators from around the world who are full of creative paper crafting ideas to share with you and get you crafting! Today we are showcasing products from the StampinUp! Mini Catalog by CASING a project using a different stamp set!


(Card I CASED made by Stampin' UP!)

This card uses the Two-Tone Flora Stamp Set & Something Fancy Stamp Set & Dies  found on page 16 of the Mini Catalog. 


I used the Sweet Citrus Stamp Set and just LOVE the results! There are many ways to CASE a card. Here is how I made mine...


I used the same layout and colors but swapped out the stamp sets and added the Sweet Citrus Hybrid Embossing Folder. 


I just LOVE the embossing folder and made sure to emboss the bottom of the Basic White to attach to the inside. 


I didn't have the same embellishment as the card in the catalog but wanted mine to have a similar color. 


So I used my Cajun Craze and Basic Rhinestones to make the perfect embellishment. 

Thank you so much for stopping by! I hope I've shown you how easy it is to be inspired by the Stampin' UP! Catalog and switch out a couple of things by using what you have to make beautiful cards! 


I am happy to answer any questions about the techniques shown here! Please contact your StampinUp! demonstrator to make a product purchase. If you do not have a demonstrator, you can use the links below to order products from me or join my team.


Happy Stampin' Everyone!!!


New at SU Blog Hop- All Tied Up with Dotted Ribbon Knot Bow

  Welcome to the NEW AT SU! Blog hop! We are a group of Stampin ’ Up! Independent Demonstrators from around the world who are full of creati...