Welcome to the NEW AT SU! Blog hop! We are a group of Stampin’ Up! Independent Demonstrators from around the world who are full of creative paper crafting ideas to share with you and get you crafting! Today we are sharing the Bundles or Suites from the NEW Mini Catalog!
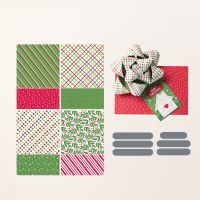
I am featuring the Take a Bow Bundle!
This is the first time in Stampin' UP! history they have bundled Designer Series Paper with Stampin' Dies! You heard me right...there is NO stamp set with this bundle!!!
When you order it as a bundle you save 10%. But if you want to have just the DSP, you can order that alone, over, and over again!
Look at how fun this bow is! It is great to add to any Christmas package or to be used year round when you try it with other Designer Series Paper. Below are some quick steps to help get you started making bows too!
Step 1: Pick your two sheets of 6" x 6" Designer Series Paper and grab your Take a Bow dies.
Step 2: Die cut your DSP by running it through your Stampin' Cut & Emboss Machine.
You'll need 6 large, 4 medium, and one small die cuts of the DSP.
Step 3: Use the Bone Folder to curl the paper and then use the Mini Glue Dots (or Tear Tape) to connect the ends of the DSP to recreate a loop.
*They overlap so the bottom straight edge, is on the side of the straight edge of the other end.
Step 4: Glue the DSP two loops at a time. Then start with the largest ribbon as a the bottom and form an "X" with two, and one going straight through the "X".
Make the small center bow by making a "+" sign.
For the center, use the smallest die cut and make a circle and not a ribbon shape.
Attach them all together.

Step 5: Add the bow with a tag to your favorite gift box, fill with treats, and give to a friend!
Need more than just steps? Watch this video to see the bow being made in action while listening to some calming Christmas Music.
If you thought this Bundle was fun, you should keep on going and HOP to the next Stamper (Tricia)!
Just use the links below to see more!
I am happy to answer any questions about the techniques shown here! Please contact your Stampin’ Up! demonstrator to make a product purchase. If you do not have a demonstrator, you can use the links below to order products from me or join my team.
Product List
LOVE this bundle??? Add it to your shopping cart today and get FREE shipping with a $75 order!
Click here to Subscribe and get 40% if you are NEW to Paper Pumpkin.
August 2024 Rewards
Use Host Code B7R7VHS4 and as a thank you for ordering
💚 Spend $15 and get the July Layout Love pdf
💚 Spend at least $50 and get my Happy Mail Gift & Card
💚Spend $150 or more and receive Stampin’ Rewards
Happy Stampin' Everyone!!!


Love this bow so much! Thanks for sharing your tips!
ReplyDeleteThanks for sharing! great
ReplyDeleteThanks for the great instructions for the bow, Rachael! the peppermint bow is adorable. Thanks for sharing this!💕
ReplyDeleteHow great is being able to make your own bows for parcels? Thanks for the video tutorial!
ReplyDeleteCool bows - thanks for the step by step...glue dots are the best!
ReplyDeleteLove your tips for creating the bow, Rachael! xx
ReplyDelete