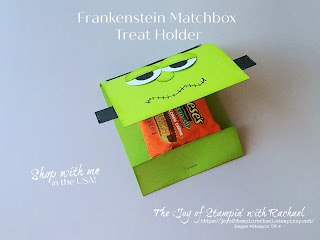
Wednesday's Kit Class with these fun treat holders for Halloween! Learn how to make a Mummy Chocolate Bar Wrap, a Frankenstein Matchbox, a DSP diaper fold with a moon and punched out cat, and a mini pumpkin made with the Mini Curvy Keepsake box die. Be sure to watch my video below and you can get this kit from FREE from me with a $35 order online using the Hostess Code GKQG9DCM.
Shop with code by shopping on the link below.
Suggested Ideas to Order
Mini Curvy Keepsake Dies $34
Cat Punch $18
Circle Punch $18
Mummy Chocolate Bar Wrap
So scary and so sweet!
Supplies
Very Vanilla Cardstock
Basic Black Cardstock
Crumb Cake Ink
Sponge
Tear Tape
Tombow Liquid Glue
Little Circle Punches for eyes
Measurements
Very Vanilla: 5 1/2 x 5 1/2 scored @ 1 1/2 , 1 3/4, 4, and 4 1/4
5 1/2 x 3/4 stripes (about 8)
Steps
- Measure, cut and score your Very Vanilla.
- Wrap your Hershey's Chocolate bar inside and use tear tape to glue down the back.
- Take your Very Vanilla stripes and tear off one side from each and on one tear off both sides.
- Use a sponge and Crumb Cake Ink and sponge all they sides of your stripes.
- Take the double tear off stripe and go 3/4 the way up and put in on at an angle and wrap it around the back. Use the Tombow glue for this.
- Punch out your eyes and glue together. Place them right over your first stripe.
- Continue wrapping your mummy with the stripes until you have him covered. Switching angles as you go. Use some of the tear off pieces to make a little extra part up by his eyes. (See Video)
This is the easiest treat holder ever and need no adhesive to make the holder, only adhesive to attach the punched out shapes!
Supplies
Magic in the Night DSP
Circle Punch
Cat Punch
Mango Melody CS & Ink
Basic Black CS
Measurements
Magic in the Night DSP: 6x6
Steps
- Cut your DSP to 6 x 6.
- Punch out your Black Cat and Punch out your Moon with the circle punch.
- Sponge the moon with the Mango Melody ink.
- Fold your DSP using the "Diaper Fold". Go to this blog link by Pat Tecza to see really good photos OR watch my video. https://ramblinstamper.blogspot.com/2019/10/easiest-halloween-treat-holders-ever.html?utm_source=feedburner
- Attach the Moon and the Cat using liquid glue and tear tape.
Make the sweetest little pumpkin and put some mini treats or a battery tealight candle inside.
Supplies
Mini Curvy Keepsake Box Dies
Pumpkin Pie CS
Hello Harvest Stamp Set
Old Olive Ribbon
Old Olive Ink
Basic Black or Memento Ink
Linen Thread
Holiday Rhinestones
Whisper White CS
Measurements
Pumpkin Pie Cardstock- 5 1/2 x 8
12 inches of Ribbon
Steps
- Run your Pumpkin Pie and Whisper White through your Stampin' Cut and Emboss Machine to make the curvy keepsake box and the white tag.
- Stamp your Jack-o-lantern face in memento ink onto the Pumpkin Pie curvy box on a side with the handle on top.
- Assemble the curvy box (no glue needed). Be sure to fill it first.
- Stamp "Boo!" in Old Olive on to your label/tag and use linen thread to attach.
- Tie a bow to the handle of the curvy box and attach the tag at the same time.
- Use rhinestone to embellish on the tag.
This Frankenstein's Monster Matchbox treat holder is so stinkin' cute!
I filled him with the Reese's Peanut Butter Frankenstein Cup (half brown and half green). This design was a creation of mine and just love him so much! You can make other treat holder designs using the measurments below. The one that inspired me used the Cat Punch and a 3x3 DSP (super easy).
Supplies
Granny Apple Green CS and Ink
Basic Black CS
Stitched Rectangle Dies
Stampin' N Write Basic Black Marker
Whisper White CS
Circle Punches
Sponge
Tombow Liquid glue
*stapler
Measurements
Granny Apple Green: 3 1/4 x 7 3/4 scored @ 3 1/4 & 6 3/4
Steps
- Measure, cut, and score your Granny Apple Green.
- Punch out the eyes with retired circled punches.
- Sponge all the green edges with the Granny Apple Green Ink.
- Die cut out his Black hair and his neck bolts.
- Glue the eyes on, and the nose (watch video for tips).
- Make mouth with Stampin' N Write Marker.
- Staple the bottom.
- Attach bolts to either the bottom or near his mouth on the side.
Happy Stampin' Everyone!!!


.jpg)


No comments:
Post a Comment
Thank you so much for leaving me a comment! It really makes my day and I love hearing from you! <3