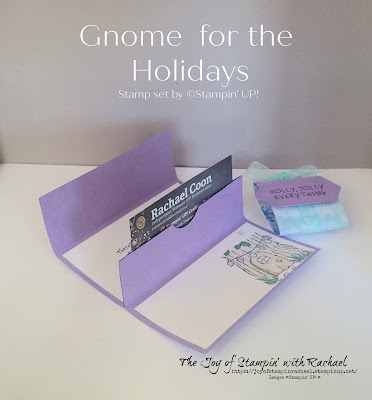
Today's Wednesday's Kit Class is all about the Christmas Gift Card holders using the Gnome for the Holidays stamp set and the Snowflake Splendor DSP. I show you three different styles: vertical, horizonal, and pop up gift card holders.
You can get this paper kit for free from me if you order $35 worth from my online store by Friday the 13th and when you use the hostess code T62QPP2K at checkout or by clicking the link below.
Here are some suggested items to get to help finish this kit
Gnome for the Holidays $19
Snowflake Adhesive-Backed $6
Tear Tape $7
Snowflake Splendor DSP $11.50
Supplies
Gnome for the Holidays
Snowflake Splendor DSP
Winter Snow Embossing Folder
Night of Navy CS & Ink
Highland Heather CS
Gorgeous Grape Ink
Pool Party CS & Ink
Menmento Ink
Blends: Highland Heather, Pool Party, Ivory, Crumb Cake, Just Jade, Night of Navy
Stitched Nested Label Dies
Pool Party Ribbon
Snowflake Adhesive-Backed
1 inch circle Punch
Traditional Gift Card Holder-Vertical

Front view of card
Inside view of card
Measurements
Night of Navy Cardbase: 4 1/4 x 11 scored @ 5 1/2 & 8 3/4
Whisper White: 4 x 5 1/4, 2 x 4, 3/4 x 3
Misty Moonlight: 1 x 3 1/4
DSP: 3 x 4
2 x 4 times 2
Steps
- Measure and cut your paper.
- Stamp your girl gnome on the bottom left corner of your 4 x 5 1/4 Whisper White in memento ink and color her in with the blends. Glue the 2 x 4 DSP the the other corner and glue inside of the cardbase.
- Stamp in Night of Navy both your sayings on the Whisper White pieces for the front and inside.
- Glue the 3 x 4 DSP to the front.
- Glue your Misty Moonlight to the stamped 3/4 x 3 Whisper White. Attach your label with dimensionals.
- Glue your 2 x 4 DSP to the Inside of the card. Use a circle punch to make a little half circle notch by where the gift card will go. Glue down your 2 X 4 Whisper White and then use tear tape on the sides to create a pocket.
Front of card
Inside of card with a gift card pocket
Measurements
Pool Party Cardbase: 4 1/4 x 5 1/2
Whisper White: 7 3/4 x 5 scored @ 2 1/4 & 6
DSP: 4 3/4 x 1 1/2
Steps
- Measure and cut your paper.
- Stamp in Pool Party inside your Whisper White.
- Stamp in Memento Ink a gnome on Whisper White, color him with blends and fussy cut him out.
- Die cut a Stitched Nested Label out of Pool Party and then stamp in Pool Party, "Holly, Jolly Everything" all over.
- Add your gnome to the label with dimensionals and then attach with dimensionals to the Whisper White.
- Glue your DSP to the bottom of the Whisper White and use the circle punch to make a notch. Glue down both sides with tear tape.
- Attach the whole Whisper White to the 4 1/4 x 5 1/2 Pool Party piece of cardstock.
- Embellish with snowflake adhesive backed shapes.
Front of the gift card holder
Inside of the gift card holder
Pop Up view of Gift Card Holder
Measurements
Highland Heather Cardbase: 4 1/4 x 8 1/2 cut @ 5 inches
4 1/4 x 4 scored @ 1 1/4 & 3 1/2
4 1/4 x 3 1/2 scored @ 1 1/4
2 Whisper White: 4 x 2
DSP: 1 3/4 x 6
Steps
- Measure, cut, and score your paper.
- Run your purple paper through the Winter embossing folder in your Stampin' Cut and Emboss machine.
- Die cut out a Highland Heather Stitched Nested Label and stamp in Gorgeous Grape the "Holly, Jolly Everything".
- Stamp on your 4 x 2 Whisper White your saying on one and in Memento Ink the Gnome tree. Color with your blends.
- Use tear tape only on the ends of the sides that match up (1 1/4). Do not glue the bottom. Use circle punch to make a notch.
- Glue in your Whisper White stamped images.
- Fold it close and wrap your DSP loosely around and close the DSP shut with tear tape to make a "belly band".
- Wrap the Pool Party ribbon around your DSP and tie a bow on top.
- With dimensionals attach your Nested Label.
- Place Gift card in the center and watch it pop!
Facebook Live Video
Happy Stampin' Everyone!!!


Beautiful creative projects Rachel.
ReplyDeleteThank you!
Delete