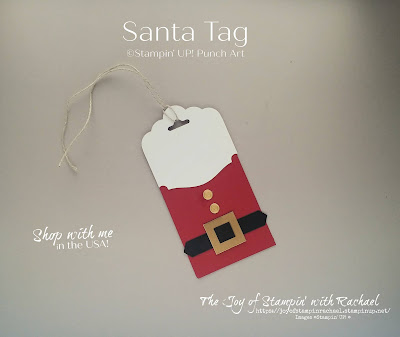
Wednesday's Kit Class with Christmas Tags! Tags are such a great way to dress up a Christmas Gift and these ones are perfect ones to make because they require little stamping and are so darn cute!
For this kit class I'll send you supplies to make 4 tags you'll just need to supply your own stamp set with a "To: and From:" on it and some ink in order to finish them. To get this kit for FREE you just need to place an $35 online order using the hostess code T62QPP2K by Friday, November 27th at 4:00 pm.
Click on the link below to shop instantly with today's code.
Suggested Items to Order
Classic Label Punch $16.20 or $18.00
Scalloped Tag Topper $23
Banner Year $17
Supplies
Banner Year stamp set
Scalloped Tag Topper Punch
Story Label Punch
Classic Label Punch
Garden Green CS & Ink
Cherry Cobbler CS
Whisper White CS
Basic Black CS
Gold Foil
Braided Real Red Trim
Linen Thread
Pearls
*Suit and Ties Dies (buttons)
*Not available until Jan 5th. 2021
Always Recommended
Paper Snips
Trimmer
Simply Shammy
Die Cutting Machine
Bone Folder
Adhesives
Measurements
Tag: 4 x 2
Whisper White: 2 x 2 1/4
Gold: 3/4 x 3/4

Steps
- Measure and cut your Cherry Cobbler cardstock by 4 x 2. Use the Scalloped Tag Topper punch on one end and punch out your Whisper White with it.
- Flip over the cardstock and stamp your "To: & From:" image with either the Garden Green Ink or a Cherry Cobbler ink.
- On the unpunched end of your Whisper White slide it into your Story Label punch through the backside (see video) while still holding onto the Tag Topper punch side.
- Glue your Whisper White to your Cherry Cobbler, matching up the hole on the top.
- Belt and Buckle: Punch out 2 Basic Black Classic Label Punches. Cut one to make the center black part to your buckle. Glue belt and buckle to the bottom of your tag. (Use dimensionals if you want the buckle to pop).
- Die cut buttons or use some gold embellishments and attach to the center of tag.
- Tie on some lined thread (about 5 inches) to the top of the topper.
Steps
- Measure and cut your Garden Green cardstock by 4 x 2. Use the Scalloped Tag Topper punch on one end and punch out your Whisper White with it.
- Flip over the cardstock and stamp your "To: & From:" image with either the Garden Green Ink or a Cherry Cobbler ink.
- Use your paper snips and cut out little triangles to the bottom of your Whisper White and then glue onto your Garden Green tag, matching up the holes.
- Belt and Buckle: Punch out 2 Basic Black Classic Label Punches. Cut one to make the center black part to your buckle. Glue belt and buckle to the bottom of your tag. (Use dimensionals if you want the buckle to pop).
- Use pearls for your buttons in the center.
- Attach your Real Red Braided Trim to the top and add a bow.
Bonus Tag Ideas:
At the end of the video you will see my bonus tag ideas and tips on how I prepare my Christmas tags each year for my family. I just grab my favorite punch, scrap of paper, and a stamp set with to and from. I punch out the paper and stamp on it. Then I flip over the tag and write one of the 4 items my kids will be getting: Wear, Want, Read, Need. I fill out to To and From and place them all into a baggie that I keep with my wrapping paper area. This helps me keep track who has gotten what and who I still need to wrap for or shop for. It also helps me not go crazy with gifts at Christmas. The fancy tags I use for BIG gifts or neighbor good plates. :)
Facebook Live Video
Happy Stampin' Everyone!!!


No comments:
Post a Comment
Thank you so much for leaving me a comment! It really makes my day and I love hearing from you! <3