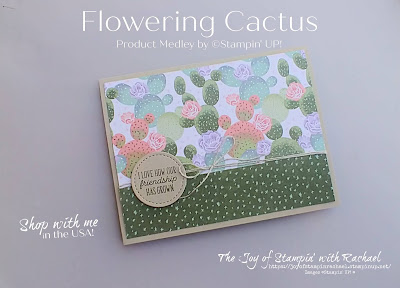
Today's Wednesday's Kit Class I'm using the Flowering Cactus Product Medley from the Mini Jan-June Catalog! If you love it all (paper, dies, stamp set, embellishments) this is the set for YOU! The beauty of this "kit" is that you are the designer and can create anything you want with it. Below are just 4 cards that I created and will be part of your kit if you order $35 worth at my online store using the hostess code by April 23rd.
Suggested Items to Order
Flowering Cactus Product Medley $70
Here is everything that comes in this Medley: Flowering Cactus stamp set, 48 sheets of 6 x 6 DSP, linen thread, coral linen thread, felt embellishments and matching Dies
Supplies
Flowering Cactus Product Medley
Stitched Rectangles Dies
Stitched Shapes
Stitched with Whimsy Dies
Crumb Cake Cardstock
Mango Melody Cardstock
Highland Heather Cardstock
Mossy Meadow Ink & Cardstock
Calypso Coral Ink
Holiday Rhinestones
*Brayer
*Sponge
*Retiring items
Always Recommended
Paper Snips
Trimmer
Simply Shammy
Die Cutting Machine
Bone Folder
This card just may be my favorite of the set! I used the Stitched Rectangle Dies to create this "frame" like look! Then to create my sunset look I used Mango Melody cardstock and Calypso Coral ink and sponge brayered just half.
Stitched Rectangle Dies
*Sponge Brayer $6.40
Measurements
Thick Basic White: 5 1/2 x 8 1/2 scored @ 4 1/4
Crumb Cake: 4 1/4 x 5 1/2
Steps
- Measure, score and cut your paper.
- Die cut a Stitched Rectangle in Mango Melody. Use the sponge brayer and Calypso Coral to add color to half of it (to make it look like a sunset).
- Die cut 2 cactus from the DSP.
- Die cut 1 Mossy Meadow cactus.
- Die cut in the corners of the Crumb Cake little spikey images.
- Die cut the smallest stitched rectangle and stamp with Mossy Meadow your staying onto it.
- Assemble: use dimensionals to attach the Crumb Cake to the cardbase. Wrap linen thread around the Mango Rectangle twice and tie a bow. Use dimensionals to attach Mango rectangle to the Crumb. Add cactus and label.
- Embellish with Holiday Rhinestones and felt flowers.
To this card we added a fun border with the Stitched with Whimsy Dies. You could make this card with the DSP only or with the stamped image. Watch my video to see how to do both!
Stitched with Whimsy Dies $29
Measurements
Highland Heather Cardbase: 5 1/2 x 8 1/2 scored @ 4 1/4
Mossy Meadow: 3 5/8 x 4 7/8
Basic White: 3 1/2 x 4 3/4
4 x 5 1/4
Steps
- Measure, score, and cut your paper.
- Die cut with the Stitched with Whimsy dies on the Basic White (3 1/2 x 4 3/4).
- Die cut the cactus and flowers from the DSP OR stamp them out onto Basic White and die cut them out. (See video to learn how to make the cactus two toned).
- Stamp in Mossy Meadow the greeting and the little cactus shadow.
- Assemble: glue on your layers. Attach the cactus with dimensionals and the flowers with glue dots.
- Embellish with the Holiday Rhinestones.
Cactus are all about texture. Usually the kind you don't want to touch! This card is a great example of all the right kinds of texture. Between the layers, felts embellishments, and the embossed background. I used a retired embossing folder from the Holiday Catalog but you could use any that you like. I suggest the "mini" ones because they fit best in the space.
Greenery Embossing Folder
Measurements
Pear Pizzazz Cardbase: 5 1/2 x 8 1/2 scored @ 4 1/4
Pear Pizzazz: 4 x 5 1/4
Basic White: 4 x 5 1/4 (inside optional)
3 x 4
Calypso Coral: 3 1/8 x 4 1/8
Steps
- Measure, score, and cut your paper.
- Die cut 2 cactus, one in Mossy Meadow and one in Pear Pizzazz.
- Die cut a DSP cactus.
- Die cut on the bottom of the 3 x 4 Basic White with the cactus stitches. Stamp on the top right corner in Mossy Meadow.
- Emboss on half of the 4 x 5 1/4 Pear cardstock.
- Assemble: glue your layers together. Attach the Coral/White rectangle with dimensionals. Use liquid glue for your cactus and for your felt flowers.
- Tie a double bow with the coral linen thread and attach with a glue dot to the DSP cactus.
This card really features the DSP from this pack and shows how easy it can be to make a lovely card fast! I did use the retiring Stitched Shapes but you could use the Layering Circle Dies in it's place.
Layering Circle Dies
Measurements
Crumb Cake Cardbase: 5 1/2 x 8 1/2 scored @ 4 1/4
DSP: 5 1/4 x 1 1/4
5 1/4 x 3
Steps
- Measure, score, and cut your paper.
- Die cut the smallest circle in Crumb Cake and stamp in Mossy Meadow on it.
- Attach your DSP together by using a 4 x 5 1/4 piece of cardstock as your guide.
- Wrap linen thread around it twice and die a bow.
- Glue DSP to the card front,
- Attach the stamped circle with dimensionals.
Facebook Live Video
Happy Stampin' Everyone!!!


.jpg)


No comments:
Post a Comment
Thank you so much for leaving me a comment! It really makes my day and I love hearing from you! <3