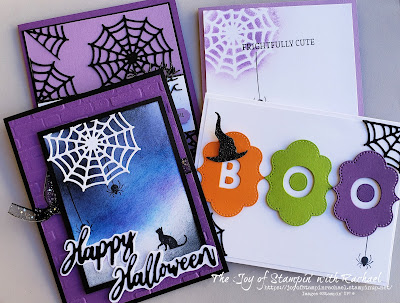
Here are the four card designs I made for my Royals Team Kit using the Frightfully Cute stamp set and the Frightful Tags Dies. My goal was to show how you could use the spider web die in 4 different ways. I also added some fun dies to create the sayings.
Supplies
Frightfully Cute Stamp Set
Frightful Tags Dies
Word Wishes Dies
Playful Alphabet Dies
Black Glitter Ribbon
Black Shimmer Paper
Paper- Basic Black, Basic White, Pumpkin Pie, Granny Apple Green, Gorgeous Grape, Highland Heather
Ink- Memento Black, Gorgeous Grape, Night of Navy, Pacific Point, Basic Gray
Brick Embossing Folder
Always Recommended
Paper Snips
Trimmer
Simply Shammy
Die Cutting Machine
Bone Folder
Adhesives: Tombow, Tear Tape, Seal, & Dimensionals

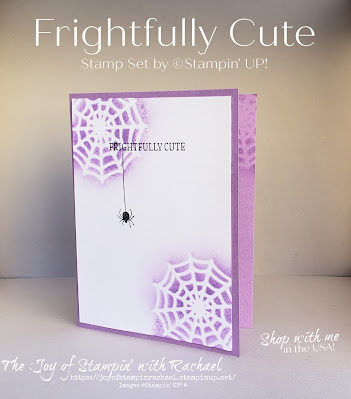
This is a very simple, two layer card but uses a cool way to make the web. All you need is the web die cut out and sponge, blending brush or sponge dauber (your choice and all would work).
Measurements
Highland Heather Cardbase: 5 1/2 x 8 1/2 scored @ 4 1/4
Basic White: 4 x 5 1/4
Steps
- Measure, score, and cut your paper.
- Die cut out a spider web (any color would do, I used Thick Basic White).
- Place the die cut over the corner and hold down with one finger in the center, then use your sponge and Gorgeous Grape to make the web. Do the same to the opposite corner.
- Stamp with Memento ink the spider and the saying.
- Glue onto the cardbase.
- *You can also make the spider sponge for the inside of the card as well.
This card creates a fun night sky with ink and then we glue on a white web.
Measurements
Basic Black Cardbase: 5 1/2 x 8 1/2 scored @ 4 1/4
Gorgeous Grape: 4 x 5 1/4
Basic White: 4 x 5 1/4
3 x 4
Basic Black: 3 1/4 x 4 1/4
Scrap of Basic White
Steps
- Measure, score, and cut your paper.
- Die cut a Basic White Web.
- Die cut out Happy Halloween in Basic Black and glue to a scrap of Basic White. Fussy cut along the edges.
- Emboss the Gorgeous Grape with the Brick Embossing Folder.
- Wrap 6 inches of Black Glitter ribbon around the Gorgeous Grape and glue to the cardbase.
- Add a knot bow to the far left side.
- Use sponges to create the night sky on the Basic White 3 x 4. Start with the lightest color first and end with black on the edges. (Night of Navy, Pacific Point, Gorgeous Grape, Basic Gray, Black).
- Stamp the cat and spiders with Memento Black ink.
- Glue on the web white and cut off the part that hangs over the edge.
- Attach the black matte and attach to the cardbase with dimensionals.
- Attach the the Happy Halloween with dimensionals too.
- Glue the Basic White for the inside.
This card uses the webs to create a background. I die cut out 3 webs total but cut one up to fill in the edges.
Measurements
Gorgeous Grape Cardbase: 5 1/2 x 8 1/2 scored @ 4 1/4
Basic Black: 4 x 5 1/4
Highland Heather: 3 7/8 x 5 1/8
Basic White: 4 x 5 1/4
3 7/8 x 1 1/2
Black Glimmer: 1/2 x 3 7/8
Steps
- Measure, score and cut your paper.
- Die cut 3 spider webs and cut one of them in one half and the other half into 1/4.
- Die cut a Black Glimmer paper tree.
- Die cut the label in Highland Heather and stamp on it using Memento Ink.
- Stamp 3 spiders onto the Basic White.
- Glue your spider webs to the Highland Heather and then attach to the Basic Black matte. Then glue to the cardbase.
- Glue the black glimmer paper to the Basic White. Attach with dimensionals.
- Glue on Black Glimmer tree.
- Attach label with dimensionals.
- Make a knot bow and attach with a glue dot.
- Glue the Basic White to the inside of the cardbase.
This card is more fun with the bright colors and you only stamp once (the little spider).
Measurements
Thick Basic White Cardbase: 5 1/2 x 8 1/2 scored @ 4 1/4
Basic White: 4 x 5 1/4
Steps
- Measure, score and cut your paper.
- Die cut a Black web and cut into 1/4.
- Die cut a Black Glimmer witch's hat and owl.
- Die cut our 3 label shapes in Pumpkin Pie, Granny Apple Green and Gorgeous Grape.
- Die cut out of the labels the B O O.
- Stamp a spider on the Basic White on the far right side.
- Assemble: Glue the spider webs 2 corners. Attach the "Boo" labels with dimensionals but glue down the center pieces. Glue the Basic White to the cardbase. Use a dimensional for the hat. Glue in the inside the owl and cut out letters.
Facebook Live Video
Happy Stampin' Everyone!!!


.jpg)


No comments:
Post a Comment
Thank you so much for leaving me a comment! It really makes my day and I love hearing from you! <3