

Merriest Moments
All
images © 1990-2021 Stampin’ Up!®
Supplies:
·
Stamp Sets: Merriest Moments (156353)
·
Card Stock and Paper: Basic White (159276); In
Good Taste DSP (152494); Blushing Bride (131198)
·
Stamp Pads: Flirty Flamingo (147052); Evening
Evergreen (155576); Garden Green (147089)
·
Tools: Merriest Frames Hybrid
Embossing Folder (56385); Scalloped Contour Dies (155560), Bone Folder
(102300), Stampin’ Cut & Emboss Machine (149653); Multipurpose Liquid Glue
(110755), Paper Snips (103579)
·
Miscellaneous: Stampin’ Dimensionals
(104430); Stampin Blends Combo packs in Soft Succulent (155521); Granny Apple
Green (154885); Old Olive (154892); Blending Brushes (153611);
Measurements:
·
Basic White: 8 ½ X 5 ½ scored at 4 ¼ and burnished with the Bone
Folder, remainder of sheet for stamping and diecutting
·
Blushing Bride: 4.25 X 5.5
·
In Good Taste Woodgrain DSP 5 ½ X 4 ¼
·
Instructions:
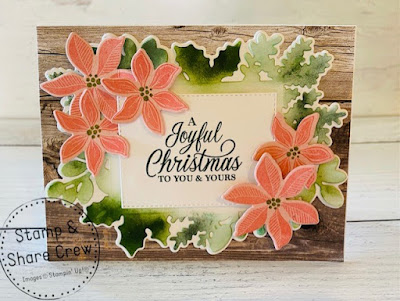
1. Die cut Merriest frames
background in Basic White; Die cut Merriest Frames greenery overlay and shade
leaves in various shades of green with blending brushes; Die cut Merriest
Frames center square and stamp with Merriest Moments sentiment in Evening
Evergreen
2. Stamp poinsettias from
Merriest Moments stamp set with Flirty Flamingo ink on Blushing Bride paper.
Stamp poinsettia center with Garden Green.
Die cut Poinsettias.
3. Adhere DSP to card front
with glue; Adhere colored greenery to white background and adhere to DSP. Using
stamping dimensional, adhere center message.
Using stamping dimensionals adhere poinsettias above and below the frame
corners. Use two dimensionals for some
flowers to add more dimension.
Order this 3 product bundle for just $54 by visiting my Online store with the link below
https://www.stampinup.com/products/merriest-moments-bundle-english?demoid=2130375
Merriest Moments
All
images © 1990-2021 Stampin’ Up!®
Supplies:
·
·
Card Stock and Paper: Soft Succulent cardstock (155776);
Cherry Cobbler cardstock (119685); Smoky Slate cardstock (131202); Basic White
cardstock (159276); Peaceful Place 12x12 Specialty Designer Series Paper (DSP)
(156394)
·
Stamp Pads: Soft Succulent Classic
Stampin’ Pad (155778); Smoky Slate Classic Stampin’ Pad (147113); Cherry
Cobbler Classic Stampin’ Pad (147083)
·
Tools: Tasteful
Labels dies (152886);
Merriest Frames Hybrid Embossing Folder (156385)
·
Miscellaneous: Simply Elegant Trim
(155766); Metallic Pearls (146282); Stampin’ Dimensionals (104430); Stampin’
Seal Adhesive (152813)
Measurements:
·
Smoky Slate cardstock: 8 1/2” x 5 1/2” (score at 4 ¼”)
·
Cherry Cobbler cardstock: 5 1/8” x 3 7/8”
·
Soft Succulent cardstock: 5” x 3 3/4”
·
Basic White cardstock:
scrap (poinsettia)
·
DSP: scrap (die cut label)
·
Simply Elegant Trim (silver): approx. 8”
Instructions:
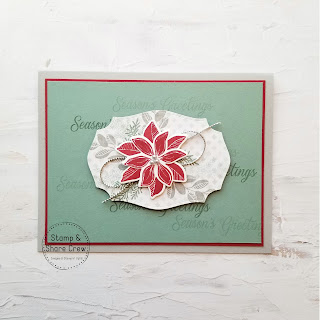
1. On a scrap of Basic White
cardstock, stamp the small and the large poinsettia from Merriest Moments with
Cherry Cobbler ink. Die cut out with the Merriest Frames Hybrid Embossing
Folder dies.
2. Die
cut a label from the Peaceful Place DSP (white with small gray diamonds
pattern) using one of the large labels (embossed edge) from the Tasteful Labels
dies.
3. On
the die cut label, stamp some foliage with the following ink colours:
a. Branch
with leaves: Smoky Slate ink
b. Large
pine sprig: Soft Succulent ink (stamped off once, & stamped as if in the
background)
c. Small
pine sprig: Soft Succulent ink
4. Glue the two poinsettias one
on top of the other, offsetting the petals, with Stampin’ Seal.
5. Tie a large bow with the
Simply Elegant Trim (silver). Attach it to the back of the poinsettia with
Stampin’ Dimensionals. Put the Stampin’ Dimensionals around the knot so your
poinsettia won’t be wobbly on the card! Stick it on the die cut label in the
middle of the foliage you stamped.
6. Put three Metallic Pearls
(silver) in the middle of the poinsettia.
7. Using the Season’s Greetings
stamp and Soft Succulent ink, randomly stamp “Season’s Greetings” on the Soft
Succulent cardstock to create a background.
Stamp twice before inking the stamp again so you will have some light
and some dark images.
8. With Stampin’ Seal, stick
the Soft Succent cardstock on the Cherry Cobbler cardstock. Then stick the
Cherry Cobbler cardstock on the Smoky Slate card base.
9. Using
Stampin’ Dimensionals, stick the die cut label in the middle of the Soft
Succulent cardstock layer.
Happy Stampin' Everyone!!!


No comments:
Post a Comment
Thank you so much for leaving me a comment! It really makes my day and I love hearing from you! <3