Fun Fold Friday with the Hello Ladybug Spinner Card! I've made Spinner Cards before but they never get old and are always fun! In fact you can make Spinner Cards with lots of things. I love using punches for Spinner Cards because they have reversable images.
Here are some pictures to help you see how it all comes together!
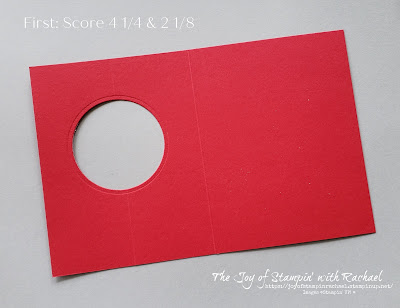
First: Score your card base twice, 4 1/4 & 2 1/8.
Secondly: Place DSP over the score line on the inside of the card base and die cut out your circle from both the base and the DSP.
Thirdly: Remove the circles. Use them for the inside of the card or use them for another project. Next watch my video to see how I use Tear Tape and attach the spinning twine.
Fourth: Your Ladybug will need 2 punched out of each body and wings.
I think you will find this card easier to make then you would have thought and would love for you to give it a "spin"!
Supplies
Hello Ladybug Stamp Set
Black Twine (Baker's Twine Essential Pack)
Paper- Basic Black, Basic White, Real Red
Ink- Basic Black, Mossy Meadow
Tear Tape
Measurements
Real Red Cardbase: 5 1/2 x 8 1/2 scored @ 4 1/4 & 2 1/8
DSP: 5 1/2 x 4 1/4
Basic White: 4 x 5 1/4
Basic Black: 4 x 4
Real Red: 3 x 3
Steps
- Measure, score, and cut your paper.
- Loosely put your DSP over the score lines on your card base and run through the die cutting machine with the circle die.
- Punch out the Basic Black for ladybug for it's body. Punch out 2 Real Red wings.
- Stamp in Basic Black on the wings the black spots.
- Stamp in Basic Black the saying on the bottom of the Basic White.
- Stamp in Mossy Meadow the leaf in the top left corner of the Basic White.
- Use tear tape on place it over the 2 1/8 score line above and below the circle.
- Cut about 5 inches of black twine and place through the middle of the cut out circle. Put more tear tape over the twine and don't remove the back,.
- Use multipurpose glue on the card base and attach the DSP.
- Put some tear tape on the body of the ladybug and attach to the twine. Add more glue to the body and attach the other body. Put the wings on both bodies.
- Glue on the Basic White to the inside of the card.
Facebook Live Video
Happy Stampin' Everyone!!!


No comments:
Post a Comment
Thank you so much for leaving me a comment! It really makes my day and I love hearing from you! <3