This is so much fun and even when you are sending late Birthday wishes, it will make them smile.
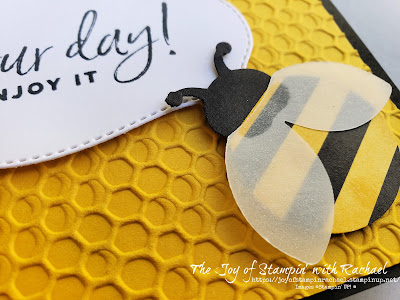
I made two different styles. On the left: late birthday with Daffodil Delight as the shade of yellow. On the right: it's your day saying and Bumblebee as the embossed yellow.

The shape of the Hexagon Adhesive Backed embellishments go perfect with this bee!
I just LOVE the Hive 3D Embossing Folder and all the details it adds to this simple layout. Also, you can see the difference between liquid glue used with the vellum wings verse the photo below with the glue dot to attach the vellum.
It is hard to see in the photo, but if you look closely you can see that I add some shimmer to the vellum by painting on some Wink of Stella.
I did not use the Hello Ladybug stamp set that goes only perfectly with the punch, but instead I used the Happiest Birthday stamp set!
Lastly, I used the Tasteful Label Dies to stamp the Birthday saying onto. The one above us a stitched outline and the one below has a scored border around it.
I hope you think these cards ae BEE-it-ful and try to made them in your craft room!
Supplies
Happiest Birthday Stamp Set
Ladybug Builder Punch
Tasteful Label Dies
Hive 3D Embossing Folder
Hexagon Adhesive-Backed
Paper- Daffodil Delight, Bumblebee, Basic White, Basic Black
Pattern Party Designer Series Paper
Daffodil Delight Blends
Vellum
Dimensionals
Wink of Stella
Memento Black Ink
Measurements
Basic Black Cardbase: 5 1/2 x 8 1/2 scored @ 4 1/4
Basic White: 4 x 5 1/4
3 x 4 scrap to die cut
Daffodil Delight or Bumblebee: 4 x 5 1/4
Steps
- Measure, score, and cut your paper.
- Punch out a Basic Black Ladybug body. Punch out the DSP for the body with no head. Punch out the wings in vellum.
- Use your shade of yellow blends to color in the stripes on the DSP. Glue to the Basic Black body.
- Attach the vellum wings with either a glue dot or liquid glue and paint the wings with some Wink of Stella glitter.
- Emboss the 4 x 5 1/4 Daffodil Delight or Bumblebee cardstock with the Hive 3D folder and glue to the cardbase.
- Die cut a Basic White label (choose your size) and stamp in Memento Ink your saying.
- Attach the label with dimensionals and attach the bee with a dimensional.
- Embellish with the Hexagon Adhesive-Backed Shapes.
Happy Stampin' Everyone!!!


No comments:
Post a Comment
Thank you so much for leaving me a comment! It really makes my day and I love hearing from you! <3