Garden Birdhouses Card
All
images © 1990-2022 Stampin’ Up!®
Supplies:
·
Stamp Set: Garden Birdhouses (155090)
·
Card Stock and Paper: Basic White Cardstock
(159276); Hues of Happiness Designer Series Paper (158822); Fluid 100 Watercolor
Paper (149612)
·
Stamp Pads: StazOn Jet Black Ink Pad
(101406); Night of Navy Classic Stampin’ Pad (147110)
·
Miscellaneous: Watercolor Assortment 1
(141709); Water Painters (151298); Scalloped Contours Dies (155560); Stylish
Shapes Dies (159183); Stampin’ Dimensionals (104430); Paper Trimmer (152392); Multipurpose
Liquid Glue (110755); Polished Dots (158134); StazOn Cleaner (109196)
Measurements:
·
Basic White Base: 4 ¼” x 11” scored at 5 ½”
·
Basic White: 2 ½” x 1 ¼” (for die cutting the sentiment)
·
Hues of Happiness Designer Series Paper: 4” x 5 ¼”
Instructions:
1.
Using StazOn Jet Black ink, stamp your
images onto the Fluid 100 Watercolor Paper that has been die cut with the
Scalloped Contours die
2.
Color in the images using the Watercolor
Assortment 1 package of pencils and then lightly smooth the lines out with the
Water Painters
3.
Set off to the side to dry
4.
Using Night of Navy Classic Stampin’ Ink, stamp your sentiment on
the Basic White cardstock piece
5.
Adhere your Hues of Happiness Designer Series Paper onto the Basic
White cardstock base using Multipurposed Liquid Glue
6.
With Stampin’ Dimensionals, adhere the water-colored scalloped
piece to your card base
7.
Add one Stampin’ Dimensionals to the back side of the sentiment
piece and then glue on the other side so that when placed on the card, both the
sentiment piece and the water-colored die cut piece are the same height
8.
Embellish with three clear Polished Dots!
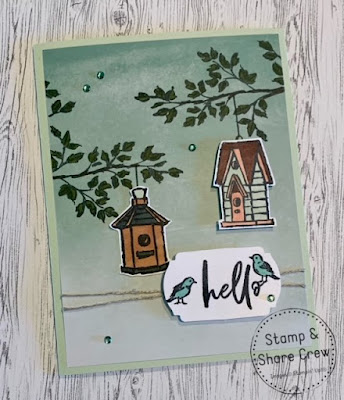
Garden Birdhouses
All
images © 1990-2022 Stampin’ Up!®
Supplies:
·
·
Card Stock and Paper: Soft Sea Foam (146988); Basic
White (159276); Abstract Beauty DSP (158039)
·
Stamp Pads: Memento Ink Tuxedo Black
Pad (132708)
·
Tools: Label Me Fancy Punch (151297)
·
Miscellaneous: Bronze/Ivory
Stampin’ Blends (154922); Soft Seafoam Stampin’ Blends (154902 Natural Tones
Stampin’ Blends Medium (159462); Evening Evergreen Stampin’ Blends (155517); Pool Party Stampin’ Blends
(154894); Stampin’ Dimensionals (104430); Stampin’ Seal Adhesive (152813);
Rhinestone Basic Jewels (158130); Linen Thread (104199)
·
Soft Seafoam: 8 ½” x 5 ½” (Base)
·
Basic White: 2 ½” x 1 ½” for sentiment and scraps for birdhouses
·
Abstract Beauty DSP: 5 ¼” x 4”
·
Linen Thread: 13”
Instructions:
1. Score you base at 4 ¼” and
crease using bone folder.
2. Find the Abstract Beauty DSP
as shown in the picture and cut it to 5 ¼” x 4”
3. Stamp your tree branches
directly onto this layer using the Memento Tuxedo Black ink and color with
blends.
4. Wrap the linen thread around
your DSP securing on the back of the left side, wrapping around front, then
around back, then around front again, securing on back of right side. Adhere this entire layer to the front of your
card base.
5. Using the Memento Tuxedo
Black ink stamp the strings from the branches; the birdhouses on to scraps; and
the Hello and birds as show on the Basic White layer and punch out with the
Label Me Fancy punch. Color the birds
with Pool Party Blends. Also, color 5 of
the small Basic Jewels with the dark Pool Party Blends (optional).
6. Layer punched image over
twine on Stampin’ Dimensionals.
7. Color birdhouses with
blends, fussy cut, and adhere the left birdhouse flat from the string image and
the right birdhouse popped up on Stampin’ Dimensionals from the other string
image. Add your five gems as desired.
Happy Stampin' Everyone!!!


.jpg)


No comments:
Post a Comment
Thank you so much for leaving me a comment! It really makes my day and I love hearing from you! <3