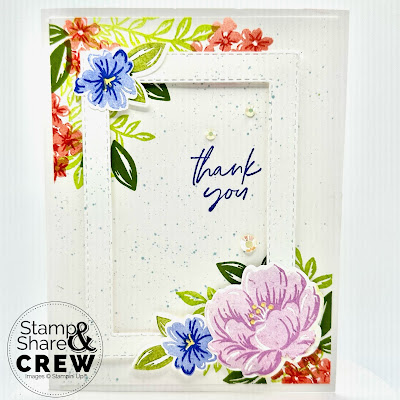
Two-Tone Flora
All images © 1990-2023 Stampin’ Up!®
·
Stamp Sets: Two-Tone Flora (160844) Something
Fancy (160416)
· Card Stock and Paper: Thick Basic White Card Stock(159229); Basic
White Card Stock (159276)
· Stamp Pads: Orchid Oasis Classic
Stampin’ Pad (159214); Calyspo Coral Classic Stampin’ Pad (147101); Fresh
Freesia Classic Stampin’ Pad (155611); Parakeet Party Classic Stampin’ Pad (159208);
Granny Apple Green Classic Stampin’ Pad (147095)
· Tools: Two-Tone Flora Dies (159181); Stitched
Rectangle Dies (151820)
· Miscellaneous: Balmy Blue
Stampin’ Blends (154830) Daffodil Delight Stampin’ Blends (154883) Iridescent
Pastel Gems (160429); Stampin’ Seal Adhesive (152813); Multipurpose Liquid Glue
(110755) Stampin’ Dimensionals (104430)
Measurements:
· Thick Basic
White Card Stock: 8 ½” x 5 ½”
· Basic White
Card Stock: 5 ¼” x 4”, 3” x 4 ¼” frame cut from Stitched Rectangle Dies (inside
measurement 3 ½” x 2 ¼”) Scrap for Stamping and Die cutting flowers
Instructions:
1.
Score the Thick Basic White Card Base at 4 ¼”
and fold to create your card base.
2.
Stamp the Leaves in Granny Apple Green and
Parakeet Party onto the Basic White 5 ¼”x 4” piece add Calypso Coral Flowers as
shown. Pro Tip: Stamp the detail part of
each flower first full strength then stamp off for the main image before
stamping over the detail. It is much
easier to line up the stamps this way.
3.
Stamp the flowers and leaves on the Basic White
scrap piece for the front and die cut out.
Reminder: for the two-step stamping, always stamp the detailed image
first. When you go to stamp the overlay
image, ink your stamp and then stamp-off on a piece of scrap paper to get a
lighter shade to go over the top of the detail that is already stamped. Do this for both the Fresh Freesia and Orchid
Oasis flowers. While stamping, you can
stamp the inside of your card and your envelope to match.
4.
Pop up the frame with dimensionals in center of
card front. Make sure some of the leaves
are inside the frame. If not stamp more
before adhering.
5.
Using the Balmy Blue Dark Blend and the inside
of the lid of your blend to lightly “flick” speckles onto the whole card front.
6.
Adhere the stamped Basic White piece to the
front of the card base.
7.
Stamp the Greeting on the front of your card.
8.
Add your die cut flowers and leaves to the
frame corners as shown. Use the dark
Daffodil Delight blend to color in the stamens (centers) of each die cut flower.
9. Add 3 Iridescent Pastel Gems around your greeting.
Happy Stampin' Everyone!!!


.jpg)


No comments:
Post a Comment
Thank you so much for leaving me a comment! It really makes my day and I love hearing from you! <3