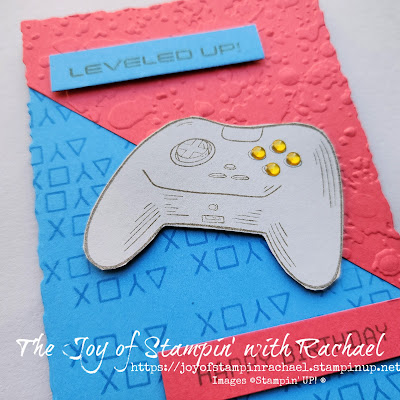
Do you ever need a card for a Teen Boy? I always do, and never have one ready. So I got the Level Complete stamp set with that demographic in mind.

The remote control is the main image for this card and you can change up the color to match whatever gaming system they use most.
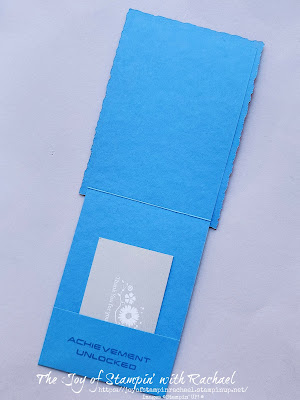
The inside has a small pocket that could fix cash (a teen boy favorites gift) or a gift card!
What makes this card a Fun Fold is the cardbase has a die cut image for the front. This layout was inspired by a Christmas card I got from a recent swap that used the Scallop & Contour Dies instead of the Deckled Rectangle Dies. Click HERE to see that card too!
In the video I used the Basic Black with Basic White Heat Embossing Powder to create this remote control to show the difference between to the two. Which do you like better?
You can make this card too when you follow my directions and shop from my online store for supplies!
Supplies
Measurements
Azure Afternoon: 3 3/8" x 11" scored @ 4 3/4", slide 4 3/4" (see video)
4 1/4" x 5 1/2
1/2" x 2 1/4"
Sweet Sorbet: 4 1/4" x 5 1/2"
1/2" x 2 1/4"
Smoky Slate or Basic Black: 3" x 2"
Steps
- Measure, score, and cut your paper.
- Die cut 2 Deckled Rectangle shapes, one in Sweet Sorbet and one in Azure Afternoon.
- Stamp in Azure Afternoon onto the bottom left and right side and top left with the "coding" letters. Stamp on the cardbase on the pocket the "achievement unlocked" with the Azure Afternoon.
- Create the pocket with Tear Tape on both sides and folding the paper up on the score line (see video).
- Stamp with the Gray Granite ink onto the Smoky Slate paper the remote control (see video for the black remote). Fussy cut that out.
- Also stamp with the Gray Granite onto the small strips of paper the "leveled up" and "happy birthday".
- Mark the Sweet Sorbet on the long side one inch down from the top left and one inch from the bottom right. Use your paper trimmer to cut at a diagonal from those two marks. Emboss with the Splatter Embossing Folder those cut pieces. Glue to the Azure Afternoon Deckled Rectangle.
- Attach words and remote control with dimensionals.
- Add the In Color Dots to the buttons of the remote control.
- Put Seal on the cardbase and attach it to the back of the Deckled Rectangle.
Video
Happy Stampin' Everyone!!!

.jpg)


No comments:
Post a Comment
Thank you so much for leaving me a comment! It really makes my day and I love hearing from you! <3