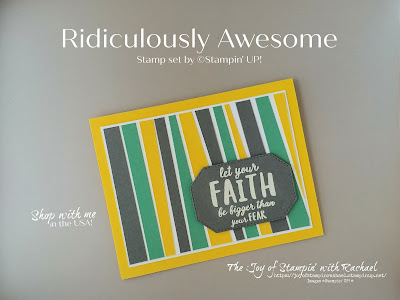
Today's Wednesday kit class has a fun stripy theme using the Ridiculously Awesome stamp set. I made 3 different cards using similar items and showing you what you can do with just stripes. Remember, if you order by October 3rd online using the hostess code GKQG9DCM a $35 order, I'll send this kit for free to you!
*Kit does not include stamp set.
Suggestions to Buy
Ridiculously Awesome Stamp set $22
Silicon Craft Sheet $6
Paper Trimmer $25
Heating Tool $30
Supplies
Ridiculously Awesome stamp set
Hippo and Friends Dies
Basic Gray CS
Crushed Curry CS
Whisper White CS
Just Jade CS and ink
VersaMark
White embossing powder
Always Recommended
Paper Snips
Trimmer
Simply Shammy
Die Cutting Machine
Bone Folder
Adhesives
Mosaic Card

Measurements
Just Jade Cardbase: 8 1/2 x 5 1/2 scored @ 4 1/4
3 Whisper White: 3 3/4 x 5
Whisper White: 4 1/4 x 7 1/2
Stipes: 3 colors 5 1/2 x 8 1/2 cut into 1/2 x 5 1/2
Steps
- Measure and cut your paper.
- Die cut your label using the Hippo & Friends dies and stamp your saying in versamark and heat emboss with white embossing powder. Set a side.
- Line up your stripes of paper and glue them on your 4 1/4 x 7 1/2 of Whisper White. Use Tombow liquid glue and use a Silicone Craft sheet to help keep your area clean.
- Trim your ends. Then cut your paper parallel to the way the pieces were glued. (See video)
- Glue your new stripes to the 3 3/4 x 5 piece of Whisper White. Leaving small gaps between each one.
- Trim your ends again and trim the piece to 4 7/8 x 3 5/8.
- Glue to the other Whisper White to frame/mat it. Glue the 3rd one to the inside of the card.
- Attach to cardbase with dimensionals or glue.
- Attach label with dimensionals.
Stripy Card
Measurements
Just Jade Cardbase: 8 1/2 x 5 1/2 scored @ 4 1/4
3 Whisper White: 3 3/4 x 5
Stripes: 5 x 8 1/2 in 3 colors (see video for size)
Steps
- Measure and cut cardstock.
- Die cut your label in Basic Gray using the Hippo & Dies Labels and stamp your image with basic gray or heat emboss with White Embossing Powder. Set aside.
- To cut your stripes of paper there is no real size. You want them to be at least 5 inches long but you can make them whatever width. I keep mine small and under 1/2 inch but twist and turn the cardstock to make not straight cuts. (see video) Do this to 3 colors.
- Glue them on to your 3 3/4 x 5 Whisper White, leaving space between each color. Use a pattern or not (totally up to you).
- Trim your ends off. Then cut down the paper to 3 5/8 x 4 7/8.
- Glue to the other Whisper White to mat it.
- Attach to cardbase.
- Attach label with dimensionals.
Diagonal Card
Measurements
Basic Gray Cardbase: 8 1/2 x 5 1/2 scored @ 4 1/4
3 Whisper White: 3 3/4 x 5
8 strips 7 x 3/4
Steps
- Measure and cut all your cardstock.
- Run your Hippo and Friends label die through your Stampin' Cut and Emboss (My Boss) on a scrap of Whisper White.
- Stamp in Just Jade "Make Today Ridiculously Awesome" onto your label die.
- On one of the 3 3/4 x 5 Whisper White, line up your strips of paper and glue them down with liquid glue (Tombow).
- Flip over and cut off the extra's that went off the Whisper White (if making more than just one card you can use some of these scraps for your next card).
- Take your strip panel to your trimmer and cut it down to 3 5/8 x 4 7/8. Glue onto one of the 3 3/4 x 5 Whisper White.
- Using dimensionals attach to the cardbase.
- Add your last Whisper White to the inside of the card.
- You could embellish with the In Color enamel dots!
*Cards were inspired by Kylie Bertucci!
Happy Stampin' Everyone!


.jpg)


No comments:
Post a Comment
Thank you so much for leaving me a comment! It really makes my day and I love hearing from you! <3