Ready to learn how to make 4 cards using the Perfectly Plaid stamp set and Pine Tree Punch by Stampin' UP!? I created this $10 kit for my Stampin' Team, Royal Hearts Stampers and go live on our Facebook group so they can stamp along with me and learn some new stamping techniques.
Scroll down to see them all and directions for each and click below to order this stamp set today.
Perfectly Plaid Stamp set $17
Pine Tree Punch $18
Supplies
Perfectly Plaid stamp set
Pine Tree Punch
Very Vanilla CS
Rocco Rose CS
Terracotta Tile CS
Pretty Peacock CS
Seaside Spray CS
Purple Posy CS
Stitched Rectangle Dies
Wonder of the Season Combo Ribbon Pack
Gold & Gold Embossing Powder, VersaMark, Heat Tool
Shaded Spruce CS and Ink
Plaid Tiding DSP
Brush Metallic Cardstock
Dainty Diamonds 3D embossing folder (EF)
Crumb Cake CS
Stitched Shapes
Braided Linen Trim
Evergreen Forest Embossing Folder (EF)
Cherry Cobbler CS
Layering Circle Dies
Always Recommended
Paper Snips
Trimmer
Simply Shammy
Die Cutting Machine
Bone Folder
Adhesives
Card #1: In Color Trees
This card I really featured the 2019-2021 In Colors for my color scheme and love how the non-traditional colors made this card work out.
Measurements
Very Vanilla Cardbase: 8 1/2 x 5 1/2 scored @ 4 1/4
Very Vanilla: 4 x 5 1/4
2 x 3
Steps
- Measure and cut your paper.
- Punch out 5 trees using the Pine Tree Punch in all 5 of the 2019-2021 In Colors.
- Die cut a small stitched rectangle die in Very Vanilla.
- Dry emboss with the Dainty embossing folder the 4 x 5 1/4 Very Vanilla.
- Heat emboss the trees with gold embossing powder, VersaMark, and your Heat Tool. Then attach with dimensionals onto your embossed Vanilla. Also emboss the "Ho Ho Ho" onto your stitched rectangle.
- Wrap about 6 inches of the gold cord and tape to the back. Glue to cardbase.
- Attach your "Ho Ho Ho" over the gold cord with dimensionals.
Again, I didn't use the Christmas colors of red and green but instead added blue and golds. I love the way this card turned out and the fun fold it has.
Measurements
Seaside Spray Cardbase: 11 x 4 1/4 scored @ 5 1/2 and 2 3/4
Steps
- Measure and cut your cardbase.
- Cut out your Very Vanilla, Shaded Spruce, Plaid Tidings, and Seaside Spray in your Stampin' Cut and Emboss machine using the Stitched Rectangle Dies.
- Punch out a Gold tree using the Pine Tree Punch. The run through your machine and emboss with the Dainty embossing folder.
- Stamp Merry Christmas on your small Rectangle Die with Shaded Spruce Ink.
- Stamp the plaid tree in the Very Vanilla for the inside of the card and glue onto the cardbase.
- Attach your gold cord around your plaid tidings rectangle. Then glue to the Shaded Spruce Rectangle. Glue on your Merry Christmas, and attach the golden tree with dimensionals. Then attach a gold cord bow with a glue dot.
- Attach the whole front panel to the cardbase with dimensionals but put them only on the left side.
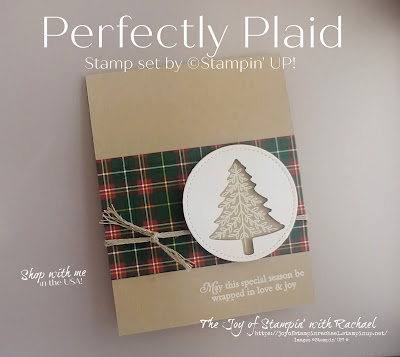
Card #3- Crumb Cake Christmas
Now this card screams "Christmas" with it's colors but uses the white embossing or color cardstock look to catch your eye.
Measurements
Crumb Cake Cardbase: 11 x 4 1/4 scored @ 5 1/2
DSP: 4 1/4 x 2 1/2
Steps
- Measure and cut paper.
- Die cut two stitched circles; One in Whisper White and one in Crumb Cake.
- Punch out a Christmas tree in the Whisper White circle. *Tip mark the middle of the circle with a pencil to help you line up your punch.
- Holding both circles together, ink up your tree with versamark and remove the top circle. Then sprinkle on embossing powder and heat up. Attach circles with dimensionals after it has cooled.
- Emboss in white embossing powder your Christmas saying on the bottom right corner of the cardbase.
- Wrap the braided trim around the DSP and tie a knot. Fray the ends of the ribbon.
- Glue the DSP onto the cardbase and using dimensionals attach the circles over the braided trim.
Card #4: Christmas Pines for Avid Stampers
If you are an Avid stamper, this card is for you!!! It has so much texture and using a lot of different products.
Measurements
Shaded Spruce Cardbase: 8 1/2 x 5 1/2 scored @ 4 1/4
DSP: 4 x 2 1/2
Whisper White: 4 x 2 3/4
1 x 3 1/2
Steps
- Measure and cut paper.
- Stamp your Christmas Cheer stamp on your 1 x 3 1/2 in Shaded Spruce and flag one end or use the Banners Pick a Punch.
- Die Cut Cherry Cobbler the largest scallop circle die.
- Die Cut the largest Stitched Circle Die in Whisper White.
- Emboss your Whisper White with the Evergreen Embossing Folder.
- Punch out 3 trees; Cherry Cobbler, Shaded Spruce, and Plaid Tidings DSP.
- Glue your embossed Whisper White to your cardbase and the DSP to the bottom.
- Glue down your Shaded Spruce ribbon where the two papers meet.
- Attach your circle layers with dimensionals. Glue your trees down to the circle and use dimensionals to pop up the tree in the DSP.
- Glue on your stamped banner to the bottom.
- Attach a gold bow with a glue dot to the middle of the plaid tidings tree.
Video
Happy Stampin' Everyone!!!


No comments:
Post a Comment
Thank you so much for leaving me a comment! It really makes my day and I love hearing from you! <3