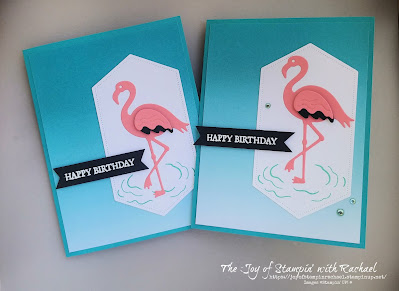
Miss Monday Cards using the Friendly Flamingo stamp set from the Jan-June Mini Catalog. Here is a little fun fact about me...I love Flamingos! It all started a couple of years ago when that is all I asked for my birthday was some yard flamingos. Of course I had to name them. Then my friend sent me a wonderful tumbler she had made with flamingos on them. Just recently my family and I went to the San Diego Zoo and the Flamingos were every where and had babies (so I feel in love with them all over again). So I knew I had to get this stamp set and am so glad I did!
I used the die cuts for the Flamingo on the front and stamped him in the inside.
I used white embossing powder for the Happy Birthday on a strip of Basic Black, which then ties in with the Flamingo underwing color.

I even add the little water ripples from where the Flamingo is standing. I did cheat slightly, and used the Retired Oh So Ombre Paper for the background but hope it gives you an idea on how to use your Sale-a-bration paper and know if you don't have it, you an create this look with some sponges and the Bermuda Bay Ink pad.
You can make this card too by ordering the supplies from my online store and following the steps below.
Supplies
Friendly Flamingo Bundle
Stitched Nested Label Dies
Holiday Rhinestones
Coastal Cabana or Bermuda Bay Ink
Bermuda Bay Cardstock
Basic White Cardstock
Basic Black Cardstock
Flirty Flamingo Cardstock & Ink
White Embossing Powder
VersaMark Clear Ink
*Oh So Ombre DSP
Always Recommended
Paper Snips
Trimmer
Simply Shammy
Die Cutting Machine
Bone Folder
Adhesives
Measurements
Bermuda Bay Cardbase: 5 1/2 x 8 1/2 scored @ 4 1/4
DSP: 4 x 5 1/4
Basic White: 4 x 5 1/4
Basic Black: 1/2 x 3
Steps
- Measure, score, and cut your paper.
- Die cut your Stitched Nested Label in Basic White. Die cut your Flamingo in Flirty Flamingo and one wing. Die cut Basic Black wing.
- Emboss "happy birthday" onto the Basic Black strip and then flag the ends.
- Stamp your water ripples on the bottom of your Label and attach your flamingo. Use dimensionals to attach his wing.
- Stamp your Flamingo in Flirty Flamingo on the Basic White and your greeting in Coastal or Bermuda.
- Assemble card: Glue your dsp to the cardbase. Glue the flamingo label to the dsp. Attach the happy birthday with mini dimenionals. Glue your Basic White to the inside of your card.
- Embellish with the blue rhinestones from the Holiday Rhinestones.
Happy Stampin' Everyone!!!


.jpg)


No comments:
Post a Comment
Thank you so much for leaving me a comment! It really makes my day and I love hearing from you! <3