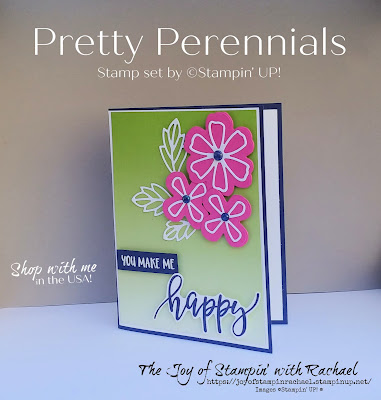
Here is my Royals Team Kit for March with the Pretty Perennials stamp set by Stampin' UP! This kit was a fun one to create with all of the little dies that go so well! My goal for this kit was to use 4 different says, and one be without the "happy". I love the results and hope you do too! My team members received this kit and the video I made for them is at the bottom. Below is also the link to order this Stamp Set and Die Bundle from me.
Supplies
Pretty Perennials Bundle
White Embossing Powder
Versamark Ink
Crumb Cake Cardstock
Smoky Slate Cardstock
Night of Navy Ink & Cardstock
Mango Melody Ink & Cardstock
Gorgeous Grape Ink & Cardstock
Magenta Madness Ink & Cardstock
Costal Cabana Ink & Cardstock
Granny Apple Green Ink
Daffodil Delight Ink
*So Ombre DSP
Vellum
Rhinestones
Opal Rounds & Night of Navy Blends
Basic White Cardstock
Polka Dot Tulle Ribbon
Stitched Shapes Dies
Stitched Rectangle Dies
Tasteful Label Dies
Painted Texture Embossing Folder
Always Recommended
Paper Snips
Trimmer
Simply Shammy
Die Cutting Machine
Bone Folder
Adhesives
This card shows off the floral images from the stamp set so well and is easy to change up the look just by changing up the ink. I use Granny Apple Green ink in my video and have Old Olive ink in this photo.
Measurements
Thick Basic White Cardbase: 4 1/4 x 11 scored @ 5 1/2
Basic White: 4 x 5 1/4
Magenta Madness: 2 1/4 x 2 1/2
Costal Cabana: 1/2 x 2
Steps
- Measure, score, and cut your paper.
- Die cut your label from the Tasteful Label Dies in Costal Cabana.
- Stamp in Magenta Madness "happy" on a piece of white cardstock and fussy cut out with your paper snips.
- Emboss with white embossing powder the "birthday" on the strip of Costal.
- Stamp your floral images on your 4 x 5 1/4 Basic White cardstock with the biggest image first and filling in with the smaller images. Try to stamp images in threes.
- Assemble your card: glue your floral stamped piece onto the base. Glue your label to the Magenta piece and use dimenionals to attach to the card.
- Die a knot in the tulle ribbon (about 2.5 inches) and stick behind the label with a glue dot.
This card is one of my favorites. It used the stamped images and then are die cut out. Then it has the added layer of the Basic White dies on top. There may be no "happy" on this card, but it is sure to make someone smile.
Measurements
Smoky Slate Cardbase: 5 1/2 x 8 1/2 scored @ 4 1/4
Smoky Slate: 4 x 5 1/4
Basic White: 4 x 5 1/4
Steps
- Measure, score and cut your paper.
- Emboss your Smoky Slate 4 x 5 1/4 paper with the Painted Texture embossing folder and glue to the cardbase. Also glue the Basic White to the inside.
- Stamp 3 flowers in Night of Navy & Mango Melody. Then die cut them out. Also die cut in Basic White the flower centers and leaf. Die cut one center in Mango Melody.
- Die cut in Basic White the Stitched Circle and the stitched banner (Tasteful Label Dies).
- Stamp "for you" in Night of Navy on the stitched banner.
- Assemble card: glue on the circle and then the banner. Use dimensionals to attach the flowers and glue down the white leaves.
- Embellish with 3 rhinestones randomly placed.
This card I used the So Ombre paper from Sale-a-bration but that could easily be replaced with a blending brush and Granny Apple Green ink. This card shows how you can just use the dies to create the flowers.
Measurements
Night of Navy Cardbase: 5 1/2 x 8 1/2 scored @ 4 1/4
Basic White: 4 1/8 x 5 3/8
DSP: 4 x 5 1/4
Night of Navy: 2 x 1/2
Basic White: 4 x 5 1/4 (inside)
Steps
- Measure, score, and cut your paper.
- Stamp "happy" in Night of Navy on a scrap of Basic White and fussy cut it out.
- Die cut your flowers in Magenta Madness and the center and leaves in Basic White.
- Emboss the "you make me" with the white embossing powder on Night of Navy.
- Assemble: Glue your layers together. Use dimensionals for your flowers, label, and happy.
- Embellish with the Opal Rounds. If you have the Night of Navy Blends, you can color your Opal rounds before putting them on the flowers.
This card shows off the different stamp images but as background pieces. I love the bright colors on the Crumb Cake base. Also, I loved using the leaf piece on the letters. It reminds of the 90's when I use to write notes to my friends and add little "extras" to the letters in their names.
Measurements
Crumb Cake Cardbase: 5 1/2 x 8 1/2 scored @ 4 1/4
Crumb Cake: 4 x 5 1/4
Mango Melody & Coastal Cabana: 1/2 x 5 1/4
Magenta Madness: 1 x 5 1/4
Goregous Grape: 3/4 x 5 1/4
Steps
- Measure, score and cut your paper.
- Die cut out a stitched rectangle in Crumb Cake and stamp and emboss with white powder on it.
- Die cut 2 vellum leaves.
- Stamp on each strip with the matching ink, choosing one of the stamps for the set.
- Glue strips to the Crumb Cake and then glue that to the cardbase.
- Glue on the vellum leaves and place the stitched embossed rectangle over the leaves.
- Use rhinestones at the center of the each of the leaves you embossed.
Facebook Live Video
Happy Stampin' Everyone!!!


.jpg)


No comments:
Post a Comment
Thank you so much for leaving me a comment! It really makes my day and I love hearing from you! <3