t> The Joy of Stampin' with Rachael: August 2021

Tuesday, August 31, 2021

Penguin Place Card on a Slope


I made this cute card for the Queens Swap with a Winter/Christmas theme. This was great because it was easy to make 12 of them but has enough "cute" factors. I did use black embossing powder to create the cute penguin. 


I added just a strip of the DSP from the Penguin Playmates to give it some color.


I fussy cut out the penguin's scarf and hat and glued them on. There is only the punch for the cute penguin. 

You can make this card too when you shop from my online store and follow the steps below. With each order I'll send you some Happy Mail and an email with this month's FREE tutorial. 

Supplies
Penguin Place stamp set
Penguin Builder Punch
*Penguin Playmates DSP
Paper-Thick Basic White, Basic White
Ink- Veramark, Balmy Blue, Just Jade, Calypso Coral
Black Embossing Powder

*Sale-a-bration item only available until Sept. 31st

Always Recommended
Paper Snips
Trimmer
Simply Shammy
Die Cutting Machine
Bone Folder
Adhesives: Tombow, Tear Tape, Seal, & Dimensionals

Measurements
Thick Basic White Cardbase: 5 1/2 x 8 1/2 scored @ 4 1/4
DSP: 5 1/2 x 3/4
scrap of Basic White

Steps
  1. Measure, score, and cut your paper. 
  2. On a scrap paper emboss with Black Embossing powder the penguin and punch him out. 
  3. Stamp onto the penguin in Coral the beak and feet. 
  4. On a scrap of paper stamp in Just Jade the hat and scarf and fussy cut them out. 
  5. Stamp random snowflakes on the top of the cardbase in Balmy Blue. 
  6. Stamp the snow hill in Balmy Blue. 
  7. Stamp the tree on the bottom of the slope in Just Jade and without reinking stamp the tree again next to it. 
  8. Glue on the strip of DSP by the score line and attach your cute penguin with dimensionals. Don't forget to glue on his hat and scarf as well. 

Happy Stampin' Everyone!!!

Tuesday's Tip at Ten-Mark Your Blocks


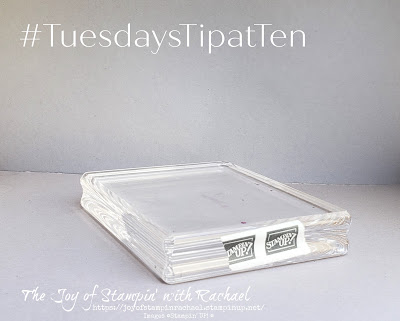
Every Stampin' UP! block has letter on it to let you know the size and the Stampin' UP! logo on the other. Pick a side to make your top or bottom of your block OR use washi tape to mark the top of your block. This will help you after you mark the top of stamps that have 2 step stamping, like the Delicate Dahlias. So just match your top washi tape with the dot on your stamps. 


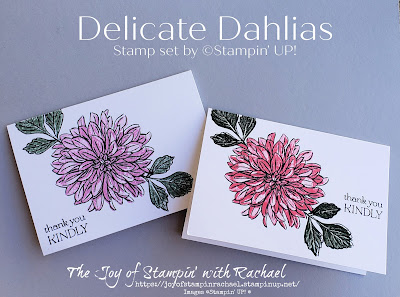
This tip helped greatly when making the card below! The flower image is so hard to line up just by looking at it and marking your stamps is the BEST way to help line them up without guessing.


Happy Stampin' Everyone!!!


Monday, August 30, 2021

Miss Monday Cards with Delicate Dahlias


These Miss Monday Cards are for my Sale-a-bration earning Stampin' Friends! These are super simple and I used notecards to create them. 


I used Polished Pink and Evening Evergreen for this one. I also used Night of Navy to stamp the outlines. 

This stamp set is for FREE when you place a $100 order during Sale-a-bration.

For this one I can used the Fresh Freesia and Soft Succulent with the Nigh of Navy as the outline. 

Which color is your favorite? I like it even without color and just the outline for a super simple, clean look. 

For the envelopes I tried two different looks. One with outline flowers and with just the color in for leaves. The other I used the flower color in for the Pink one and the outline for the leaves. 


The best thing about this stamp set that it doesn't need much to look awesome! 

Supplies
Sale-a-bration Delicate Dahlias stamp set
Notecards
Ink- Night of Navy, Soft Succulent, Evening Evergreen, Polished Pink, & Fresh Freesia 

Measurements
Note cards:  5" x 3-1/2 folded

Steps
  1. Use a Stampin' UP! Note cards that measure 5 x 3 1/2 when folded. 
  2. Stamp in Night of Navy the outline and the saying. 
  3. Stamp the color in for the flower with Polish Pinks or Fresh Freesia.
  4. Stamp the color in for the leaves with Soft Succulent or Evening Evergreen. 
Bonus Card with a step up version! Double flowers and embossed with white embossing power for the saying on Night of Navy Cardstock! 


Happy Stampin' Everyone!!!

Friday, August 27, 2021

Fun Fold Friday- Feels Like Home & Beautifully Penned DSP


Fun Fold Friday with the Feels Like Home Sale-a-bration Stamp set and the Beautifully Penned Sale-a-bration DSP. You can get both of these ideas for FREE when you order $50 worth from my online store. Do get both at the same time you will need to order $100. 
This card was inspired by my friend, Joya Bohman and you can see her card here


There are two inside layers to this Fun Fold. One with a message. 

Inside layer shows off the other side of the DSP. 


Here is a side view of the card so you can see how all the layers line up. 

Order online by September 31st to get these items! See all the Sale-a-bration items available by clicking here

Supplies
Feels Like Home Stamp Set
Beautifully Penned DSP
Ink- Pool Party, Bermuda Bay, Granny Apple Green
Paper- Granny Apple Green, Basic White, Pool Party 
Pool Party Sheer Ribbon
Clear & Silver Epoxy Shapes

Always Recommended
Paper Snips
Trimmer
Simply Shammy
Die Cutting Machine
Bone Folder
Adhesives: Tombow, Tear Tape, Seal, & Dimensionals

Measurements
Granny Apple Green: 5 1/2 x 7 1/4 scored @ 4 1/4
DSP: 5 1/2 x 7 1/2 scored @ 4
Basic White: 3 1/4 x 3 1/4
Pool Party: 3 1/2 x 3 1/2
Basic White: 2 1/2 x 2 1/2
Pool Party: 2 3/4 x 2 3/4
Basic White: 3 1/4 x 5 1/4

Steps
  1. Measure, score, and cut your paper. 
  2. Stamp in Pool Party your door image onto the  2 1/2 square of Basic White. 
  3. Stamp with your stamperatus the "I can't thank you enough" using the hinge step method (see video) in the 3 ink colors. 
  4. Stamp on the 3 1/4 x 5 1/4 Basic White your vines and plant in Granny Apple Green and the saying in Bermuda Bay. 
  5. Wrap ribbon around the front of the cardbase and tie a knot. 
  6. Assemble: Glue your Basic White to the Pool Party mattes. Attach the smaller square to the front with dimensionals. Attach the large square with glue (just don't put any of it on the bottom). Attach the Basic White rectangle onto the DSP. 
  7. Embellish with the clear epoxy shapes. 

Facebook Live


Happy Stampin' Everyone!!!


Thursday, August 26, 2021

Backstage @ Home Gifts & Notes


Backstage @ Home is a really fun online event made by Stampin' UP! for their Leaders. You have to be a Silver Elite and above to attend (make X amount in sales and have at least 5 team members). It is an event I look forward to all year long. I learn so much and am spoiled even more! 

Stampin' UP! sent their attendees a HUGE beautiful box full of goodies! Scroll down to learn what was in mine!


First, did I mention how beautiful the box is? It is full of color and love. The top item you see above is the cool portfolio. At first, I had no idea what it was meant to be used for, but it is a great place to store our notes we take during Backstage. 


We also got a fun backstage pin to add to our collection. A notebook with the cutest pen (with a fake diamond on top). A adorable bag with clouds and pom poms and last but not least...


The coolest water bottle with Stampin' UP! Logo! All the cool kids have these at school now a days and I feel like I've joined the cool kids club! 


As you may know, a Hydro Flask LOVES to be decorated and they gave us fun stickers to add to ours to personalize as the event goes on. 


This event is a 2 day and one night deal and as I learn more each day I will update my blog with highlights and fun! 

Thursday 26th
Thursday was just a quick welcome and then we went to a Zoom Networking meeting where we got the chance to meet new demonstrators. We were trying to make it as if we were in the room together in person and how we would go up and meet new friends. We were in the same Zoom Networking group each time (I was in last names from A-C) and saw the same faces each time. That was super nice! 

Friday 27th
Sara Douglass (Stampin' UP! Ceo) started us off this day with her message of Shining! See the Light! Be the Light! Free the Light! She asked us what is our superpower and encourage us to see that and use that light to help others. She also talked about how we are unique and to use that for our business. It may seem we are all a like (demonstrators trying to share Stampin' with others) but just like a chocolate chip cookies that uses the same ingredients many times, yet there are so many variations of that recipe. It is the method or the secret ingredient that changes it. My favorite quote from her was "Being different doesn't mean you don't belong." 


Then we got to hear from one of our keynote speaker, Carey Lohrenz who was the Navy's First Fighter Pilot. She taught how to achieve the impossible by having courage, having tenacity and by being intentional. My favorite quotes from here were:
"Action conquers fears."
"See things as opportunities instead of obstacles."
"80% is good enough to reach 100% of your goals."
"Stop chasing perfection!"
"You lose sight! Lose the Fight!" <--don't get distracted.
"Perform. Prepare. Prevail."
"Value each role of your team."
"Don't wait for an invitation to make a difference." 
"Don't take no as a final answer!"
"Rise above the noise!"

Then we had more networking sessions where I was inspired and got to share what I am doing with my business. These were key moments of interaction that is priceless! 

We had breakout classes where you could choose which class to go to (then watch the other classes you missed latter).
I went to the From Buyers to Sellers taught by successful Demonstrators
and Brenda Ster's Creating a Multi-Post Social Content Campaign
Both were amazing and I learned how to help my team and share better on social media. 


We ended the night with a fun Game Night with a Family Feud Style game where they asked 100 demonstrators and the home office employees formed teams to try to answer. 


*After backstage I joined a Leader Zoom set up by a fellow demo and learned lots there too!


Saturday 28th
We started off this day talking about the State of Stampin' UP!. We heard all about how the company is doing, has improved and future goals. There are currently 57,073 Stampin' Up! Demonstrators all over the world. Those who attend the backstage event (the leaders) only make up 3% of this total. Talk about an elite club to be a part of! 

We had another breakout session of classes to choose from and I watched the Three Habits of Highly Successful Demonstrators by Patty Bennett, Karen Titus, and Lisa Curcio (who just reached 2 million in sales). My favorites from this class were:
"Make a Team Newsletter"
"Treat you business like a business and others will too. "
"Know that good enough is good enough to start and know that you will improve as you go." 
"Fun is a gift we can give others."
"Don't be afraid to try new things."
"Don't be afraid to click."
"Make it is easy for your customers to order."

Then we had some great Networking times to help us work on our goals and chat with each other one last time. 

Lastly we ended the day listening to a motivator speaker named Lisa Nichols. She was so full of energy and personal stories to help inspire us to shine. My favorite quotes from her were:
"Your sparkle can spark someone else to do better."
"Not a hand out but a hand up."
"Protect your future memories of yourself." 
"Shero!"
"Get through the manure to see the grass on the other side."
"No one else can do you!"
"Share your shine!"
"Find your unique rhythm."
"Don't put a period where God put a comma." 

Sara ended the night with giving us dates for future events and letting us register EARLY for the next event (Onstage in November)! 
I am so excited for that one and to be able to attend Online with my Team!!!! 

I hope you've enjoy my notes from Backstage and if you are a Demonstrator make it your goal to be able to attend and if you are a Stampin' Friend, consider becoming a Team Member of mine and join in the fun! 

Happy Stampin' Everyone!!!


Throwback Thursday-Halloween Card


Throwback Thursday with this BEAUTIFUL Halloween card created last year by the talented Melody Hyde! I don't even know the name of the stamp set or paper but just love everything about the layers on this card. Zoom in to see just how truly amazing it is! 


Halloween doesn't have to be scary or cute but can be beautiful too!


Happy Stampin' Everyone!!!


Wednesday, August 25, 2021

Wednesday's Kit Class- Paper Pumpkin Hope Box Extras


Wednesday's Kit Class with the Hope Box Paper Pumpkin Stamp Set.  Learn how you can make these cards too with your Paper Pumpkin!!! Didn't get this month's kit? It isn't too late. For one week you can order this kit without having a subscription for just $19. 
To get my Wednesday's Kit Class for FREE you just need to order $35 worth by Friday the 27th. 
Shop with Hostess Code by clicking here

Suggested Items

Supplies
Paper Pumpkin Hope Box Stamp Set
Merry Melody 3D Embossing Folder
Stitched With Whimsy Dies
Layering Circle Dies
Beautifully Penned Sale-a-bration DSP
Paper- Smoky Slate, Basic White, Basic Black, Daffodil Delight, Pool Party, Bermuda Bay, Melon Mambo, Blackberry Bliss
Ink- Blackberry Bliss, Pool Party, Bermuda Bay, Basic Gray
Versamark
White Embossing Powder
Genial Gems
Basic Essentials Twine
Playful Pets Combo Trim
Blending Brushes
Pick a Banner Punch

Always Recommended
Paper Snips
Trimmer
Simply Shammy
Die Cutting Machine
Bone Folder
Adhesives: Tombow, Tear Tape, Seal, & Dimensionals


The second I saw the the stamp set for this kit and saw this saying, "Just a note of hope", I knew I had to use the Merry Melody embossing folder with the musical notes. 


Measurements
Bermuda Bay Cardbase: 5 1/2 x 8 1/2 scored @ 4 1/4
Basic Black: 4 1/8 x 5 3/8
DSP: 4 x 5 1/4
Pool Party, Daffodil Delight, Bermuda Bay, Melon Mambo: 4 x 1
Basic White: 4 x 5 1/4

Steps
  1. Measure, score, and cut your paper. 
  2. Emboss the 4 strips of paper with Merry Melody and banner the ends with the Banner Pick a Punch. 
  3. Die cut two circles: Daffodil Delight scalloped circle and one size smaller basic white.
  4. Stamp in Bermuda Bay on the circle and glue to the Daffodil one.
  5. Assemble: Glue the Basic Black to the DSP. Glue that to the cardbase. Glue on the colored strips. Attach the stamped circle with dimensionals after you attach the black and white twine. 
  6. Embellish with Genial Gem

I just LOVE this card! I used the same idea from the kit and show you how you can make the colored words too! Also, I used the blending brushes to create that amazing colors on the DSP. 


Measurements
Blackberry Bliss Cardbase: 5 1/2 x 8 1/2 scored @ 4 1/4
DSP: 2 x 5 1/4
Blackberry Bliss: 2 3/4 x 3
Basic White: 4 x 5 1/4
2 1/2 x 2 3/4
scraps of Bermuda and Pool Party

Steps
  1. Measure, score, and cut your paper. 
  2. Cut two inches off the cardbase on the long side to make it 5 1/2 x 6 1/2.
  3. Use the blending brushes to blend Pool Party, Bermuda Bay and Blackberry Bliss onto the DSP.
  4. Stamp in Blackberry Bliss onto the small Basic White and attach to the Blackberry Bliss matte.
  5. Stamp in Blackberry Bliss the tomorrow and hope onto a scrap of Pool Party and Bermuda Bay. Fussy cut them out and attach them with dimensionals. 
  6. Ink up the flower with Pool Party and sponge on Blackberry Bliss and Bermuda. Stamp that onto the Basic White corner and glue to the inside of the card. 
  7. Assemble: Glue the DSP to the cardbase. Attach the square saying with dimensionals. Glue the Basic White to the inside of the card. 
  8. Embellish with the Genial Gem. 


This card shows the softer side of this kit by using the butterflies with white embossing powder. 


Measurements
Smoky Slate Cardbase: 5 1/2 x 8 1/2 scored @ 4 1/4
Smoky Slate: 3 3/4 x 5
Basic White: 4 x 2 3/4
Smoky Slate: 2 3/4 x 1
Basic White: 4 x 5 1/4

Steps
  1. Measure, score, and cut your paper. 
  2. Die cut the Smoky Slate with the Stitched with Whimsy dies and attach to the cardbase. 
  3. Stamp onto the Basic White in Smoky Slate speckles and in Pool Party the mini butterfly. Attach to the cardbase.
  4. With white embossing powder emboss 3 butterflies onto Bermuda Bay, Pool Party and Melon Mambo and fussy cut them out. 
  5. Stamp in Basic Gray the saying and attach the twine to the back with dimensionals. 
  6. Attach the butterflies with glue dots and embellish with gems. 


Facebook Live Video


Happy Stampin' Everyone!!!


Tuesday, August 24, 2021

Paper Pumpkin Hope Box


Did you hear? For one week only you can get this Paper Pumpkin kit without the subscription!!! There was a glitch earlier this month that made it hard to subscribe and thus this extended week for EVERYONE!!! You only have until September 31st though to get it, so don't delay!

Click here to order your kit

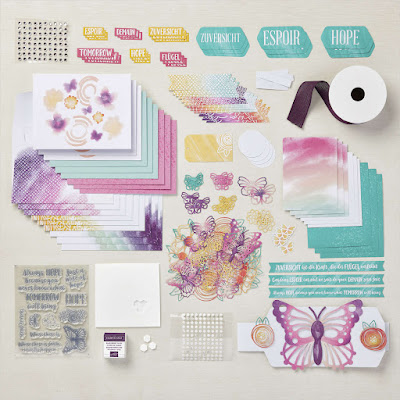
Here are all the supplies that come in the kit!

Here are all 9 cards I made with the kit. 

Super fun, bright colors!

One of the best things about this kit are the envelopes. Like, seriously they are my favorite. 

This kit comes with the Blackberry Bliss ink spot. Which is a great dark purple. 

I love the two colored words and use this technique all the time. 

This kit also comes with supplies to decorate the box. My plan is to give this whole finished kit in the box as a gift! 

Below is the video to show you how to make it from the Co Founder Shelli.

Happy Stampin' Everyone!!!


Tuesday's Tip at Ten- Tailored Tag Punch Shapes


Stampin' UP!'s Tailored Tag Punch can be used to create lots of shape. Here are just two extras you can create when using it. 


Feed the paper through the middle into either end to create the perfect pointed banner. 


Feed the paper through the top but only going half way through the Tailored shape to create the banner end. 

*Tips: Don't use paper wider than 2 1/4 but you can make smaller banners just mark the center on the paper and line up to the center of the punch. 

Happy Stampin' Everyone!!!

New at SU Blog Hop- All Tied Up with Dotted Ribbon Knot Bow

  Welcome to the NEW AT SU! Blog hop! We are a group of Stampin ’ Up! Independent Demonstrators from around the world who are full of creati...