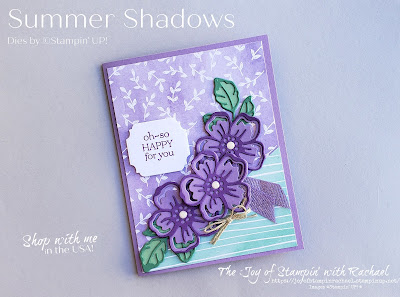
Wednesday's Kit Class with the Sale-a-bration item, Summer Shadows Dies. You can only earn these by ordering $100 worth from my online store. The really cool thing is that they coordinate with a stamp set from the Annual Catalog, Shaded Summer. However, you don't have to have that stamp to make beautiful cards with just the dies. I paired the dies with another Sale-a-bration stamp set, the Delicate Dahlias but you could use any stamp set you have to finish these cards. These cards show how to have different layouts with 1 flower, 2 flowers, and even 3 flowers.
Order $35 worth from my website between Wednesday the 15th through Friday the 17th and get this paper kit of items for FREE! Just shop with the Hostess Code (Fw7qksfq) or the link below.
Suggested Items to Order for Kit
Elegant Faceted Gems $7.50
Gold Foil Sheets $5.00
Supplies
*Summer Shadows Dies
*Delicate Dahlias Stamp Set
Merry Melody 3D Embossing Folder
Timeworn Type 3D Embossing Folder
Ornate Frame Dies
Stitched Rectangle Dies
Gold Foil Sheets
Hand-Penned (Designer Series Paper) DSP
Vellum
Ink- Flirty Flamingo, Gorgeous Grape, Just Jade
Paper- Basic White, Blushing Bride, Just Jade, Mint Macaron, Highland Heather, Gorgeous Grape, Pale Papaya
Embellishments- Elegant Faceted Gems, Linen Thread, Highland Heather Grosgrain Ribbon
*Sale-a-bration items only available while supplies last or until September 30th
Always Recommended
Paper Snips
Trimmer
Simply Shammy
Die Cutting Machine
Bone Folder
Adhesives: Tombow, Tear Tape, Seal, & Dimensionals
I thought this card would be great for a music teacher with the saying and the embossed Merry Melody on vellum. This card uses just one flower.

Measurements
Blushing Bride Cardbase; 5 1/2 x 8 1/2 scored @ 4 1/4
Vellum: 4 x 5 1/4
Blushing Bride: 2 1/2 x 3 1/2
Flirty Flamingo: 3/4 x 2 1/4
Steps
- Measure, score and cut your paper.
- Embossing with your Stampin' Cut & Emboss Machine the Merry Melody on the Vellum and the Timeworn Type for the Blushing Bride.
- Die cut in Flirty Flamingo 3 pieces to your flower. Attach them with glue dots.
- Die cut in Mint Macaron just 1 leaf. Crumble that leaf to give some added texture.
- Stamp in Flirty Flamingo your saying onto the little strip of paper.
- Assemble: Use Glue dots to attach the vellum to the cardbase. Use multipurpose liquid glue to attach the embossing Blushing Bride rectangle. Attach the flower with a glue dot and then the leaf. Use dimensionals to attach the saying.
- Embellish with the Elegant Faceted Gems.
This card with 3 flowers shows how you can use 2 shades of purple and 2 shades of green to create this look.
Measurements
Highland Heather Cardbase: 5 1/2 x 8 1/2 scored @ 4 1/4
DSP: 4 x 5 1/4
4 x 2 1/2 cut from corner to corner at the diagonal
Basic White: 4 x 5 1/4
Steps
- Measure, score, and cut your paper.
- Die cut 3 flowers in Highland Heather and 3 flower outlines in Gorgeous Grape.
- Die cut 2 leaves in Mint Macaron and 2 leaves outlines in Just Jade.
- Die cut a Basic White label and stamp in Gorgeous Grape the saying.
- Assemble: Glue your DSP together and attach to the cardbase. Glue the Basic White to the inside of the card. Using liquid glue, glue your flowers together one by one and the leaves. Attach them with glue dots.
- Cut about 3 inches of ribbon, fold in half and use a glue dot to attach under the center flower.
- Make a double bow with the linen thread and attach with a glue dot.
- Embellish with the Elegant Faceted Gems for the center of the flowers.
This card with 2 flowers turned out so classy and beautiful by using the gold foil to outline the flowers and leaves. However, in my craft room we treat gold foil like gold and use it sparely and not waste it! Be sure to watch my video and see how created a frame of gold allowed me to die cut out the gold details with ease.
Measurements
Pale Papaya Cardbase: 5 1/2 x 8 1/2 scored @ 4 1/4
Gold Foil: 4 x 5 1/4
Basic White: 4 x 5 1/4
Steps
- Measure, score and cut your paper.
- Die cut your gold foil with the stitched rectangle die. Use that same die to cut out the basic white.
- Use the center of the gold rectangle to die cut your flower and leaf outline.
- Attach your gold frame to the cardbase.
- Stamp on the Basic White stitched rectangle in Just Jade and attach to the inside of the gold frame.
- Die cut Papaya flowers and Just Jade leaves and glue the foil to them.
- Use liquid glue to attach the leaves and flowers to create a more flesh look.
- Embellish with the Elegant Faceted Gems.
Facebook Live Video
Happy Stampin' Everyone!!!


.jpg)


No comments:
Post a Comment
Thank you so much for leaving me a comment! It really makes my day and I love hearing from you! <3