

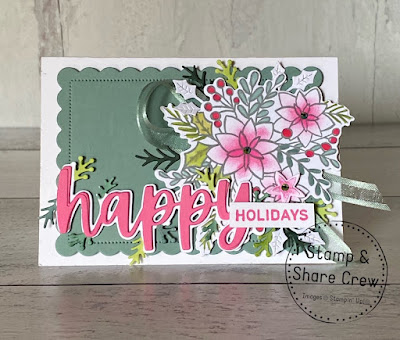
Words of Cheer
All
images © 1990-2021 Stampin’ Up!®
·
Stamp Sets: Words of Cheer (156357)
·
Card Stock and Paper: Basic White (159276); Soft
Succulent (155776); Polished Pink (155710); Evening Evergreen (155574)
·
Stamp Pads: Polished Pink (155715); Smokey
Slate (147113)
·
Tools: Christmas Cheer Dies (156388);
Scalloped Contour Dies (155560), Bone Folder (102300), Stampin’ Cut &
Emboss Machine (149653); Multipurpose Liquid Glue (110755), Paper Snips
(103579)
·
Miscellaneous: In Color Jewels (155571);
Stampin’ Dimensionals (104430); Stampin Blends Combo packs in Soft Succulent
(155521); Granny Apple Green (154885); Real Red (154899);Old Olive (154892);
Blending Brushes (153611);Open Weave Ribbon in Soft Succulent (155780)
Measurements:
·
Basic White: 5” X 7” scored at 3 ½” and burnished with the Bone
Folder, remainder of sheet for stamping and diecutting
·
Soft Succulent: 5 ½” X 4”
·
Evening Evergreen 3” X 3”
·
Polished Pink 5” X 5”
·
Ribbon: 10 inches
Instructions:
1. Die cut 4 ½ inch scalloped
edge frame from Scalloped Contour Dies, From the Christmas Cheer dies, die cut
branches in Evening Evergreen, die cut holly leaves in Basic White, die cut
small ball branches and color in light Granny Apple Green, die cut the small
flowers in Basic White and shade with a Blending Brush using Polished Pink.
2. Die cut “happy” background
from Christmas Cheer dies in Basic White, color stems in Soft Succulent, Granny
Apple Green, and light Olive
3. Die cut “happy” from
Christmas Cheer dies 3 times in Polished Pink, glue three layers together and
adhere to the background happy die cut in Basic White
4. Stamp Floral arrangement
from Words of Cheer using Smokey Slate; die cut image; using a blending brush
color in flowers with Polished Pink; color stems with soft succulent light and
dark, light old olive, light Granny Apple Green; color ball sprays with light
real red
5. Stamp “HOLIDAYS” on Basic
White using Polished Pink and cut
6. Adhere scalloped contour
panel using Stampin’ Dimensionals; fold ribbon and cross and adhere to the soft
succulent panel using Stampin’ Dimensionals, adhere main floral image over the
ribbon using Stampin’ Dimensionals, Glue white holly, Evening Evergreen
branches, and light Granny Apple Green branches around the floral image. Adhere
the die cut small flower on top of the smallest stamped flower for extra dimension.
Adhere In Color Jewels in Evening Evergreen to the center of the flowers
7. Adhere “happy” stack over
the image using Stampin’ Dimensionals
8. Adhere HOLIDAYS using
Stampin’ Dimensionals
9. Trim ribbon to your liking


Words of Cheer Stamp Case
All
images © 1990-2021 Stampin’ Up!®
Supplies:
·
Stamp Sets: Words of Cheer Bundle (156389)
·
·
Stamp Pads: Real Red Ink (147084)
·
Tools: Paper
Trimmer (152392);
Paper Snips Scissors (103579); Mini Stampin Cut & Emboss machine (150673);
Simply Scored Scoring Tool (122334); Bone folder (102300)
·
Miscellaneous: Real Red Sheer Ribbon (153535);
Multipurpose Glue (110755); Tear & Tape (154031); Standard Stamp Cases
(119105)
· Small
legal pad, you will have to have this cut down at your local office supply
store. I have mine cut down to about 6 ½.
Measurements:
·
Evening Evergreen Cardstock – 3 ½ x 10 ½, 3 ½ x 6, scrap for die
cutting
·
Real Red Cardstock – scrap for die cutting
·
Basic White – ½ x 1 ¾
·
Crumb Cake 1 ¾ x 5
·
DSP: 4 x 10 ½, 1 ½ x 4 ¾, 3 x 5, 2 x 5
·
Ribbon: 11 inches
Instructions:
1. Stamp the Christmas stamp on
the basic white cardstock with real read ink so it will dry.
2. Die cut the word cheer in
Real Red, and the “shadow” in Evening Evergreen, using multipurpose glue adhere
them together. Adhere the crumb cake and the 1 ½ x 4 ¾ piece of dsp together
and then add the cheer word in the center. Die cut the berries in red and
adhere to the area’s on the die cut that are supposed to be berries.
3. Take the 4 x 10 ½ dsp and
the 3 ½ x 10 ½ evening evergreen and over lapping by 1/2” using multipurpose
glue so you have some wiggle room adhere them together, the finished width is 7
inches. Run tear & tape in the middle of this piece along the 10 1/2” side
on the front. Take your ribbon and adhere over the tape. Trim your ribbon ends to
the end of the cardstock.
4. Open your stamp case and
insert cardstock piece between the plastic cover and the case. Close case and
run your hand over the spine to give a good crease. Remove cardstock from case.
5. Using
Multipurpose glue adhere the cheer piece in the middle of the front of the
cardstock, then add the stamped sentiment at an angle over the cheer piece. Put
back in the case.
6. Next, we are going to make a
pocket for the inside of your case. Take the 3 ½ x 6 piece of Evening Evergreen
and using simply scored, score on both shorter sides at ¼ and ½, do this on one
6” side as well. Fold and burnish with your bone folder. With your snips remove
the 4 little squares on the bottom of the piece. Adhere the piece of dsp on the
front. Fold the sides in and the bottom up to make sort of a L shape, where they
meet in the corner put a dab of glue. Run tear & tape along 3 pocket edges,
remove backing and stick to the inside left bottom.
7. Take the last piece of dsp and put 3 strips of tear & tape on the long side on the wrong side. Remove backing and adhere to the top of the pad to hide the paper top. You can either adhere this to the case on the right side or just leave it free.
Happy Stampin' Everyone!!!


No comments:
Post a Comment
Thank you so much for leaving me a comment! It really makes my day and I love hearing from you! <3