Classic Wedding – November 2024
All
images © 1990-2024 Stampin’ Up! ®
Supplies:
·
·
Card Stock: Thick Basic White (159229); Basic White (159276); Real Red
(102482); Garden Green (102584); Granny Apple Green (146990); Brushed Silver
and Gold Foil (164861); Take a Bow 6x6 DSP (164309)
·
Stamp Pads: Real
Red (147084); Memento Black Ink (132708)
·
Tools: Paper Trimmer (152392);
Paper Snips Scissors (103579); Stampin’ Cut & Emboss Machine (149653); Bone
Folder (102300); Black Stampin Blends (154843); Reindeer Fun Dies (164043)
·
Miscellaneous: Stampin’ Dimensionals (104430); Stampin’ Seal (152813); Multipurpose
Liquid Glue (110755); Adhesive Backed Snowflakes Assortment (162129); Snowflake
Sky 3D Embossing Folder (162026)
Measurements:
·
Thick Basic White – 5 ½ x 8 ½ scored at 4 ¼ on the 8 ½ inch side
·
Basic White – 4 1/8 x 5 3/8, 3 x 3 ½ for car, 3/8 x 15/16
·
Real Red – scraps for lights and bows and car back lights
·
Garden Green - scraps for lights and present
·
Granny Apple Green - scraps for lights and bow and present
·
Designer Series Paper – 1 x 3 ¼ - 4 different patterns
·
Silver Foil – scraps for window frame, light string, truck handle
and bumper
Instructions:
1. Fold
and burnish card base with bone folder.
2. Run
the larger piece of basic white with the snowflake sky 3D embossing folder
though the Stampin’ Cut and Embossing machine. Adhere to the front of the card.
3. Stamp
the outline of the car with memento ink and then stamp the fill in with real
red.
4. Do
all your die cutting, the car, the presents, bows, silver pieces.
5. Snip
off the lights and adhere to the silver string of lights.
6. Cut
the presents with cardstock and DSP, adhere the bows to the presents as shown.
7. Using
multi-purpose glue, adhere all the silver to the car.
8. Using
the light basic black blend, color the tires.
9. After
adhering all the pieces to the car, adhere to the front of the card so that the
tires are about 3/8 to a ½ inch from the bottom of the card.
10. Put
the completed presents on the top of the car using stamping dimensionals and
glue.
11. Stamp
CHEERS! in real red, then cut off the S! and cut down to 3/8 x 15/16.
12. Scatter
the snowflake embellishments as desired.
13. Finish
inside and envelope as desired.
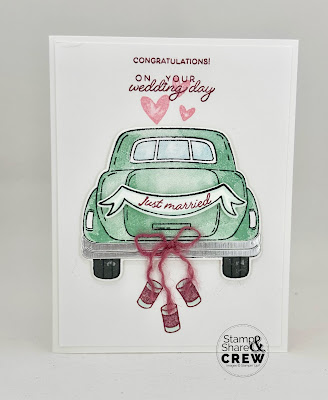
Classic Wedding
All
images © 1990-2024 Stampin’ Up!®
·
Stamp Sets: Classic Wedding Stamp Set (164881)
·
Card Stock and Paper: Thick Basic White Card
Stock (159229); Basic White Card Stock (159276); Brushed Silver & Gold Foil
(164861)
·
Stamp Pads: Memento Tuxedo Black Ink (132708);
Pool Party Ink (147107); Moody Mauve (161649); Pretty In Pink (163807); Basic
Gray (149165); Balmy Blue (147105)
·
Tools: Classic
Wedding Dies (164887); Pool Party Blends (154894)
·
Miscellaneous: In Color Jute Trim (161637);
Stampin’ Dimensionals (104430); Stampin’ Seal Adhesive (152813); Multipurpose
Liquid Glue (110755); Mini Glue Dots (103683)
Measurements:
·
Thick Basic White Card Stock: 8 1/2” x 5 1/2”
·
Basic White Card Stock: 5 ¼” x 4” (2)
·
Brushed Silver Foil: ¾” x 4”
·
Jute Twine: 10” (Moody Mauve)
Instructions:
1. Fold Thick Basic White Cake
Card Stock in half to form a card base.
2. Stamp the car's outline with
Memento Black Ink on one of the Basic White Card Stock pieces, Stamp the inside
with Pool Party, the truck windows in Balmy Blue Ink that you stamp off first,
and the tires with Basic Gray Ink.
3. On the same paper stamp the
banner with Memento Black Ink. Stamp the words Just Married in Moody Mauve Ink
inside the banner.
4. Cut out the Car and Banner
with matching Classic Wedding Dies.
5. Die-cut the rear bumper out
of the Silver Foil and adhere to the back of the car with Liquid Glue.
6. Pop up the wedding banner
with Stampin Dimensionals and adhere to the back of the car.
7. Pop up the Car with Stampin’
Dimensionals and adhere to the center of the second piece of Basic White
paper.
8. Stamp the cans in Moody
Mauve under the car and above the car stamp the hearts in Pretty In Pink and
the greetings in Moody Mauve.
9. Unwind the Moody Mauve Jute
into 3 pieces. Tie one into a bow and
adhere to the bumper with a mini glue dot add a third piece to attach to 3rd
can. Attach each end to a can with a
glue dot
10. Stamp the inside and
envelope to match.
Happy Stampin' Everyone!!!


.jpg)

.jpg)


No comments:
Post a Comment
Thank you so much for leaving me a comment! It really makes my day and I love hearing from you! <3