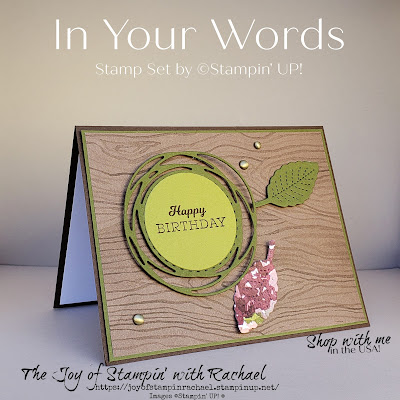
Wednesday's Kit Class with the Sale-a-bration Host Stamp Set, In Your Words! This stamp set is FREE with a $300 party or order and it is not too late to earn! You can place your own order for that amount and earn $30 worth of Hostess Rewards, and 6 $50 Sale-a-bration items or 2 $100 items and 2 $50 items! If a $300 order isn't in your budget and you still want this stamp set, have your friends help! Email me and I'll give you a personal Hostess Code and you can share that with your friends to order from your party. With just a couple of orders you will reach your goal! BUT you only have until September 30th to get your order or party started!
The last way to earn this Stamp Set is by shopping with my Hostess Code FW7QKSFQ or use the link below
One lucky customer of mine that shops with this link will receive the stamp set!
Here are the sayings from this stamp set and you can see why it quickly became my favorite. I love every single one of them. Which saying is your favorite?
You can kit this Card Kit for FREE from me when your order $35 worth by Friday the 24th. Below are item I suggest to order to help you finish this kit.
Suggested Items to Order
Supplies
*In Your Words Stamp Set
Painted Label Dies
Beauty of the Earth DSP
Stitched Leaves Dies
Layering Circle Dies
Paper- Thick Basic White, Basic White, Mossy Meadow, Early Espresso, Old Olive, Merry Merlot, Vellum
Ink- Mossy Meadow, Early Espresso
Brushed Metallic Adhesive-Backed Dots
*Sale-a-bration Item
Always Recommended
Paper Snips
Trimmer
Simply Shammy
Die Cutting Machine
Bone Folder
Adhesives: Tombow, Tear Tape, Seal, & Dimensionals
I just love everything about this card. I tend to struggle with making masculine cards and this "warm" Fall themed paper made it really easy.
The great thing about this Designer Series Paper is that is made to cut out leaves that look like they are changing colors. So it was easy to pair it with Stitched Leaves Dies from the Annual Catalog.
Measurements
Early Espresso Cardbase: 5 1/2 x 8 1/2 scord @ 4 1/4
DSP & Basic White: 4 x 5 1/4
Mossy Meadow: 4 1/8 x 5 3/8
Steps
- Measure, score and cut your paper.
- Die cut the circle swirl in Mossy Meadow.
- Die cut the inner circle in Old Olive with the Layering Circle Die that matches. Stamp in Early Espresso onto it.
- Die cut 2 leaves: Beauty of the Earth DSP and in Mossy Meadow with the Stitched Leaves Dies.
- Assemble: Glue the stamped circle to the swirl circle. Glue the DSP the to the Mossy Meadow and glue to the cardbase. Attach stamped circled with dimensionals and the leaves with glue dots.
- Embellish with the Brushed Metallic Dots.
This card has a very simple design. The DSP goes from 1 inch, to 3/4, to 1/2. But because of the way the paper lines up it looks great!
That saying is so general that this card could be sent for anything.
Measurements
Mossy Meadow Cardbase: 5 1/2 x 8 1/2 score @ 4 1/4
DSP: 5 1/4 x 1
5 1/4 x 3/4
5 1/4 x 1/2
Basic White: 4 x 5 1/4
Steps
- Measure, score, and cut your paper.
- Die cut in Basic White the circle swirl shape.
- Stamp in Mossy Meadow your saying.
- Glue the DSP in the order it was cut onto your cardbase.
- Attach the stamped circle swirl with dimensionals.
- Embellish with Brushed Metallic Dots
I can't lie, this is the saying that caught my eye first. It is so funny and so me! Yes, I do send late Birthday cards and always feel so awkward about it. But this saying don't breaks the ice and makes it funny and not a bad thing.
Lastly, can we just admire these dies. I've had the Painted Label Dies in my craft room for at least 2 years and am sad to say I rarely use them! But they are amazing especially when layered together. I used vellum as the bottom layer, Merry Merlot, and then Basic White.
Measurements
Thick Basic White: 5 1/2 x 8 1/2 scored @ 4 1/4
DSP: 4 1/4 x 5 1/2
Steps
- Measure, score and cut your paper.
- Die cut swirly circle in vellum.
- Die cut the scallop circle in Merry Merlot.
- Die cut the label in Basic White.
- Stamp with Early Espresso.
- Assemble: Glue the DSP to the card front. Glue the vellum onto the DSP. Glue the Merry Merlot to the label and attach both with dimensionals.
- Embellish with the Brushed Metallic Dot.
They even have a leaf outline die with it, so if you didn't have the Stitched Leaves Dies you could use this in place for this card.
Which is your favorite? Can't decide? Make all 3 by shopping from my online store or get this get for FREE with your $35 order.
Facebook Live
Happy Stampin' Everyone!!!


.jpg)


No comments:
Post a Comment
Thank you so much for leaving me a comment! It really makes my day and I love hearing from you! <3