t> The Joy of Stampin' with Rachael: March 2022

Thursday, March 31, 2022

The Penny Crafter Tutorials- Flowering Tulips


Order from me during the month of April and I'll email you The Penny Crafter Tutorials created by Joya Bohman, Lynda Day, and Rachael Coon (me). This month we will give you 6 ideas using the Flowering Tulips Bundle with ideas for Mother's Day! 

Just Order with my Hostess Code for the Month if spending less than $150 and I'll send you some extra Happy Mail too! 
Hostess Code WABFCBZQ


Here are my creations for the Tutorial! 


I made a fun Treat Holder using the Pillowbox Dies and the Flowering Fields DSP. 


I filled mine with chocolate but you could fit other small things inside as well! 


Here is my DSP Tulips Card!


With the Mother's Day greeting. 


This card could be used for so many people and not just Mom's. 


The tulips are easy to make using the Tulip Dies. 


When you order this Bundle from me this month (April), I'll send you my Flowering Tulips kit for FREE! You just need inks, adhesive, and the stamp set to finish the cards!  Just click here to add this bundle to your shopping cart! 

Happy Stampin' Everyone!!!


Wednesday, March 30, 2022

Stamp & Share Crew- Daffodil Daydream Treat Holder


Learn how to make this fun Easter Treat Holder using the Stamp & Share Crew Design Teams Tutorial! 


Daffodil Daydream

All images © 1990-2022 Stampin’ Up!®


Supplies:


·       Stamp Sets: Daffodil Daydream Bundle (157795)

·       Card Stock and Paper: Basic White (159276); Pool Party (122924); Calypso Coral (122925); Pale Papaya (155668); Pear Pizzazz (131201); Flowering Fields DSP (157670)

·       Stamp Pads: Memento Ink (132708); Calypso Coral (147101)

·       Tools: Paper Trimmer (152392); Paper Snips Scissors (103579); Stampin Cut & Emboss machine (149653); Simply Scored Scoring Tool (122334); Bone folder (102300); Delightful Tag Topper (149518); Blending Brushes (153611)

·       Miscellaneous: Multipurpose Glue (110755); Stampin Dimensionals (104430); Brushed Brass Butterflies (158136); Pool Party Sheer Ribbon (152462); Baker’s Twine Essentials Pack (155475); Stampin Blends (154881); Layering Circles (151770); Hippo & Friends (153585)

Measurements:


·       Pool Party –  2 x 11, 3 ½ x 3 ½

·       Calypso Coral, Pale Papaya, Pear Pizzazz – scraps for die cutting

·       Basic White – scrap for sentiment

·       DSP – 1 ¾ x 3 ½

·       Ribbon – 5 ½ inches


Instructions:


1.     Using the Tag Topper punch each end of the 2 x 11 pool party, then score on each end at 6 7/16. Burnish each score with bone folder.

2.     Score the 3 ½ x 3 ½ square at ¾ on all sides. Cut up the to score line on 2 sides opposite each other, taking a little sliver out of the corners.

3.     Using the smallest circle center on the square and run thru die cutting machine. Fold corners in and put glue on each side. Bring sides with glue up to make a box. Put glue on 2 opposite sides of the box and put in between the front and back of the holder.

4.     Die cut all the pieces of the daffodil, stem and leave and build the flower as picture shows. I took the blending brush and calypso coral ink and blending on the pale papaya cardstock to give a little extra color.

5.     Adhere the flower to the DSP and adhere that to the front of the holder.

6.     Stamp sentiment with black ink and cut out with the smallest die shape in the dies.

7.     Using dimensional adhere over flower, adhere butterflies as shown.

8.     Put pool party ribbon thru both holes in the topper and then tie a bow with white twine.

9.     Put Cadbury Egg in the hole.


Wonderful Wednesday- Stamp Camp Swaps


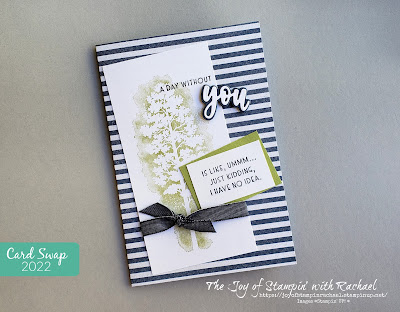
Wonderful Wednesday with my Stamp Camp Swaps! Scroll through and see each card and the name of the stamper and the main item they used to create the card. Be sure to watch my video below that shares more details about each card! 

By Cindy Hafner

By Marjeen Nation

By Natalie Woll

By Susan Loamanu

By Robyn Bennett

By Paula Skeen


By Ashley Reid
*WINNER

By Susan Dryer
Many Layered Blossom Dies (retiring soon & on Sale)

By Becky Ray 

By Megan Snider 


I'm missing two more from this swap and will post them once they arrive!


Facebook Live Video


Happy Stampin' Everyone!!!


Tuesday, March 29, 2022

Tuesday's Tip at Ten- Which Clear Blocks are Must Haves


Tuesday's Tip at Ten: Which Clear Blocks are Must Haves if you are a Stamper? 


In order to use Stampin' UP! stamps you also need to have a clear block to mount the stamp onto. Blocks come in all different sizes and shapes. They are labeled by letter A-F with the smallest starting with A and the largest being F. The G, H, I blocks are rectangle in shape and are best for word only stamps.  Below each stamp set in the Catalog and in the description online it gives you a suggested size you would need in order to use that stamp set. 

If you are New to stamping and are not sure which blocks you should start with, here is my tip and why. I highly recommend the D and F Blocks. The size D fits a lot of the Stampin' UP! stamps. In fact, when you order your first Paper Pumpkin kit, that is the size of block they give and guarantee is all you'll need to make all Paper Pumpkin kits. It fits nicely in the hand and is easy to use. It is my daily go to size. Next I would tell ya the F Block because this block will hold the largest stamps. Think of those big font sets and background stamps. You'll need something big enough to hold them. With these two you will be set! 

Why get them all? 
So, if I only "need" two, why should I get them all? Confession time, just last month, I finally ordered the whole bundle. I had earned the 50% off one item deal and I grabbed the bundle of blocks. I had a handful (like 10) of the D blocks but can I tell you how much I love the smaller sizes for my word only stamps or my tiny, tiny images? It truly makes it easier to stamp if you have the right size of block to the size of your stamp. Not to mention, not as messy. I can stamp a small image on my small block and not worry as much about getting ink on the corners of the block because I couldn't keep it straight enough when inking. It is truly really, really nice. So when you have a larger collection of stamps and are ready to invest in all the sizes, I highly encourage getting at least one of all the sizes. You can order one by one, little by little in each order or order the bundle of all and size 10%. 

Happy Stampin' Everyone!!!

Monday, March 28, 2022

Miss Monday- Good Feelings Card


Miss Monday with a NEW Stamp Set coming out in the Annual Catalog on May 3rd! This stamp set was sent to me because I registered for an Online Training called OnTour and I just LOVE the big font and fun sayings found in it!  


Here is the stamp set I used, Good Feelings. You can't find this stamp set online yet and can only see it in the Catalog or the photos of it other stampers take. 


I had a fun time pairing this NEW stamp set with some soon to be RETIRING items. It is this fun window of time where I can show off the new and say good bye to the old. 


The stamped on layer was die cut with the Stitched So Sweetly Dies (a favorite), that will be retiring soon. 


The next layer I used the Stitched Rectangle Dies to cut out the Pattern Party Designer Series Hostess Paper that will be retiring also in May. 


Lastly, I used the Clear & Silver Epoxy Essentials to embellish. 

You can make this card too, or use this Layout (that was inspired by my team member Ashley Reid). 

Supplies
Good Feelings Stamp Set
*Stitched So Sweetly Dies
Stitched Rectangle Dies
*Pattern Party DSP
Clear & Silver Epoxy Essentials
Paper- Basic White, Pool Party, Costal Cabana 
Ink- Pool Party, Coastal Cabana, Petal Pink, & Flirty Flamingo 
Dimensionals

Measurements
Pool Party Cardbase: 5 1/2 x 8 1/2 scored @ 4 1/4
Costal Cabana: 4 x 5 1/4
DSP & Basic White: 4 x 5 1/4


Steps
  1. Measure, score, and cut your paper. 
  2. Die cut your Basic White with the Stitched So Sweetly dies. 
  3. Die cut the DSP with the Stitched Rectangles
  4. Stamp on the Basic White by inking up the lightest shade (either Pool Party or Petal Pink) and then use a sponge to ink on the darker shade only on half the stamp. 
  5. Assemble- Attach the Coastal Cabana to the cardbase with liquid glue. Glue on the DSP and then attach the Basic White with dimensionals. 
  6. Embellish with the Clear & Silver Epoxy shapes! 

Happy Stampin' Everyone!!!


Saturday, March 26, 2022

Biggest Wish Stamp Camp


Hey Stampin' Friend's! I did it again! I held another Stamp Camp and couldn't be happier with how it turned out! The theme for this one was Birthday and so I used the Biggest Wish stamp set to design 5 cards and make 20 cards for the event! Look below for the creations and learn a little bit on how I run my Stamp Camps. If you missed this one, no worries, I am hosting a Masculine Stamp Camp in May and you can sign up with the google form link below! 
Cards 

Here are three of the cards with more of a "manly" look. 


This one was designed for a teen boy in mind using the Sports Fan dies and DSP. 


This card was made for the more mature men in your life, but could be made with lots of variations. 


This was our Fun Fold that was gender neutral. Or could look different depending what candles you choose. 


Here is the fun part of this card, with this Dutch gate. Fun Fact: the top part of this card base was used for the Sports card above! Waste not! 


These two cards were made with the girls in mind. 


This card is for the mature ladies in our lives with these bold colors that contrast. 


This softer color card with butterflies was made with the younger girl or younger girls at heart. I just LOVE how it turned out! 

Gifts & Kit
About a week before the event everyone gets sent their kits in the mail and below are just some of the things that were included. 

Every good party has a "goodie" bag. I also included two of my favorite things, lip balm and a fancy highlighter. 


Inside the goodie bag was a Cake in a Mug packet with frosting, a candle, and Birthday Balloon. 


You can't have a party without some cake and ice cream. I gave them vanilla frosting chocolate kisses and Lindor Neapolitan chocolates. 


I always try to send a tool, embellishments, and a sheet of dimensionals that can use to make their card with. 


I die cut for two days and them put all the kits together. I had 4 cards in each clear bag in 5 different designs. 


Lastly, I wrap it all up together pretty and send out in a flat rate bubble mailer. 


Games
What is a party without games! We had a door prize Wheel of names going on through out the event and two scheduled games. Our first game was to help them decorate. They all got a Birthday Balloon in their kit and were put into teams based on the color of their balloon. They had to blow in it 10 times and tie a knot and hold up their color. First team done wins a Stampin' Blend Marker and everyone is a winner for now they had a Party Balloon! 


Through out the weeks leading up to the event I ask getting to know you questions on our Facebook Group (created just for this event). One of them was what their favorite Ice Cream and Cake flavors (going on the Birthday theme). I then used their flavors plus some extras to form a "Bingo" game! They got to pick 3 flavors and one would win when I drew their 3 flavors first! :) 


Ice cream Game 


Before the event I have a pre-party activity for them to create using supplies I sent but they could embellish and design anyway they would like. I sent them a kit to make a box to hold their cards they finished in. I also made a video for this if you would like to learn how to make it too. 
My stampers also earn tickets through out the event to earn them a grand prize at the end. They earn them in lots of different ways but mostly by interacting with our group. They earn a "pick a punch bundle", "pick a die bundle" or a $50 shopping spree with me! 


Swaps
I had some of the most talented stampers at my event and will have their swaps available for you to see over on another blog post. They are so great, they have earned their own space! 


Next Stamp Camp 
If you don't want to miss out on the fun, join me for my next Stamp Camp in May. Here are more details below! 


Happy Stampin' Everyone!!!


Friday, March 25, 2022

Fun Fold Friday- Sweet Ice Cream Cone


Fun Fold Friday with one of my Retiring Favorites (gone by May 2nd or only while supplies last). 
The Sweet Ice Cream stamp set was $17 and now only $13.60


With the help of the Ice Cream Builder Punch (now on sale for only $9 used to be $18) I was able to make all of these ice cream scoops with ease! 


When this card is closed it looks like you only have a couple of scoops, which is still cute. 


But once it unfolds you see all 9 scoops. These scoops were chose as a ode to the retiring In Colors. As of May 3rd all of these colors will be gone! 

Supplies
Sweet Ice Cream Stamp Set
Ice Cream Builder Punch
In Colors Ink & Paper- Magenta Madness, Bumblebee, Misty Moonlight, Just Jade, Cinnamon Cider
Paper- Basic White
Iridescent Rhinestones Basic Jewels

Measurements
Magenta Madness Cardbase: 4 1/4 x 5 1/2
Basis White: 10 1/2 x 4 scored @ 5 1/4 & 2 1/2

Steps
  1. Measure, score, and cut your paper. 
  2. Punch out two of each In Color Ice Cream scoops and one Basic White scoop. 
  3. Punch out one Cinnamon Cider cone and stamp in Cinnamon Cider the Criss cross. 
  4. Stamp in Cinnamon Cider "Happy Birthday" on the bottom of the Basic White and stamp right above the 5 1/4 score line the "with sprinkles on top". 
  5. Use the matching ink to cardstock and stamp on your scoops. 
  6. Glue your cone on with liquid glue and attach the Basic White scoop with a dimensional.
  7. Glue on the stacks of scoops starting with the bottom scoop first and layering on top of it until you have 9 or 10 scoops. 
  8. Attach the Basic White to the cardbase. 
  9. Embellish the first scoop (Basic White) with the Iridescent Rhinestone. 
  10. Attach the Basic White to the 

Facebook Live


Happy Stampin' Everyone!!!

New at SU Blog Hop- All Tied Up with Dotted Ribbon Knot Bow

  Welcome to the NEW AT SU! Blog hop! We are a group of Stampin ’ Up! Independent Demonstrators from around the world who are full of creati...