t> The Joy of Stampin' with Rachael: April 2021

Friday, April 30, 2021

Fun Fold Friday- Sweet Ice Cream Slide & Lock Card


Fun Fold Friday with this AMAZING Fun Fold created by Chris Slogar from Buckeye Inklings in Ohio! This is a slide & lock fun fold and I used the Sweet Ice Cream stamp set but you could use any DSP and image to create this Fun Fold. 


Send the card in this "lock" position with the ice cream on the right side of the card. 


Then slide the ice cream to the left to unlock this card. 


Once open you can see the oval that makes the sliding possible and the spot for the inside greeting and a place to write your message. 


I used the Classic Label Punch that will be retiring on Monday May 3rd. Click on the link below if you want to order it before it is gone.
Classic Label Punch: Was $18 Now $14.40

You will want to plan to make 2 of these cards when you make it because of the way we cut the stripe Blackberry DSP will provide two pieces to use. 

Supplies
Sweet Ice Cream Stamp Set
Ice Cream Corner DSP
Blackberry Bliss Cardstock & Ink
Cinnamon Cider Ink
Early Espresso Ink
Pool Party Ink 
Bermuda Bay Ink
Basic White Cardstock
*Classic Label Punch
Blackberry Bliss Ribbon
Tasteful Labels Dies
Dimensionals
Ice Cream Builder Punch
Layering Oval Dies

*retiring May 3rd

Always Recommended
Paper Snips
Trimmer
Simply Shammy
Die Cutting Machine
Bone Folder
Adhesives

Measurements
Blackberry Bliss Cardbase: 5 1/2 x 10 1/2 scored @ 4 1/4 & 8 1/2
DSP: 2 1/2 x 5 1/4
4 x 5 1/4
Basic White: 4 x 5 1/4

Steps
  1. Measure, score, and cut your paper. 
  2. To create the angle on the cardbase measure on the top side at 1 inch and cut down to the bottom corner at a diagonal. (see video)
  3. Cut the 2 1/2 x 5 1/4 DSP by measuring at the top 3/4 from the right (mark with pencil) and mark the bottom on the left side 3/4 the way in. Put it in your paper trimmer and it will make 2 pieces to use. 
  4. Die cut in Blackberry Bliss and Basic White your layered circles from the Tasteful Label Dies. Stamp in Blackberry Bliss on your Basic White circle. 
  5. Stamp on Thick Basic White your ice cream top (Pool Party and Bermuda Bay) and your cone (Cinnamon Cider and Early Espresso). Punch them out. Glue them together. 
  6. Use the Classic Label Punch on right side of the card by sticking it all the way up and only punching 1/4 of it out (see the video). 
  7. Close it and using a pencil mark the top of where you punched before. Then match it and punch again.
  8. Glue on the DSP to both sides and punch it out at those spots again. 
  9. Die cut an Oval in Blackberry Bliss big enough to cover the Classic Label punch hole (about 2 1/4). 
  10. Use washi tape or a post it note and cover the back of the Classic Label Punch hole with the oval. 
  11. Cut the top off of one dimensional and stick it through the punched out hole onto the oval. Attach the ice cream cone here. (Be sure to remove washi tape before you attach the ice cream). 
  12. Glue your Tasteful circles together and attach the Blackberry Bliss ribbon. Then attach with dimensionals. 
  13. Stamp your "Happy Birthday" in Blackberry Bliss onto the 4 x 5 1/4 Basic White and glue it in. 

Facebook Live Video


Happy Stampin' Everyone!!!


Thursday, April 29, 2021

Throwback Thursday- All The Good Things Koi Fish Card


Throwback Thursday with the stamp set, All The Good Things. I got this Koi fish card from a swap years ago that was made by Valerie Sanchez. This was a stamp set that I really liked and never got and maybe why I can't part with this card yet! This card uses so many great items that are retired. The embossing folder, the ribbon, and even the embellish bubbles she used. 
 

This photo can't capture it but the detail on this fish is amazing and I believe was one of the first Distinktive styles that Stampin' UP! released! 
 Distinktive** stamp set; it has a special texture that gives added depth and dimension in a single step, creating photo-realistic images. **Patent pending


She also used the clear embossing powder over this fish image to create a shiny look but keep the color integrity of the image. 

Hope you have enjoyed to blast to the past and if you have this stamp set still to pull it out and create something amazing with it! 

Happy Stampin' Everyone!!!


Wednesday, April 28, 2021

Wednesday's Kit Class- Paper Pumpkin So Cool Cards


Today's Kit Class is using the Paper Pumpkin Kit, So Cool, stamp set. If you order with the Hostess Code (link below) by Friday, April 30th, $35 worth of product from my online store I'll send you one kit that includes 4 cards in two of today's card designs. The really awesome thing about this Paper Pumpkin Kit is that is coordinates with the Ice Cream Corner DSP.


Suggested Items to Order
Ice Cream Corner DSP $11.50
https://www.stampinup.com/products/ice-cream-corner-designer-series-paper?demoid=2130375

So Cool Refill $10
https://www.stampinup.com/products/kit-refill-so-cool-april-2021?demoid=2130375


Supplies
Paper Pumpkin So Cool Kit or Refill Kit
Ice Cream Corner DSP
Memento Black Ink
Bermuda Bay Ink & Cardstock
Terracotta Tile Cardstock
Basic White Cardstock
Granny Apple Green Ink & Cardstock
Blending Brush

BLACK 3/8" (1 CM) GLITTERED ORGANDY RIBBON

Rhinestones
Holiday Rhinestones
Playful Pets Trim
Painted Texture Embossing Folder
Tasteful Texture Embossing Folder
Banners Pick a Punch
Layering Circle Dies


If you order, you will be getting 2 of each of these card designs for your FREE kit! These are the ones you can make with the stamp set and some extra craft room supplies.


These cards are not part of today's FREE kit, but give you some extra ideas on how to make full cards using the So Cool Paper Pumpkin Kit supplies. 


This card has a very basic layout but the "cool" thing about this card is the popsicles are all the Ice Cream Corner DSP! 


Measurements
Bermuda Bay Cardbase: 5 1/2 x 8 1/2 scored @ 4 1/4
Terracotta Tile: 4 x 5 1/4
DSP: 2 x 5
Basic White: 4 x 2 1/2

Steps


Both of these cards have a rainbow theme either literally with the rainbow or with the popsicles and DSP. 


The texture for this card's sky comes from the Painted Texture embossing folder. 


Measurements
Pool Party Cardbase: 5 1/2 x 8 1/2 scored @ 4 1/4
Pool Party: 4 x 5 1/4
Basic White: 3/4 x 3 1/2

Steps


Watermelon Cards

Wither you like the small watermelon look or the large watermelon better, both of these are perfect for Summer Sending. 


This watermelon card using the stamps from this kit and Stampin' Blends. 


Measurements
Thick Basic White Cardbase: 5 1/2 x 8 1/2 scored @ 4 1/4
Basic White: 4 x 5 1/4

Steps


I just love the way this card turned out! This was my original design! Many of the designs are inspired by others but this one was 100% me! Which always makes it more loveable. 


Measurements
Terracotta Tile: 11 x 4 1/4 scored @ 5 1/2
DSP: 4 x 5 1/4
Granny Apple Green: 5 1/4  x  1/2

Steps
  1. Measure, cut and score your paper. 
  2. Die cut a small scalloped circle and stamp in Memento Ink "way to go!".
  3. Put a little adhesive on the back of the circle and make a "fake bow" to attach. (see video)
  4. Take the watermelon and detached it from the card. Then cut it into 4 triangles. 
  5. Glue the DSP the to the card front.
  6. Glue on the Granny Apple Green strip to the lower bottom of the DSP. 
  7. Attach the watermelons and circle with dimensionals. 
  8. Embellish with the Holiday Rhinestones. 


Facebook Live Video


Happy Stampin' Everyone!!!


Tuesday, April 27, 2021

Tuesday's Tip at Ten- Storing Your Dies


Tuesday's Tip at Ten today is to help you store your New Stampin' UP! dies! The dies come in a protective case and has it labeled on the outside with the name and how many dies are in there. Once you open it up, they are attached to a "sticky" strip to keep it in place while it travels from the store house to your home, but isn't meant to be used forever. 

So my tip today to you is to cut a piece of 5 x 7 (or larger depending on the size of the case) cardstock and attach a magnetic sheet that has adhesive on the back. I used retired DSP and leftover stripes of my magnetic sheets and pieced them together. Then I slipped the info sheet with the dies back in and wrote on the top of the cardstock the name of the dies. The magnetic sheets can be purchased from amazon or found at your local office supplies store. I really do think they are a game changer and help keep your dies organized and the clear case helps you see quickly what dies they are. 

The dies below are some brand New Dies that will be coming out on May 4th! Come back then to see all of my samples and shop with me that day! 


Happy Stampin' Everyone!!!

Monday, April 26, 2021

Miss Monday- Flower Pot Cards


Miss Monday cards with the Pierced Blooms Dies! I made 10 of these flower pots for a card swap I do with friends where the theme was Birthday and to use at least 2 of the colors that were picked. The colors this month were Sahara Sand, So Saffron, Old Olive, Misty Moonlight, and Calypso Coral. I choose this design so I could use all the colors. I made a video on how to make this card for Fun Fold Friday and just added a couple of new products to this design. (Video link below)


This card will fit into a  A2 size envelope. 


I used the Painted Texture 3D embossing folder to create the texture on the pot. 


The Pierced Blooms Dies are perfect for this card design. I used the large leaves and the large flower for this flower pot. 


You just pull up on the the flowers and below is a spot for you to write your Birthday message. I used the Crinkled Seam Binding ribbon to hold the pot together. No adhesive is needed. 


The back of the flower pot will look like this and the ribbon wraps around it. 

You can make this card too when you shop at my online store and follow my steps below. 

Supplies
Pierced Blooms Dies
Crinkle Seam Binding Ribbon
Scalloped Edge (Scalloped Contour Dies)
Sahara Sand Cardstock
Misty Moonlight Cardstock
Basic White Cardstock
So Saffron Cardstock
Old Olive Cardstock
Calypso Coral Cardstock

Always Recommended
Paper Snips
Trimmer
Simply Shammy
Die Cutting Machine
Bone Folder
Adhesives

Measurements
Sahara Sand Flower Pot: 3 1/2 x 9 scored @ 3 1/2 x 7
Sahara Sand: 2 1/2 x 4 1/2
Basic White: 2 1/4 x 2 1/4
Template (any color): 3 1/2 x 3 1/2


Steps
  1. Measure, score, and cut your paper.
  2. Create your pot template by taking the 3 1/2 x 3 1/2  piece of cardstock and marking the bottom on each side at 1/2 mark. Put in your paper trimmer and cut from the mark to the top corner (on both sides). 
  3. Die cut all of your flower pieces: 1 Large Misty Moonlight flowers, 1 So Saffron large flower, 4 Old Olive large leaves, 3 large white centers. 
  4. Die cut the flower pot edge with the Scallop Contour Dies. Lay your template on the bottom of the pot and cut off each side (see video). 
  5. Then emboss just the bottom half of the pot with the Painted Texture embossing folder. 
  6. Use ribbon to keep the pot closed. No adhesive needed. 
  7. Glue your White to your Crumb Cake and attach the flowers and leaves with glue dots. 

Happy Stampin' Everyone!!!


Friday, April 23, 2021

Fun Fold Friday- Forget Me Not Flower Pot Card


Fun Fold Friday with this Forget Me Not Flower Pot using the Pierced Blooms Dies. There are a lot of different ways to make a "Flower Pot" card, but I used Julie Davison's measurements to create today's card. 


The star to this card are the Pierced Blooms Dies. I just love the shapes and details to these flowers. You could substitute any flower die or punch you have and change up the colors to whatever you like. 

Pierced Blooms Dies


I left this card blank so it could be used for anything, but this would make one great Mother's Day Card. Just pull out the flowers and write a message inside. You can create this card too when you order from my online store and follow the steps below. 


Supplies
Pierced Blooms Dies
Just Jade Gingham Ribbon (Flowers For Every Season Combo Pack)
Scalloped Edge (Scalloped Contour Dies)
Crumb Cake Cardstock
Pacific Point Cardstock
Basic White Cardstock
Daffodil Delight Cardstock
Shaded Spruce Cardstock
Black Matte Dots

Always Recommended
Paper Snips
Trimmer
Simply Shammy
Die Cutting Machine
Bone Folder
Adhesives

Measurements
Crumb Cake Flower Pot: 3 1/2 x 9 scored @ 3 1/2 x 7
Crumb Cake: 2 1/2 x 4 1/2
Basic White: 2 1/4 x 2 1/4
Template (any color): 3 1/2 x 3 1/2

Steps
  1. Measure, score, and cut your paper.
  2. Create your pot template by taking the 3 1/2 x 3 1/2  piece of cardstock and marking the bottom on each side at 1/2 mark. Put in your paper trimmer and cut from the mark to the top corner (on both sides). 
  3. Die cut all of your flower pieces: 5 Pacific Point flowers, 5 Daffodil mini flower centers, 3 Spruce leaves. Attach the yellow centers to the blue flowers and curl the petals with your bone folder a little bit. 
  4. Die cut the flower pot edge. 
  5. Lay your template on the bottom of the pot and cut off each side (see video). 
  6. Use ribbon to keep the pot closed. No adhesive needed. 
  7. Glue your White to your Crumb Cake and attach the flowers and leaves with glue dots. 
  8. But a Black Matte dot in the center of each card and you have yourself a pot of Forget Me Nots. 

Facebook Live Video


Happy Stampin' Everyone!!!


Wednesday, April 21, 2021

Wednesday's Kit Class- Flowering Cactus Product Medley


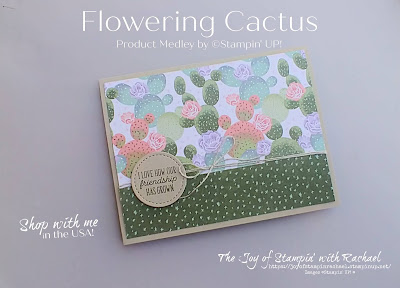
Today's Wednesday's Kit Class I'm using the Flowering Cactus Product Medley from the Mini Jan-June Catalog! If you love it all (paper, dies, stamp set, embellishments) this is the set for YOU! The beauty of this "kit" is that you are the designer and can create anything you want with it. Below are just 4 cards that I created and will be part of your kit if you order $35 worth at my online store using the hostess code by April 23rd. 


Suggested Items to Order
Flowering Cactus Product Medley $70

Here is everything that comes in this Medley: Flowering Cactus stamp set, 48 sheets of 6 x 6 DSP, linen thread, coral linen thread, felt embellishments and matching Dies


Supplies
Flowering Cactus Product Medley
Stitched Rectangles Dies
Stitched Shapes
Stitched with Whimsy Dies
Crumb Cake Cardstock
Mango Melody Cardstock
Highland Heather Cardstock
Mossy Meadow Ink & Cardstock
Calypso Coral Ink
Holiday Rhinestones
*Brayer
*Sponge 

*Retiring items

Always Recommended
Paper Snips
Trimmer
Simply Shammy
Die Cutting Machine
Bone Folder
Adhesives


This card just may be my favorite of the set! I used the Stitched Rectangle Dies to create this "frame" like look! Then to create my sunset look I used Mango Melody cardstock and Calypso Coral ink and sponge brayered just half. 

Stitched Rectangle Dies

*Sponge Brayer $6.40


Measurements
Thick Basic White: 5 1/2 x 8 1/2 scored @ 4 1/4
Crumb Cake: 4 1/4 x 5 1/2

Steps
  1. Measure, score and cut your paper. 
  2. Die cut a Stitched Rectangle in Mango Melody.  Use the sponge brayer and Calypso Coral to add color to half of it (to make it look like a sunset). 
  3. Die cut 2 cactus from the DSP. 
  4. Die cut 1 Mossy Meadow cactus. 
  5. Die cut in the corners of the Crumb Cake little spikey images. 
  6. Die cut the smallest stitched rectangle and stamp with Mossy Meadow your staying onto it. 
  7. Assemble: use dimensionals to attach the Crumb Cake to the cardbase. Wrap linen thread around the Mango Rectangle twice and tie a bow. Use dimensionals to attach Mango rectangle to the Crumb. Add cactus and label.
  8. Embellish with Holiday Rhinestones and felt flowers. 


To this card we added a fun border with the Stitched with Whimsy Dies. You could make this card with the DSP only or with the stamped image. Watch my video to see how to do both!

Stitched with Whimsy Dies $29


Measurements
Highland Heather Cardbase: 5 1/2 x 8 1/2 scored @ 4 1/4
Mossy Meadow: 3 5/8 x 4 7/8
Basic White: 3 1/2 x 4 3/4
4 x 5 1/4

Steps
  1. Measure, score, and cut your paper. 
  2. Die cut with the Stitched with Whimsy dies on the Basic White (3 1/2 x 4 3/4).
  3. Die cut the cactus and flowers from the DSP OR stamp them out onto Basic White and die cut them out. (See video to learn how to make the cactus two toned).
  4. Stamp in Mossy Meadow the greeting and the little cactus shadow. 
  5. Assemble: glue on your layers. Attach the cactus with dimensionals and the flowers with glue dots. 
  6. Embellish with the Holiday Rhinestones. 


Cactus are all about texture. Usually the kind you don't want to touch! This card is a great example of all the right kinds of texture. Between the layers, felts embellishments, and the embossed background. I used a retired embossing folder from the Holiday Catalog but you could use any that you like. I suggest the "mini" ones because they fit best in the space. 

Greenery Embossing Folder


Measurements
Pear Pizzazz Cardbase: 5 1/2 x 8 1/2 scored @ 4 1/4
Pear Pizzazz: 4 x 5 1/4
Basic White: 4 x 5 1/4 (inside optional)
3 x 4
Calypso Coral: 3 1/8 x 4 1/8

Steps
  1. Measure, score, and cut your paper. 
  2. Die cut 2 cactus, one in Mossy Meadow and one in Pear Pizzazz.
  3. Die cut a DSP cactus. 
  4. Die cut on the bottom of the 3 x 4 Basic White with the cactus stitches. Stamp on the top right corner in Mossy Meadow.
  5. Emboss on half of the 4 x 5 1/4 Pear cardstock.
  6. Assemble: glue your layers together. Attach the Coral/White rectangle with dimensionals. Use liquid glue for your cactus and for your felt flowers. 
  7. Tie a double bow with the coral linen thread and attach with a glue dot to the DSP cactus. 


This card really features the DSP from this pack and shows how easy it can be to make a lovely card fast! I did use the retiring Stitched Shapes but you could use the Layering Circle Dies in it's place.

Layering Circle Dies


Measurements
Crumb Cake Cardbase: 5 1/2 x 8 1/2 scored @ 4 1/4
DSP: 5 1/4 x 1 1/4
5 1/4 x 3

Steps
  1. Measure, score, and cut your paper.
  2. Die cut the smallest circle in Crumb Cake and stamp in Mossy Meadow on it. 
  3. Attach your DSP together by using a 4 x 5 1/4 piece of cardstock as your guide. 
  4. Wrap linen thread around it twice and die a bow. 
  5. Glue DSP to the card front,
  6. Attach the stamped circle with dimensionals. 

Facebook Live Video


Happy Stampin' Everyone!!!


Tuesday, April 20, 2021

Tuesday's Tip at Ten- Post It Notes & Dies


Sometimes you just want something to stay put temporarily. That is when Post-It Notes (a stampers best friend) come in handy! Use a Post-It Note to help hold a die in place over stamped images and safely remove it once you've ran it through your Stampin' Cut & Emboss Machine. I can't tell you how many times this has saved me time and made my first cut a successful one! This is just one of the many ways a Stamper can use Post-It Notes! 

#TuesdaysTipatTen
*Die is from the Scalloped Contour Dies coming May 4th


Happy Stampin' Everyone!!!

Monday, April 19, 2021

Miss Monday Cards- Beautiful Friendship & Forever Greenery Paper


Miss Monday Cards using the retiring Beautiful Friendship stamp set and the Forever Greenery Paper! I had ordered this paper months ago (when it went on sale) and just barely opened it up today! It is soooo pretty! I don't have the matching stamp set to this paper (just not my style) so I paired it with another soon to be retiring stamp set, Beautiful Friendship. I made 4 cards this time using 4 pieces of DSP cut at 4 x 5 1/4. You could get away with just using 2 pieces of DSP and just flip the paper and only make 2 cards. But I love all the different ways these turned out! Scroll through and see how one is different from the others and decide which you like best! 


These ones I used the Soft Seafoam for my card bases.


I kept this one very basic and have it the vertical card layout. 


This one I added a bow and turned it so it became a horizontal card. 


These ones I changed the card base to the Shaded Spruce.


This one I attached the DSP to a piece of 4 x 5 1/4 cardstock first and then added the ribbon. 


This one I embellished with light blue rhinestones from the Holiday Rhinestone pack. 


Here are the similar designs, just different card bases and arrangement of the DSP. 


These ones were both horizontal and have Just Jade Gingham ribbon (just placed differently) and have different cardbases. 


Here are the measurements of the DSP and how to cut them. You can change the DSP arrangement by switching spots from the top the bottom pieces (see Soft Seafoam card above). 

These cards all look different but all started the same! Use the measurements and steps below to help create you own DSP cards too!

Supplies
*Beautiful Friendship Stamp Set
*Forever Greenery DSP
Stitched So Sweetly Dies
Basic White Cardstock
Soft Seafoam Cardstock
Shaded Spruce Ink & Cardstock
Holiday Rhinestones
Just Jade Gingham Ribbon (Forever For Every Season Combo Pack)

*Retiring May 3rd or while supplies last

Beautiful Friendship Stamp Set

Forever Greenery DSP: Was $11.50 Now $9.20

Measurements
Cardbase: 5 1/2 x 8 1/2 scored @ 4 1/4
DSP: 4 x 5 1/4 cut into
2 1/2 x 2 1/4
2 1/2 x 3
1 1/2 x 3 1/4
1 1/2 x 2
Basic White: 4 x 5 1/4 (for inside of dark cardbases)

Steps
  1. Measure, score, and cut your cardbases for 2 or 4 cards. 
  2. Die cut 2 or 4 Basic White labels from the Stitched So Sweetly dies in your die cutting machine. 
  3. Stamp in Shaded Spruce your Birthday Greeting. 
  4. Cut your DSP by following the guide picture above for either 2 sheets of DSP or 4. Then mix and match your DSP so there are 4 different ones for each card. 
  5. Glue your DSP onto your cardbases or if you want to wrap around ribbon, glue onto a piece of 4 x 5 1/4 cardstock first. 
  6. Embellish with the Just Jade ribbon and Holiday rhinestones. 
This card layout was inspired by Jackie Bolhuis, a Million Dollar Seller for Stampin' UP! 

Happy Stampin' Everyone!!!


New at SU Blog Hop- All Tied Up with Dotted Ribbon Knot Bow

  Welcome to the NEW AT SU! Blog hop! We are a group of Stampin ’ Up! Independent Demonstrators from around the world who are full of creati...