t> The Joy of Stampin' with Rachael: September 2021

Wednesday, September 29, 2021

Wednesday's Kit Class- Paper Pumpkin Haunts & Harvest Bonus Cards


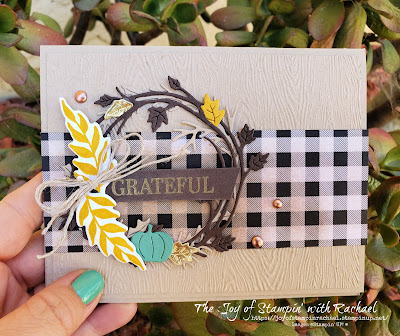
Wednesday's Kit Class with the Paper Pumpkin Haunts & Harvest Stamp set. There are so many more creations that could be made after your Paper Pumpkin kit is made. Here are just 3 bonus card ideas you can make with the stamp set and some extra items you may already have in your craft room. 

Order $35 worth from my online store using the Hostess Code or Link below by October 1st and you'll get this kit for FREE (kit inclues paper products and embellishments). 

Suggest Items to reach $35
or


Supplies
Paper Pumpkin Haunts & Harvest Stamp Set
Stitched So Sweetly Dies
Painted Label Dies
Tailored Tags Dies
Bark 3D Embossing Folder
*Layering Squares Dies
Essentials Combo Twine
Genial Gems
In Color Vellum
Pattern Party Hostess DSP
Paper- Very Vanilla, Basic White, Soft Succulent, Poppy Parade, Just Jade
Ink- Poppy Parade, Just Jade, Pale Papaya, Pumpkin Pie, Memento Ink
*Retired Item


This card has a very simple, clean look to it and I really debated if I should add more. Which you totally could. But I kept it simple on purpose to show how sometimes you don't need "all the stuff" to make a card look great. 


Measurements
Very Vanilla Cardbase: 5 1/2 x 8 1/2 scored @ 4 1/4
Very Vanilla: 4 x 5 1/4


Steps
  1. Measure, score, and cut your paper. 
  2. Die cut out of the center of the 4 x 5 1/4 Very Vanilla the square. Then emboss that piece with the Bark embossing folder. 
  3. Place that embossed piece over your cardbase and mark with pencil where the square is, so you know where to stamp the Poppy Parade stem and the Pale Papaya leaf. 
  4. Attach to cardbase with dimensionals. 
  5. Die cut the label from the Stitched So Sweetly Dies and stamp "thank you" in Poppy Parade. 
  6. Attach with dimensionals. 


This card using the stamp set to create your own DSP as background. Watch my video and see how I made the leaves their different shades. 


Measurements
Poppy Parade Cardbase: 5 1/2 x 8 1/2 scored @ 4 1/4
Very Vanilla: 4 x 5 1/4

Steps
  1. Measure, score, and cut your paper. 
  2. Die cut 3 labels from the Painted Label Dies. Swirl in Soft Succulent Vellum. Scalloped circle in Soft Succulent. Label in Very Vanilla
  3. Stamp the biggest image first (leaves) with a mixture of Pale Papaya, Pumpkin Pie and Poppy Parade. Stamp the stems in Poppy. 
  4. Stamp the skinny stems in Just Jade
  5. Stamp the paint brush stamp in Pale Papaya. 
  6. Stamp on the label in Just Jade your saying of choice and stamp off some leaves in Pumpkin Pie
  7. Assemble: Glue the stamped Very Vanilla to the cardbase. Glue the Vellum swirl down. Glue the scallop circle to the label and attach both with dimensionals over the swirl. 
  8. Embellish with the Genial Gems


This card makes a fun "lighter" leaf look by stamping off the ink first before inking onto our scalloped rectangle. 


Measurements
Just Jade Cardbase: 5 1/2 x 8 1/2 scored @ 4 1/4
2 DSP: 1 1/2 x 3 3/4
Basic White: 4 x 5

Steps
  1. Measure, score, and cut your paper. 
  2. Die cut in Basic White your stitched scalloped rectangle and a little tag. 
  3. Stamp onto the rectangle the skinny stem in Memento Black ink.
  4. Stamp you leaves in Just Jade, Pumpkin Pie, and Poppy Parade by stamping the ink off first once.
  5. Stamp your greeting on the tag in Just Jade. 
  6. Stamp in Just Jade on the left side of the cardbase the background/paint brush stamped image. 
  7. Glue the DSP to the cardbase at a slight tilt. 
  8. Wrap the black twine around twice and make a bow and attach the tag. 
  9. Attach the stamped rectangle with dimenionals. 
  10. Embellish with the Genial Gems. 

Facebook Live Video


Happy Stampin' Everyone!!!


Tuesday, September 28, 2021

Tuesday's Tip at Ten: Designer Series Paper Saving Tip


If you are like me, you are all about saving money and supplies, right?! So here is my tip on how to make your Designer Series Paper  (DSP) go further and a quick tutorial on how to make this super easy Thank You card at the bottom. 


If you are going to cover up most of your DSP then only use what will be seen. Cut strips of paper the size that you need (or will be seen) and leave the middle blank. This way, I could make two cards this way with one piece of 4 1/4 x 5 1/2 of paper. 


I made this "stamp free" card for a swap and it came together so quick and easy. 

*Bonus Tip: Use Craft Stampin' Ink White to rub over an embossed image to make it pop even more! 

Supplies
Thanks & Hello Embossing Folder
Basic White Twine
Beauty of the Earth Designer Series Paper
Craft Ink White
Thick Basic White Cardstock & Misty Moonlight

Measurements
Thick Basic White Cardbase: 5 1/2 x 8 1/2 scored @ 4 1/4
2 Basic White: 5 1/2 x 1/2
2 DSP: 5 1/2 x 1/1/2
Misty Moonlight: 3 x 5 1/2

Steps
    1. Measure, score, and cut your paper. 
    2. Emboss your Misty Moonlight with the "Thank You" or the "hello" embossing folder. 
    3. Use craft white ink to sponge over the embossed paper. You can use a sponge or put the paper directly over the ink pad and gently pull in through. 
    4. Glue the Basic White strips to the ends of the Misty Moonlight and wrap the Basic White twine around it twice and make a bow. 
    5. Glue the DSP to the top and bottom of the card. 
    6. Attach the embossed paper with dimensionals in the center of the card. 

Happy Stampin' Everyone!!!

Monday, September 27, 2021

Miss Monday- Counting Sheep All Dress Up


Miss Monday with my final card share with the Sale-a-bration Counting Sheep stamp set and the Penguin Playmates Designer Series Paper! One of my favorite things to do is not color but to stamp on colored cardstock to create the shading for animals, flowers, etc. I use this method all of the time and consider it my "lazy" way not to color. But in it's place I have to "fussy" cute instead. 


I made two cards and dressed up these sheep in two different ways. 


This card using the DSP as a background piece and I LOVE it! However, I want you to notice how I got that striped sheep to have a white hoof. I had to stamp two sheep. One I die cut out and the other I just cut off his arm and glued it onto the DSP! 


To create the sheep clothes I just had to stamp on DSP and fussy cut it out and then glued it on over another sheep. 


For this card I add some twine (Flowers for Every Season Combo Pack) and will tell you how I made that center sheep with a gray hoof/arm. For that small piece I used my Stampin' Blends in the same color as his face, ears, and other legs. It matched perfectly and was able to do it that way because the DSP allowed it. 


I hope you have enjoyed this sheep as much as I have during Sale-a-bration and be sure to get it for FREE by placing an order by September 30th! I promise you will love having these sheep in your collection. 


Supplies
*Counting Sheep Stamp Set
*Sheep Dies
*Penguin Playmates DSP
Scalloped Contour Dies
Flowers for Every Season Twine
Genial Gems
Paper- Thick Basic White, Soft Seafoam, Smoky Slate
Ink- Memento Ink, Misty Moonlight
Light Smoky Slate Stampin' Blends

*Sale-a-bration item will no longer be available after September 30th 2021

Always Recommended
Paper Snips
Trimmer
Simply Shammy
Die Cutting Machine
Bone Folder
Adhesives: Tombow, Tear Tape, Seal, & Dimensionals


Measurements
Thick Basic White Cardbase: 5 1/2 x 8 1/2 scored @ 4 1/4
DSP: 4 x 5 1/4


Steps
  1. Measure, score and cut your paper. 
  2. Stamp on Basic White 3 sheep, 2 DSP sheep, and one Smoky Slate sheep with Memento Ink. 
  3. Die cut your sheep out.
  4. Die cut out a scalloped rectangle out of  Soft Seafoam
  5. Die cut the smallest scalloped rectangle out of Basic White and stamp in Misty Moonlight your saying of choice. 
  6. Fussy cut your DSP and glue onto your sheep. 
  7. Cut off one of the white sheep's arms and glue over the DSP. 
  8. Use a Stampin' Blend in Smokey Slate to color the hoof/arm of the sheep in the white polka dot DSP.
  9. Assemble: Either wrap twine around the Seafoam scallop and attach with dimenionals. Or glue on your DSP to the cardbase and attach the Seafoam with dimensionals. Attach the sheep with dimenionals and the Birthday label too. 
  10. Embellish with the Genial Gems. 

Happy Stampin' Everyone!!!


Friday, September 24, 2021

Fun Fold Friday- Mini Bat Flip Card


Fun Fold Friday with the Sparkle of the Season Halloween card that has a mini flip! This card actually uses a lot of different Halloween sets from the Mini Holiday Catalog. The paper is from the Cute Halloween Suite. The moon is from the Frightfully Cute stamp set. 


When you open the card it looks like this and the circle from the front now is part of the inside. 


You start with a normal cardbase and cut out a circle from the front. 


Choose whatever Cute Halloween DSP for your front and for the inside pieces. 


Here is a great view from the top so you can see how folds together.  You can make this card too! Be sure to watch my video for tips and learn how to make it too!


Supplies
Sparkle of the Season Stamp Set
Seasonal Swirl Dies
Layering Circle Dies
Frightfully Cute Bundle
Cute Halloween DSP
Paper- Basic Black, Basic White, Highland Heather, Shimmer Black
Ink- Pumpkin Pie, Memento Black, Highland Heather

Always Recommended
Paper Snips
Trimmer
Simply Shammy
Die Cutting Machine
Bone Folder
Adhesives: Tombow, Tear Tape, Seal, & Dimensionals

Measurements
Basic Black Cardbase: 5 1/2 x 8 1/2 scored @ 4 1/4
Highland Heather: 8 x 5 scored @ 2, 3 1/2, & 5 1/2
DSP: 5 1/4 x 4
1 3/4 x 4 3/4
1 1/4 x 4 3/4

Steps
  1. Measure, score, and cut your paper. 
  2. Glue the 4 x 5 1/4 DSP to the front of the Basic Black cardbase but only glue around the outside (leave the center glue free). 
  3. Lay the cardbase flat and run it through your Die Cut and Embossing machine with a circle die. Save the Basic Black circle for later and use the circle of DSP for something else.
  4. Stamp on the Highland Heather the "Happy Halloween" in black ink and the bats in Highland Heather. 
  5. Put adhesive only on the part you just stamped (see video) and attach to the inside of the Basic Black cardbase. 
  6. Glue the DSP panels. 
  7. Glue the other side of the Highland Heather to the inside left of the cardbase. Be careful to put adhesive only on the top and left side. Close the card down onto it to have it attach at the right place. 
  8. Center Circle: Die cut the Highland Heather swirl stars. Die cut the black glimmer bat. Stamp onto Basic White in Pumpkin Pie the moon and die cut out. Glue those pieces onto the Basic Black circle you cut out of the cardbase. 
  9. Close the card and put adhesive on the right side of the circle (on the DSP) and attach the black circle piece. 

Facebook Live


Happy Stampin' Everyone!!!


Thursday, September 23, 2021

Throwback Thursday- Halloween Cards


As I was sorting through my card stash this past week I found some of these Halloween gems. All of the products used to stamp these cards are now retired but just check out those layouts. or the one with the easy Candy Corn by using layering circles! 


This card was made easily by using layering circles to make candy corn! 

 
*Both cards were from a swap

I am not sure of the card on the left stamp set but that look is easy to recreate with 1 1/2 inch squares. The owl one is from the Have A Hoot stamp set. That one is one of my favorites from last year. 

Hope you have enjoyed this blast from the past! 

Happy Stampin' Everyone!!!


Wednesday, September 22, 2021

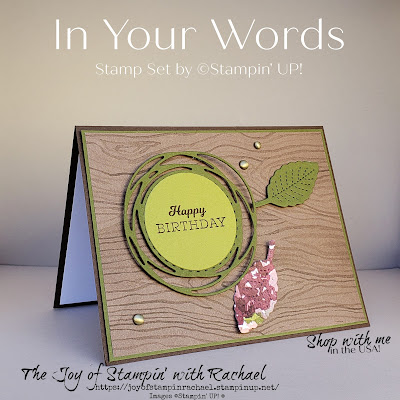
Wednesday's Kit Class- In Your Words Stamp Set


Wednesday's Kit Class with the Sale-a-bration Host Stamp Set, In Your Words! This stamp set is FREE with a $300 party or order and it is not too late to earn! You can place your own order for that amount and earn $30 worth of Hostess Rewards, and 6 $50 Sale-a-bration items or 2 $100 items and 2 $50 items! If a $300 order isn't in your budget and you still want this stamp set, have your friends help! Email me and I'll give you a personal Hostess Code and you can share that with your friends to order from your party. With just a couple of orders you will reach your goal! BUT you only have until September 30th to get your order or party started! 

The last way to earn this Stamp Set is by shopping with my Hostess Code FW7QKSFQ or use the link below

One lucky customer of mine that shops with this link will receive the stamp set! 
Here are the sayings from this stamp set and you can see why it quickly became my favorite. I love every single one of them. Which saying is your favorite? 

You can kit this Card Kit for FREE from me when your order $35 worth by Friday the 24th. Below are item I suggest to order to help you finish this kit. 

Suggested Items to Order

Supplies
*In Your Words Stamp Set
Painted Label Dies
Beauty of the Earth DSP
Stitched Leaves Dies
Layering Circle Dies
Paper- Thick Basic White, Basic White, Mossy Meadow, Early Espresso, Old Olive, Merry Merlot, Vellum
Ink- Mossy Meadow, Early Espresso
Brushed Metallic Adhesive-Backed Dots

*Sale-a-bration Item

Always Recommended
Paper Snips
Trimmer
Simply Shammy
Die Cutting Machine
Bone Folder
Adhesives: Tombow, Tear Tape, Seal, & Dimensionals


I just love everything about this card. I tend to struggle with making masculine cards and this "warm" Fall themed paper made it really easy. 


The great thing about this Designer Series Paper is that is made to cut out leaves that look like they are changing colors. So it was easy to pair it with Stitched Leaves Dies from the Annual Catalog. 

Measurements
Early Espresso Cardbase: 5 1/2 x 8 1/2 scord @ 4 1/4
DSP & Basic White: 4 x 5 1/4
Mossy Meadow: 4 1/8 x 5 3/8

Steps
  1. Measure, score and cut your paper. 
  2. Die cut the circle swirl in Mossy Meadow.
  3. Die cut the inner circle in Old Olive with the Layering Circle Die that matches. Stamp in Early Espresso onto it. 
  4. Die cut 2 leaves: Beauty of the Earth DSP and in Mossy Meadow with the Stitched Leaves Dies.
  5. Assemble: Glue the stamped circle to the swirl circle. Glue the DSP the to the Mossy Meadow and glue to the cardbase. Attach stamped circled with dimensionals and the leaves with glue dots. 
  6. Embellish with the Brushed Metallic Dots. 


This card has a very simple design. The DSP goes from 1 inch, to 3/4, to 1/2. But because of the way the paper lines up it looks great! 


That saying is so general that this card could be sent for anything. 

Measurements
Mossy Meadow Cardbase: 5 1/2 x 8 1/2 score @ 4 1/4
DSP: 5 1/4 x 1
5 1/4 x 3/4
5 1/4 x 1/2
Basic White: 4 x 5 1/4

Steps
  1. Measure, score, and cut your paper. 
  2. Die cut in Basic White the circle swirl shape.
  3. Stamp in Mossy Meadow your saying. 
  4. Glue the DSP in the order it was cut onto your cardbase. 
  5. Attach the stamped circle swirl with dimensionals. 
  6. Embellish with Brushed Metallic Dots


I can't lie, this is the saying that caught my eye first. It is so funny and so me! Yes, I do send late Birthday cards and always feel so awkward about it. But this saying don't breaks the ice and makes it funny and not a bad thing. 


Lastly, can we just admire these dies. I've had the Painted Label Dies in my craft room for at least 2 years and am sad to say I rarely use them! But they are amazing especially when layered together. I used vellum as the bottom layer, Merry Merlot, and then Basic White. 

Measurements
Thick Basic White: 5 1/2 x 8 1/2 scored @ 4 1/4 
DSP: 4 1/4 x 5 1/2

Steps
  1. Measure, score and cut your paper. 
  2. Die cut swirly circle in vellum.
  3. Die cut the scallop circle in Merry Merlot. 
  4. Die cut the label in Basic White. 
  5. Stamp with Early Espresso. 
  6. Assemble: Glue the DSP to the card front. Glue the vellum onto the DSP. Glue the Merry Merlot to the label and attach both with dimensionals. 
  7. Embellish with the Brushed Metallic Dot. 

They even have a leaf outline die with it, so if you didn't have the Stitched Leaves Dies you could use this in place for this card. 


Which is your favorite? Can't decide? Make all 3 by shopping from my online store or get this get for FREE with your $35 order. 

Facebook Live


Happy Stampin' Everyone!!! 

Tuesday, September 21, 2021

Tuesday's Tip at Ten: Change the Color of Your DSP


Tuesday's Tip at Ten: Change the color of your Designer Series Paper with a Stampin' Blending Brush. 
Just grab your favorite paper that has a white base (or a light color) and your favorite ink (Crumb Cake for me) and blend away. It is a subtle look, but makes a big difference in the over all look of the card. See the card I made with this below. 

Happy Stampin' Everyone!!!

Monday, September 20, 2021

Miss Monday- Rainbow Counting Sheep


Miss Monday with some more Counting Sheep before Sale-a-bration comes to an end. An Australia Stampin' UP! Demonstrator (Mandy Witherby) shared this card design and I knew I had to recreate (with a twist) and share with you!  I used the Sale-a-bration Counting Sheep stamp set (which you can get for FREE with a $50 order until September 30th) and the Counting Sheep Dies!
 

Just look at these fun, rainbow colored sheep! They just crack me up and almost look like cotton candy to me! Mandy had used the Rainbow Glitter paper for her background for the sheep but I used ink and a blending brush for one and the other just embossed paper. 


Of course for Miss Monday I wanted this to be a Birthday card and have stamped the "so glad it is your Birthday" in the inside. 

Embossed Paper


For the embossing paper look I used the 4 colors and cut them to 1 3/8 x 4. Then I glued that onto a 4 x 5 1/4 piece of Basic White. Lastly I embossed it with the Painted Texture 3D Embossing Folder. 


For the fence I used the new Silver Foil paper that comes with 3 different shades of silver. I used the darker shade on the card below. 
Blending Brush & Ink

For the background for this card I used the Blending Brush and the ink pads in the same colors that were used for the sheep: Highland Heather, Balmy Blue, Pool Party and Granny Apple Green. 


Make this card and send it to someone who loves a fun, colorful card. Pick which background you like best and give it a try!  Order all the supplies from my online store and follow my steps below to help you create your own Rainbow Sheep. 


Supplies
*Counting Sheep Stamp Set
*Sheep Dies
Tasteful Label Dies
Silver Foil Paper
Paper- Basic Black, Basic White, Highland Heather, Granny Apple Green, Balmy Blue, Pool Party
Stampin' Blends- Highland Heather, Granny Apple Green, Balmy Blue, Pool Party. Gray Granite
Ink- Highland Heather, Granny Apple Green, Balmy Blue, Pool Party,  Black Memento Ink
Essential Twine Combo Pack 
Blending Brushes or Painted Texture Embossing Folder
Wink of Stella

*Sale-a-bration item only available with a $50 order and sale ends September 30th

Always Recommended
Paper Snips
Trimmer
Simply Shammy
Die Cutting Machine
Bone Folder
Adhesives: Tombow, Tear Tape, Seal, & Dimensionals

Measurements
Highland Heather Cardbase: 5 1/2 x 8 1/2 scored @ 4 1/4
2 Basic White: 4 x 5 1/4
Basic Black: 4 1/8 x 5 3/8
*optional: strips of paper 4 x 1 3/8

Steps
  1. Measure, score, and cut your paper. 
  2. On a scrap of Basic White stamp in Memento Ink 4 sheep and 4 party hats. Die cut them out and color with the blends.
  3.  Stamp the Birthday greeting for the inside piece and glue to to the inside of the cardbase.  
  4. Did cut the banner from the Tasteful Label Dies and stamp in Memento ink "You're Amazing!"
  5. Die cut out 2 Silver Foil Fences. 
  6. Die cut out 3 balloons and color them with some wink of stella. 
  7. Emboss Version: glue the pieces of paper over the 4 x 5 1/4 piece of Basic White and embossing with the Painted Texture embossing folder. 
  8. Blending Brush Version: Use the blending brush and inks to create a line of colors starting with Highland Heather, Balmy Blue, Pool Party and then Granny Apple Green.
  9. Glue the Basic Black matte to the background piece and then glue that to the front of the card. 
  10. Assemble: Glue the fence to the bottom of the card and add each sheep with a dimensional. Add the balloons with dimensionals and then tie a bow and attach with a glue dot over the balloon strings. Glue the stamped banner piece with liquid glue. Glue each party hat on the sheep with just a drop of glue. 
Happy Stampin' Everyone!!!


Sunday, September 19, 2021

Demo Swap- Fall & Halloween Cards

The Demonstrator Stampers (Demo Swap) group I am a part of have swapped again! This month's theme was Fall or Halloween and to use 2 colors from that month's list (Highland Heather, Basic Black, Pumpkin Pie, Bumblebee, Crumb Cake, Cajun Craze, Misty Moonlight). Below each card you will see the name of the stamper and the name and link of the stamp set they used most for their card. Every item used on these cards can be found at my online store!

 Fall/Autumn 

By Susan Holloway

By Ashley Reid

Halloween
By Stefanie Wilcox

By Natalie Woll

By Marjeen Nation

By Cindy Hafner

By Cheryl Holden 

See the card I made for this swap by visiting my post here.

Hope you have LOVED these swaps! Be sure to share your love for them in the comments below!

Happy Stampin' Everyone!!!

New at SU Blog Hop- All Tied Up with Dotted Ribbon Knot Bow

  Welcome to the NEW AT SU! Blog hop! We are a group of Stampin ’ Up! Independent Demonstrators from around the world who are full of creati...