t> The Joy of Stampin' with Rachael: September 2020

Wednesday, September 30, 2020

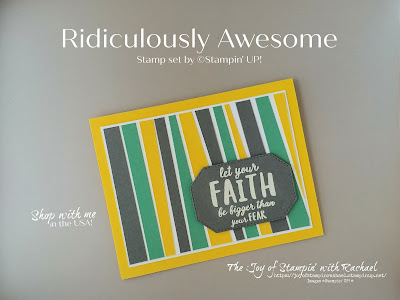
Wednesday Kit Class- Ridiculously Awesome Cards


Today's Wednesday kit class has a fun stripy theme using the Ridiculously Awesome stamp set. I made 3 different cards using similar items and showing you what you can do with just stripes. Remember, if you order by October 3rd online using the hostess code GKQG9DCM a $35 order, I'll send this kit for free to you!
*Kit does not include stamp set.

Suggestions to Buy
Ridiculously Awesome Stamp set $22
Silicon Craft Sheet $6
Paper Trimmer $25
Heating Tool $30

Supplies
Ridiculously Awesome stamp set
Hippo and Friends Dies
Basic Gray CS
Crushed Curry CS
Whisper White CS
Just Jade CS and ink
VersaMark
White embossing powder 

Always Recommended
Paper Snips
Trimmer
Simply Shammy
Die Cutting Machine
Bone Folder
Adhesives

Mosaic Card 


Measurements
Just Jade Cardbase: 8 1/2 x 5 1/2 scored @ 4 1/4
3 Whisper White: 3 3/4 x 5
Whisper White: 4 1/4 x 7 1/2
Stipes: 3 colors  5 1/2 x 8 1/2 cut into 1/2 x 5 1/2

Steps
  1. Measure and cut your paper.
  2. Die cut your label using the Hippo & Friends dies and stamp your saying in versamark and heat emboss with white embossing powder. Set a side.
  3. Line up your stripes of paper and glue them on your 4 1/4 x 7 1/2 of Whisper White. Use Tombow liquid glue and use a Silicone Craft sheet to help keep your area clean. 
  4. Trim your ends. Then cut your paper parallel to the way the pieces were glued. (See video)
  5. Glue your new stripes to the 3 3/4 x 5 piece of Whisper White. Leaving small gaps between each one.
  6. Trim your ends again and trim the piece to 4 7/8 x 3 5/8.
  7. Glue to the other Whisper White to frame/mat it. Glue the 3rd one to the inside of the card. 
  8. Attach to cardbase with dimensionals or glue.
  9. Attach label with dimensionals. 
Stripy Card


Measurements
Just Jade Cardbase: 8 1/2 x 5 1/2 scored @ 4 1/4
3 Whisper White: 3 3/4 x 5
Stripes: 5 x 8 1/2 in 3 colors (see video for size)

Steps
  1. Measure and cut cardstock.
  2. Die cut your label in Basic Gray using the Hippo & Dies Labels and stamp your image with basic gray or heat emboss with White Embossing Powder. Set aside.
  3. To cut your stripes of paper there is no real size. You want them to be at least 5 inches long but you can make them whatever width. I keep mine small and under 1/2 inch but twist and turn the cardstock to make not straight cuts. (see video) Do this to 3 colors. 
  4. Glue them on to your 3 3/4 x 5 Whisper White, leaving space between each color. Use a pattern or not (totally up to you). 
  5. Trim your ends off. Then cut down the paper to 3 5/8 x 4 7/8.
  6. Glue to the other Whisper White to mat it. 
  7. Attach to cardbase.
  8. Attach label with dimensionals


Diagonal Card 


Measurements
Basic Gray Cardbase: 8 1/2 x 5 1/2 scored @ 4 1/4
3 Whisper White: 3 3/4 x 5
8 strips 7 x 3/4

Steps
  1. Measure and cut all your cardstock.
  2. Run your Hippo and Friends label die through your Stampin' Cut and Emboss (My Boss) on a scrap of Whisper White.
  3. Stamp in Just Jade "Make Today Ridiculously Awesome" onto your label die. 
  4. On one of the 3 3/4 x 5 Whisper White, line up your strips of paper and glue them down with liquid glue (Tombow)
  5. Flip over and cut off the extra's that went off the Whisper White (if making more than just one card you can use some of these scraps for your next card).
  6. Take your strip panel to your trimmer and cut it down to 3 5/8 x 4 7/8. Glue onto one of the 3 3/4 x 5 Whisper White.
  7. Using dimensionals attach to the cardbase.
  8. Add your last Whisper White to the inside of the card.
  9. You could embellish with the In Color enamel dots!

*Cards were inspired by Kylie Bertucci!


Happy Stampin' Everyone!

Tuesday, September 29, 2020

Tuesday's Tip at Ten: Silicone Craft Sheet


Tuesday's Tip at Ten! Use your Silicone Craft Sheet (usually used to prevent sticky messes in your work space) to gather the backings of your dimensionals! There is a static cling that helps pull the backings to it and stay until ready to throw away. This tip was shared by a fellow Demo named Nancy McArther, who loves to sew as well and this idea came to her when she was looking for a way to help keep her work space clean. I know I need all the help I can get because it always looks like I had a dimensionals party at my house and that I threw it everywhere like confetti! 

Don't have a Silicone Craft Sheet yet? You can order your Silicone Craft Sheet by clicking the link below! 

Happy Stampin' Everyone!!

Designer Series Paper Sale


Stampin' UP! is having a Designer Series Paper Sale for the month of October on selective papers!
If you love our "Pretty Paper" this is the sale for you! If you have never tried our "Pretty Paper" this is the sale for you too! With 15% worth of savings it is great time to stock up or try something new! Below is the list of Papers that will be on the list with a link on how to buy them. Sale starts on the 1st and runs until Halloween! 


Artistry Blooms


Forever Greenery

Heartwarming Hugs

In Good Taste

Magic in the Night

Peony Garden

Plaid Tidings

Playful Pets

Playing with Patterns

Poinsettia Place

Snowflake Splendor

Tis' the Season

Toile Tidings

Trimming the Town

Whale Done


Happy Pretty Paper Saving Everyone!!!


Monday, September 28, 2020

Manly Monday- Sailing Home Card


Today's card I busted out a oldy but a goodie, the Sailing Home stamp set! I used 3 colors: Misty Moonlight, Smoky Slate, and Night of Navy! I used a very basic layout with just added layers and a single strip across with the greeting and compass. 

*All four cards


Supplies
Sailing Home Stamp Set
A Grand Kid
Basic Gray CS and Ink
Night of Navy CS and Ink
Misty Moonlight and Ink
Whisper White CS

Measurements
Basic Gray Cardbase: 5 1/2 x 8 1/2 scored @ 4 1 1/4
Night of Navy: 4 x 5 1/4
Whisper White: 3 3/4 x 5
Basic Gray: 1 x 4 1/4


Steps
  1. Measure and cut your paper.
  2. Stamp the anchors all over the Whisper White cardstock in 3 different colors. Stamp off the Misty Moonlight to make it lighter in shade. 
  3. Stamp the compass in Night of Navy on Misty Moonlight paper and fussy it cut it out with your paper snips.
  4. Stamp your Happy Birthday (from A Grand Kid stamp set) saying on a strip of Basic Gray. 
  5. Glue all your layers together and pop up the compass with dimensionals. 

Happy Stampin' Everyone!


Friday, September 25, 2020

Fun Fold Friday-Love of Leaves


Fun Fold Friday with Love of Leaves and the Plaid Tiding Paper. I just got a swap by Liz Warren with this Fun Fold. So I took it to my trimmer and "di-sect" it. I figured out what the measurements were and made it into a Fall card. It is so cute and little and opens up in an amazing, fun way!


When the card opens up it looks like this! It is like it twist opens! 


Here are some "quick measurements" but shop my supply list and create this card yourself by following the steps below and watching the video!

The link below takes you to the Love of Leaves Bundle on my Online Store

Supplies
Love of Leaves Bundle
Plaid Tidings DSP
Bumblebee Cardstock
Whisper White Cardstock
Pretty Peacock Cardstock & Ink
Linen Thread
Everyday Label Punch

Always Recommended
Paper Snips
Trimmer
Simply Shammy
Die Cutting Machine
Bone Folder
Adhesives

Measurements
Bumblebee Cardbase: 4 1/4 x 7 1/2 
scored @  2 1/2 & 5 
2 DSP & 1 Whisper White: 4 x 2 1/4

Steps
  1. Measure and cut your paper. Score between the 2 1/2 score from right corner to left corner. Score on the other side of the 5 inch score the same way. 
  2. Punch out with the Everyday Label punch with Whisper White.
  3. Stamp in Pretty Peacock on you label.
  4. Put your DSP in your trimmer corner to corner. Make sure to look at your score lines to know which corner to cut from (see video for tips).
  5. Glue your Whisper White in the middle after you stamped your leaf image.
  6. Die cut in Pretty Peacock your little leaf. 
  7. Glue on your DSP to the front and the back of your cardbase. 
  8. Put glue on half of your label and glue on the card front on one side. 
  9. Use your bone folder to help you crease the score lines. 
  10. Make a bow out of your linen thread and attach it with a glue dot. 
Now who wouldn't want a card that said "I thought of you today"? Since a sweet thought that has to be shared! 


Happy Stampin' Everyone!!!


Thursday, September 24, 2020

Simply Citrus Kit


WORLD CARD MAKING DAY IS OCTOBER 3RD

You know what would be be great to have to make on World Card Making Day??? The Simply Citrus Stamp Kit! It is truly is my favorite and has everything you need (minus scissors) to make it! 

Stamp Set Includes:
Makes 15 cards, 3 each of 5 designs, using the included Simply Citrus Photopolymer Stamp Set. 
Folded card size: 4-1/4" x 5-1/2" (10.8 x 14 cm).
Includes 9-1/4" x 9-1/4" x 1-7/8" (23.5 x 23.5 x 4.8 cm) printed cardboard box.

Colors: Calypso Coral, Garden Green, Just Jade, Mango Melody, Night of Navy, white


Block, Ink, adhesives, twine, and embellishments all comes in a nice gift box.

Here are the stamp images just larger to see! You can use this set over and over again. Visit my Wednesday's Kit Class to see even more ideas of what to make with this kit. 


Order yours today to get it in time to make on World Card Making Day just by clicking on the link below!

Stamp Camp Swaps Part 1: Fall & Other

Stamp Camp Swaps Part 1 

Here is Part 1 of my swaps I got from the most recent Stamp Camp I attended via Zoom. I got 24 cards from this swap and have broken it up into 2 sections. Part 1 has all the Fall Swaps and all other card categories. Part 2 has all the Christmas Swaps I received. Please visit both! Many of these cards are nameless but show them some love in the comments below! I'll share links to the stamps sets they used so you can add them to your cart with ease. 

Fall Cards

By Jade Boger

Jade did a great job getting it simple, clean, and beautiful! She even got 3rd place in the most votes! She used Very Vanilla cardstock, her Stampin' Blends to color in, and the Stitched Shapes for her squares!


This is a older stamp set, Rooted in Nature, but she did a great job making modern and using new products with it. Like that golden ring called Gold Hoops. 


This Halloween Have a Hoot fun fold card is stunning and so well put together. I love her moon shading and the inside is just as cute!

By Cheryl Holden

Who says the Merry Moose has to be Merry? He looks great as a Fall card, which is easy to create using the Autumn Punch Pack and the Gilded Autumn Designer Series Paper. 

By Liz Warren

Look at those leaves from the Gathered Leaves Dies. They are so well colored that they nearly look real! I love the label she made using the Pick a Banner Punch and they texture she created by using the Texture Textile folder.

All Other Cards
My Nancy McArther

We know the star of this card...the Stitched Stars! Just beautiful colors layered so nicely!


By Jenni Trembly

I love this goat card!!!Great texture, layers, dsp, and he cutest dancing goat so well colored!

Floral Cards

These Poppy Dies are still just so stunning. I love the way she chose her colors. 

By Sharon Elggren


Sharon did a great job with this set. I haven't seen it used often and it truly is stunning here! 

Hope you have all enjoyed Part 1 of these swaps! Be sure to visit Part 2, the Christmas cards!

Happy Stampin' Everyone!!!

Hearts of Elegance Vs. Linked Together Stamp Sets

 Hearts of Elegance Verse Linked Together Which card do you like best from each photo? Leave me comments below!  Happy Stampin' Everyone...